What's new
Photoshop Gurus Forum

Welcome to Photoshop Gurus forum. Register a free account today to become a member! It's completely free. Once signed in, you'll enjoy an ad-free experience and be able to participate on this site by adding your own topics and posts, as well as connect with other members through your own private inbox!

How to use brush tool "undestructive"?


Gore.m

Member
Messages
5
Likes
0
Hello,
I'm using brush tool to "flaten" (clean up color and difference in lightnes) background on portrait photos... but if I want start from RAW and open it as smart object, I would like to have opportunity, after using brush tool go back to RAW for addional tweaks, but after that I need rework all work on brush tool layer... So is there way to work with brush tool "undestructive"?
Thanks you
PS.: Or is there an hack to imitate brush tool in ACR?
 
So is there way to work with brush tool "undestructive"?
Although you may not understand, you are working non-destructively.

Let's say I have a photo that needs editing. The first thing I do is make adjustments before I commence with any work. Why? Any editing changes such as clone or brush work that I make are based on the last state of the underlying photo. So you make adjustments before you start any additional work.

For example.....

This is my prepared (adjusted) photo.
Screen Shot 2019-07-20 at 8.49.22 PM.png

These are the changes that I made on a new layer using the Clone Stamp Tool and the Brush Tool.
Screen Shot 2019-07-20 at 8.49.32 PM.png

So what happens if I change the state of the underlying photo...........
Screen Shot 2019-07-20 at 8.50.02 PM.png
Since the changes made to the underlying photo were not included on the brush/clone layer, they will have to be completely redone. You can try to add adjustment layers that might get them close.


So, in your situation, when you double click the SO photo layer it reverts back to ACR........any changes you make while in ACR that are saved, will go back to Photoshop and any "Brush Tool" changes will have to be re-worked since the underlying layer has changed.

The only way to resolve your problem is to not open your raw photos as smart objects or to make all of your changes up front. You will have to evaluate all reasoning for opening your raw photos as smart objects.

How are you saving these photos after editing?

You can open them normally and apply Camera raw changes after any clone/brush changes using a different work flow/technique. Unfortunately, you will lose the option of saving back to .DNG (RAW) format. You can save in other similar formats.
 
Hm, I thought that it won't be possible.

My problem is that I'm not able to done RAW editing straightway, I'm usually going back milion times, I just need some break...

So... is there other way to try in my case (than sample color and use brush tool)... if I want make backdrop color and lightnes more "clean / flat " - but preserve auto updateable workflow?
 
My problem is that I'm not able to done RAW editing straightway, I'm usually going back milion times, I just need some break...
I understand.............however, as long as you are starting from ACR and opening your raw images as smart objects in Ps...........any changes you make by double clicking the SO and going back to ACR, will update the image in Ps. So..............any changes or adjustments that you have made (in Ps) will more than likely need to be reworked as you have experienced.

So... is there other way to try in my case (than sample color and use brush tool)... if I want make backdrop color and lightnes more "clean / flat " - but preserve auto updateable workflow?
I'm not certain as to what you're actually doing, can you provide a full screenshot of your current process of how you are using the Brush Tool to make adjustments?

I will have to experiment once I see what your trying to do.
 
Thanks you.
I don't use paper for background when I'm shooting... it is just wall, as you can see on first image, so there are a lots of problems.
bg1.png

- What I tried was add layer under original smart object, sample color from smart object and cut background on smart object by mask... but missing micro gradients and sometimes little bit of wall texture looked too "fake".
- I've tried duplicate smart object (that is sometimes resulting crazy _.psd size :rolleyes: ) cut background on top smart object by mask... and use blur for bottom smart objects as smart filter, but bg is not still pleasant and sometimes updating smart objects takes ages.

Now I found best looking technique, I just added new layer, I sampled color from smart object and than I painted with brush tool over the smart objects (on new layer) with variable opacity and I set layer opacity to maintain "natural" look, but that work is lost after updating smart objects. :

bg2.png
 
Hi Gore.m
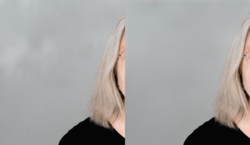
Here is an example of smoothing your background all within the same Camera Raw Filer or ACR adjustments. They left is the original and the right is smoothed.

background-smoothed.png

This can easily be done in a variety of ways. For the above, I just used the adjustment brush with sharpness and clarity turned down and brushing over the background. You can get the same/similar results with the same adjustment brush by turning the texture down.
I followed that up by using the spot healing brush where I needed an even more uniform look.
So lots of options directly within the same Smart Ojbect.

This is the most flexible approach and allows going back and forth between ACR/Camera Raw Filter and Photoshop as many times as desired.

This works because you are making adjustments to the pixels and not "replacing" pixels with an overlay layer in Photoshop. If you had to use and overlay brush and pixels to "replace" pixels, there are ways to do this yet each approach has its own limitations. You have mentioned a few ways yet there are others yet that seems a mute point if your objective can be achieved as I have shown above.

Hope this gives you a direction to explore
John Wheeler
 
I was trying the same thing but I leave it because I was not able to done such precise mask in ACR as in PS - specially around hairs. Do you have any tips for precise masking in ACR?
Thanks you
 
I was trying the same thing but I leave it because I was not able to done such precise mask in ACR as in PS - specially around hairs. Do you have any tips for precise masking in ACR?
Thanks you

Hi Gore.m
I am not aware of all of your requirements so hard to target all of my suggestions accurately. No, if you need precision masks, I do not know how to do that in ACR.

If you stay away from "replacing" pixels (i.e. painting pixels on an overlay layer) and want to "adjust" a limited area of an already existing SO with accurate masks, there are several approaches yet I don't know your specific needs (just learned you need high accuracy masking). One approach is to use a hierarchical SO.

1) Make the changes to the base SO by double clicking the SO and going in to ACR.
2) With the SO Layer selected, choose the Filter desired such as Filter >Camera Raw Filter. Make the desired changes to your to the background area (or the whole image) Save and you go back to PS
3) Included under the SO is both a Filter Effects Mask and then a list of Camera Raw Filter. Change the Filter mask so that the Camera Raw Filter adjustments are limited to the background with just as much accuracy as a regular Layer Mask
(Note the above can be done by using any of the filters including any Blur etc etc to achieve you objective. Camera Raw Filter gives many options at once)

So with the above, you can double click on the "Camera Raw Filter" listed under the SO for more adjustments on the background or you could double click on the SO icon to go back to ACR for the base adjustments you made. This approach allows for the technique I mentioned in my previous post with high accuracy maksing.

Hope this helps
John Wheeler
 
1) Make the changes to the base SO by double clicking the SO and going in to ACR.

I want start from RAW and open it as smart object

For me............when I open a RAW photo from ACR into Photoshop as a Smart Object, when I double click the smart object, the photo reverts back to ACR..............so there is no way to build a hierarchical SO.

Maybe I misunderstood how the OP was opening the RAW photo.
 
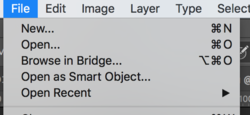
Here's how I am opening the RAW file.

FILE > OPEN AS SMART OBJECT...
Screen Shot 2019-07-22 at 11.24.52 AM.png

If I just open the RAW photo normally and convert to a SO, I can build a SO hierarchy and edit the SO via FILTER > CAMERA RAW FILTER.
 
Here's how I am opening the RAW file.

FILE > OPEN AS SMART OBJECT...
View attachment 100556

If I just open the RAW normally and convert to a SO, I can build a SO hierarchy and edit the SO via FILTER > CAMERA RAW FILTER.

I think we are on the same page even if I did not say it so clearly. Repeated step #2 from prior post of mine

2) With the SO Layer selected, choose the Filter desired such as Filter >Camera Raw Filter. Make the desired changes to your to the background area (or the whole image) Save and you go back to PS

So we are in agreement that we can create a hierarchical SO and use the Filter Mask?
 
So we are in agreement that we can create a hierarchical SO and use the Filter Mask?
Yes.

You can add the CR Filter to either of the opening methods..............I guess where I may sound confusing is the differences of how the RAW photo is opened and what actually happens when you double click the SO...............if that makes any sense. LOL!


EDIT: Just for clarification............ for me and my way of processing, you have a Ps side and a SO side.

Anything built upon a Ps layer, even if it's a SO, is what I consider to be the Ps side. I would refer to this as a Ps hierarchy.

When you double click a SO and open a PSB, anything built on this is what I consider to be the SO side. I would refer to this as a SO hierarchy.

I may not be at all correct in this , but it's how I organize things in my mind. Food for thought.
 
OK, I found out fantastic technique to done what I need, when I combined it with your recommendation to convert my smart objects to other smart objects it works perfectly "undestructive"...
Now I'm only curious about three things...

1) Why my _.psd has same size if I'm using another smart object inside one? I'm curious, because common duplicating layer is causing almost doubling _.psd size.
2) I had High Pass smart filter on original smart object layer, PS duplicated it with HP filter too, when I deleted it "inside" (on new smart object layer), it disappeared from original smart objects too, why?
3) Am I right that there is no way to add individual mask for each smart filter?

Thanks you
 
It would probably help if you included ideally an image of your Layer stack and image and/or a step by step on what you are doing because it is hard from just the conversational text to know for sure what you are doing. I will answer the best I can by trying to divine what you are doing without that information.

1) Why my _.psd has same size if I'm using another smart object inside one? I'm curious, because common duplicating layer is causing almost doubling _.psd size.

I am not an expert on the internals of PS software so I am not sure. There could be several factors. One likely cause:
If you are assuming that the document sizes in the lower left corner of the image represent the size of the PSD when it is saved, that is incorrect. I suspect that if this is what you were doing, you will find that when you save the PSD to a file, it will increase in size with each added hierarchical SO. It might be that PS is only reporting the size of the PS layers and does not include the size of the embedded objects within the SO.

2) I had High Pass smart filter on original smart object layer, PS duplicated it with HP filter too, when I deleted it "inside" (on new smart object layer), it disappeared from original smart objects too, why?

There are two ways of making duplicating a Smart Object. In one case, the underlying object in the SO is identical so when you make a change to one, it will make it to all similarly duplicated SOs.
You can also create an SO to be independent of each other where you should not have the behavior you describe. There are several ways to create an SO this way (check internet) yet one way is to right click on the SO Layer and in the dropdown use the "New Smart Object Via Copy" This will create an independent SO

3) Am I right that there is no way to add individual mask for each smart filter?

Yes there is a way to have a separate mask for each smart filter. All you need to do is after creating one Smart Filer and creating the associated Filter Mask, turn that SO into another SO where you apply the next smart filter and so on.

Hope this helps
John Wheeler
 
It would probably help if you included ideally an image of your Layer stack and image and/or a step by step on what you are doing because it is hard from just the conversational text to know for sure what you are doing.
I completely agree!

In testing, I opened a RAW image that was 19.3 mb. I then copied the image and applied a median filter, added a layer mask, inverted the layer mask and used the Brush Tool on the layer mask. I then saved the PSD (new name) which is 119.1 mb.

I opened the same RAW image again that was 19.3 mb. I converted the image to a SO. I then double clicked the SO and opened the PSB. In the PSB, I then copied the image and applied a median filter, added a layer mask, inverted the layer mask and used the Brush Tool on the layer mask. I saved the PSB. I then saved the PSD (new and different name) which is now 249.5 mb.

That is a 130.4 mb increase in file size between the two PSD files. There's no doubt that using SO's increases the file size.
 
That is a 130.4 mb increase in file size between the two PSD files. There's no doubt that using SO's increases the file size.

Same experience here. There is one case, as I understand it, where the saved PSD does not grow (much) is when a linked file (as opposed to an embedded file) is brought in as an SO. All PS does is save the link to that file instead of a copy of the file. I don’t use them much yet linked files have their uses.
 

Back
Top