Gaussian
Retired Administrator
- Messages
- 1,526
- Likes
- 67
This is helpful when making a tutorial because you can capture an image of menu's, selections, or anything else that appears on your screen.
How to take a Screenshot in Windows:
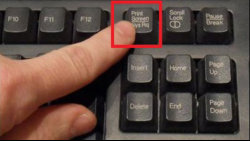
If you are using Microsoft Windows, pressing the Print Screen button on your keyboard (usually labeled Prnt Scr) captures a screenshot of the entire visible desktop and places it in the clipboard.

If you press Alt+Print Screen it will capture only the active window instead of the entire screen.
In most versions of Windows, screenshots do not include the mouse pointer. If you need the mouse pointer included, you can either add it in Photoshop, or use a third party screen capture program that includes the cursor.
After the screenshot has been captured in Windows, it must be pasted from the clipboard into a separate program, such as Adobe Photoshop, in order to be viewed or saved. Simply open Photoshop and choose File --> New (Ctrl+N) and the document dimensions should be set automatically by Photoshop based on the size of the screenshot in your clipboard. Click ok or press Enter then press Ctrl+V to paste the image into the new document.
How to take a Screenshot in Mac OSX:
If you are using Mac OS X, pressing Command+Shift+3 takes a screenshot of the entire screen, and Command+Shift+4 takes a screenshot of a chosen area of the screen.
If you press Space afterwards you can choose a window or graphic element on the screen to individually screenshot.
These images are saved to the desktop, but if you hold down the control key with the rest of the keyboard shortcut, the pictures are copied to the clipboard instead. These shortcuts also work in Mac OS Classic, and can be customized using the Keyboard and Mouse preference pane in the System Preferences.
How to take a Screenshot in Windows:
If you are using Microsoft Windows, pressing the Print Screen button on your keyboard (usually labeled Prnt Scr) captures a screenshot of the entire visible desktop and places it in the clipboard.

If you press Alt+Print Screen it will capture only the active window instead of the entire screen.
In most versions of Windows, screenshots do not include the mouse pointer. If you need the mouse pointer included, you can either add it in Photoshop, or use a third party screen capture program that includes the cursor.
After the screenshot has been captured in Windows, it must be pasted from the clipboard into a separate program, such as Adobe Photoshop, in order to be viewed or saved. Simply open Photoshop and choose File --> New (Ctrl+N) and the document dimensions should be set automatically by Photoshop based on the size of the screenshot in your clipboard. Click ok or press Enter then press Ctrl+V to paste the image into the new document.
How to take a Screenshot in Mac OSX:
If you are using Mac OS X, pressing Command+Shift+3 takes a screenshot of the entire screen, and Command+Shift+4 takes a screenshot of a chosen area of the screen.
If you press Space afterwards you can choose a window or graphic element on the screen to individually screenshot.
These images are saved to the desktop, but if you hold down the control key with the rest of the keyboard shortcut, the pictures are copied to the clipboard instead. These shortcuts also work in Mac OS Classic, and can be customized using the Keyboard and Mouse preference pane in the System Preferences.


