There are many ways one could get a similar look, so the method I outline below (ie, a bunch of adjustment layers - same as BC's suggestion) is almost certainly not to be the exact steps the photographer took, but it should give you some ideas and illustrate that one can get a fairly close match starting from any reasonable photo.
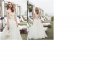
As an illustrative example, I found a photo of the royal couple in a similar pose. Unfortunately, the skin tones (including their photographic saturation) were wildly different than the example, thereby making the transformation a bit more difficult.
I first made masks for the faces, hair, bits of the background, etc. so that they could be adjusted independently of each other .
Next, I almost completely desaturated all colors except blue in the background + their clothing. I then uniformly recolored (at partial opacity) these areas with blue using a hue/sat adjustment layer with the "colorize" option selected.
Next, I used separate adjustment layers to match the brightness, contrast and saturation of the different areas in the photo of the royals to that of the cited example.
The subjects in the image I used have a typical British red/ruddy complection, whereas the subjects in the cited image have a more yellowish complexion. I only made a very, very quick, half-hearted attempt to bring the skin tones closer, but if had more time (or interest), one could easily make the skin tones match better.
The OP was probably looking for a "one-button" fix, and may be disappointed that matching requires several steps, especially when one is starting from an arbitrary image.
However, if I had to do this in a production environment, it wouldn't be as tedious as one may think because, with one exception, all of my changes were made using adjustment layers, so one could get a real head start by doing little more than making up a new set of masks and then placing the next photo under the same set of adjustment layers.
HTH,
Tom


") .
.