
Photoshop Gurus Forum
Welcome to Photoshop Gurus forum. Register a free account today to become a member! It's completely free. Once signed in, you'll enjoy an ad-free experience and be able to participate on this site by adding your own topics and posts, as well as connect with other members through your own private inbox!
You are using an out of date browser. It may not display this or other websites correctly.
You should upgrade or use an alternative browser.
You should upgrade or use an alternative browser.
how to make this shaped opacity?
- Thread starter chiqchui
- Start date
ibclare
Queen Bee
- Messages
- 11,033
- Likes
- 4,638
This appears to be made with masking.
A shape has been made with marquee tool perhaps and with some other tool for the non-rectangular shapes - you can use the polygonal lasso or pen tool.
Then that part of the image is duplicated to a new layer. Using that selection (ctl/cmd click on the thumbnail) a mask is applied to the original layer, except for those shapes which are obvious overlays, like the "house" shapes.
Make another marquis selection, duplicate from the original layer. Activate that same thumbnail, select the mask on the original layer and fill it with black. Continue this process.
Make sure your background layer is unlocked. You can do this by double clicking it and saying OK. Then make a white layer below that.
Now go to your duplicate layers and lower the opacity so that you get the effects you want. On the shapes which are darker on top of the BG layer, you might want to try a layer blend mode like hard light or multiply, then lower the opacity.
If this has been hard to follow, I apologize. I can make a visual tutorial but I don't have time right now.
- Messages
- 23,862
- Likes
- 13,628
Ok, this is very simple and it's about repetition.
Start with your original photo.
Place a new layer above the original and fill with white. This will be your Background.
Create a new transparent layer above the white layer.
Use your Brush Tool, select whatever brush shape and size you desire. Make black your foreground color. (press D on your keyboard will reset the Foreground and Background colors to Black and White)
Make a random pattern on the transparent layer with the brush.

Note: This is where your creativity comes into play, you can use shape dynamics and scattering to make this pattern. For demonstrative purposes only, I will keep it simple.
This is my random pattern I made on the newly added transparent layer.

Next is where the magic happens!
Duplicate your Original photo and place the copy at the top of the layers panel.
Right click within the body of the duplicated originals layer and choose "Create clipping mask".


The black brush shapes (squares in my example) should now look like this.......

Highlight the layer in which you placed the black Brush shapes and reduce it's opacity to about 30%.
Next comes the repetitive part I mentioned.
Create a new transparent layer on top.
Again, with your Brush Tool set on black and using the shape of choice, (I used a larger square) make another random pattern on the newly created transparent layer.

Again, duplicate your Original photo and place the copy at the top of the layers panel.
Right click within the body of the duplicated originals layer and choose "Create clipping mask".

Highlight the newest layer in which you placed the black Brush shapes and reduce it's opacity to about 40%.

Just keep repeating this until your happy with the out come.
Just remember to increase the brushed layers opacity by 10% each time until you reach 100% opacity!
Try to fill in the central area so that in the end it will be at 100%

Start with your original photo.
Place a new layer above the original and fill with white. This will be your Background.
Create a new transparent layer above the white layer.
Use your Brush Tool, select whatever brush shape and size you desire. Make black your foreground color. (press D on your keyboard will reset the Foreground and Background colors to Black and White)
Make a random pattern on the transparent layer with the brush.
Note: This is where your creativity comes into play, you can use shape dynamics and scattering to make this pattern. For demonstrative purposes only, I will keep it simple.
This is my random pattern I made on the newly added transparent layer.
Next is where the magic happens!
Duplicate your Original photo and place the copy at the top of the layers panel.
Right click within the body of the duplicated originals layer and choose "Create clipping mask".
The black brush shapes (squares in my example) should now look like this.......
Highlight the layer in which you placed the black Brush shapes and reduce it's opacity to about 30%.
Next comes the repetitive part I mentioned.
Create a new transparent layer on top.
Again, with your Brush Tool set on black and using the shape of choice, (I used a larger square) make another random pattern on the newly created transparent layer.
Again, duplicate your Original photo and place the copy at the top of the layers panel.
Right click within the body of the duplicated originals layer and choose "Create clipping mask".
Highlight the newest layer in which you placed the black Brush shapes and reduce it's opacity to about 40%.
Just keep repeating this until your happy with the out come.
Just remember to increase the brushed layers opacity by 10% each time until you reach 100% opacity!
Try to fill in the central area so that in the end it will be at 100%
Last edited:
Tom Mann
Guru
- Messages
- 7,222
- Likes
- 4,343
That's a elegant, well crafted tutorial, Sam. The OP should be very happy.
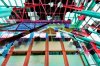
I was lazy and since no one appeared to be answering, I was just about to post a crazy old image of mine that I had composited with an inverted, shifted version of itself using the "stained glass" filter to generate a mask filled with semi random polygonal shapes, but your tutorial is much more directly related to his question.
For yucks here's what I did a couple of years ago using this general polygonal masking technique.
Cheers,
T
PS - Clare, your explanation was great, as well, but Sam beat us to the demo. :-(
Attachments

chrisdesign
Guru
- Messages
- 4,225
- Likes
- 6,238
I almost missed this.
Sam, this is a great tut, very elegant as Tom said, and not too difficult to understand. I'll try it out soon!
Sam, this is a great tut, very elegant as Tom said, and not too difficult to understand. I'll try it out soon!
- Messages
- 23,862
- Likes
- 13,628
Geez........thanks guys! It's seriously no big deal, but I appreciate your comments! You guys are not slouches yourselves! I learn something from each and every one of you most every day.
I really appreciate all the tutorials that I have had the privilege of having access to over the past 14 months or so that I started using Photoshop. Without them and this forum, I would be lost. I still have a lot to learn!
I don't mind giving back and as I have said, I really enjoy it for now!
I really appreciate all the tutorials that I have had the privilege of having access to over the past 14 months or so that I started using Photoshop. Without them and this forum, I would be lost. I still have a lot to learn!
I don't mind giving back and as I have said, I really enjoy it for now!
Ok, this is very simple and it's about repetition.
Start with your original photo. Place a new layer above the original and fill with white. This will be your Background. Create a new transparent layer above the white layer. Use your Brush Tool, select whatever brush shape and size you desire. Make black your foreground color. (press D) Make a random pattern on the transparent layer with the brush.
View attachment 39729
Note: This is where your creativity comes into play, you can use shape dynamics and scattering to make this pattern. For demonstrative purposes only, I will keep it simple.
View attachment 39730
Next is where the magic happens! Duplicate your Original photo and place the copy at the top of the layers panel. Right click within the body of the duplicated originals layer and choose "Create clipping mask". The black brush shapes (squares in my example) should now look like this.......
View attachment 39731
Highlight the layer in which you placed the black Brush shapes and reduce it's opacity to about 30%. Next comes the repetitive part I mentioned. Create a new transparent layer on top. Again, with your Brush Tool set on black and using the shape of choice, (I used a larger square) make another random pattern.
View attachment 39732
View attachment 39737
View attachment 39736
Again, duplicate your Original photo and place the copy at the top of the layers panel.
Right click within the body of the duplicated originals layer and choose "Create clipping mask".
Highlight the newest layer in which you placed the black Brush shapes and reduce it's opacity to about 40%.
Just keep repeating this until your happy with the out come. Just remember to increase the brushed layer by 10% each time until you reach 100% opacity! Try to fill in the central area so that in the end it will be at 100%
View attachment 39735
thank you so much i really appriciate your tutorial but
i cant really do it correctly T__T
heres the photo i want to do with can u help me

- Messages
- 23,862
- Likes
- 13,628
chiqchui said:thank you so much i really appriciate your tutorial but
i cant really do it correctly T__T
Why?
What part do you need help with?

Tom Mann
Guru
- Messages
- 7,222
- Likes
- 4,343
@OP - FYI, if this were my photo, the first thing I would be work on would be ordinary color and brightness corrections. I would do this long before I would concern myself about fancy edge efx. Specifically, look at how much cyan/blue there is in the subject's presumably white blouse, and hence also in her skin tones. It would be fine to leave the colors in background as is, but you really have to fix the colors and tones of the subject, e.g.,

T
PS - It's really too bad you didn't make use of the excellent tutorial Sam made up for you. My guess is that he probably gave up an hour or two of his own time working on that. Did you at least try? If so, post the results and we can help you along.
T
PS - It's really too bad you didn't make use of the excellent tutorial Sam made up for you. My guess is that he probably gave up an hour or two of his own time working on that. Did you at least try? If so, post the results and we can help you along.
ibclare
Queen Bee
- Messages
- 11,033
- Likes
- 4,638
chiqchui, if you are still checking this thread, I would like to explain something to you.
This is a Photoshop support and discussion forum. We occasionally do an actual edit for someone who asks nice, lol. I don't mean you.
But when a member comes to the site, states he/she has Photoshop and needs help to mimic a technique . . . well, that's what we are all about! So you get a dedicated, generous member like IamSam to go out of his way to make an excellent tutorial for you. Did you even try to do it yourself? Are you so impatient that you can't follow the steps? His instructions are very clear.
Then you come on and ask us to do it for you. If you post your efforts to this point, we can help you to keep trying. We all know that Photoshop can be frustrating. It is complicated, that's for sure. But we can guide you through the problems you're having and it will be empowering to your efforts to learn the program.
Were you telling a tall tale that you even use Photoshop and that you actually wanted help so you could do it? We do not take kindly to this kind of thing. In fact, it really irks us. I am disappointed in your response. I hope you are just stuck. Let us help you get on with it and get it done. You'll be happy you did.
- Messages
- 23,862
- Likes
- 13,628
I agree with Tom. I can make a video, but it would not be any easier to follow than the written instructions!
This is a VERY SIMPLE technique! There are literally 2 (two) steps to follow and repeat!
Please explain to us what you do not understand!
This is a VERY SIMPLE technique! There are literally 2 (two) steps to follow and repeat!
Please explain to us what you do not understand!