If I understand the OP's request, start by simulating the drops using any of the standard techniques, e.g.,
http://abduzeedo.com/water-drops-photoshop-5-minutes. This tutorial doesn't seem to have any audio, but their approach is pretty clear even without the audio. If you don't like it, there are a huge number of other similar tutorials on the web.
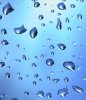
Next, add a layer which contains the image to be distorted, and temporarily turn it off. Also, if necessary, add a levels or curves adjustment layer above the final droplet layer to temporarily increase the contrast to make it easier to generate a selection for each oddly shaped drop, say, by clicking in the center of each using the "quick selection" tool. The 1st attached image shows several droplets selected.
After you have a sufficient number of the drops selected, turn off the droplet layer, turn on the image layer, copy (cntrl-C) all the parts of the base image that are under the drops, and paste them to their own layer (with the rest of that layer transparent).
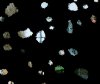
Apply the "ripple" filter to them. Be careful of over-doing this distortion. See attached screen grab. Note: I temporarily put these on a black background (instead of transparent) to make the distortion easy to see.
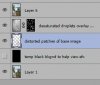
Next, put a copy of the droplets on its own layer, desaturate it, switch the blending mode to "overlay", and mask it with the selection generated earlier.
The result should be a layer stack like shown in the attached image.
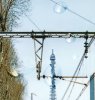
The final attachment is the result of this process.
Obviously, there are lots of other ways to get a similar effect, but I hope this is more or less what you were looking for.
Tom M
PS - Clare, I hope you don't mind that I used your great image from the other thread for this tutorial. In case you run into an overly clear day in Paris, here's how to fix it. ;-)