What's new
Photoshop Gurus Forum

Welcome to Photoshop Gurus forum. Register a free account today to become a member! It's completely free. Once signed in, you'll enjoy an ad-free experience and be able to participate on this site by adding your own topics and posts, as well as connect with other members through your own private inbox!
How to get rid of shadows


Blindeagle

Member
Messages
18
Likes
2
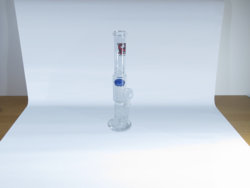
Hi guys i have this image :
IMG_4327.JPG

You can see the shadows coming off, i was wondering what would be the best way to get rid of the shadows? If someone can give me like a step by step that would be fantastic

Thanks
 
Do you want the object 'cut out' of the image or do you want to keep it without the shadows?
 
I just want to keep it in the same place but get rid of the shadows if thats possible? or make them lighter, whatever is easier , i have about 300 photos that are like this and i just want a quick and fast way to do it for all of them
 
I'm afraid there's no quick and fast way to do this because the background is an irregular gradient and cloning would take forever.
Here's what I did:
Isolate the object with the pentool and place it on his own top layer.
With the rectangle marquee tool select from top to bottom a rectangle within the background making sure NOT to include the shadow part.
Use the content aware scale to expand the selection to the left side and remove with the pen tool the selection of the wood part.
This will give you a rather uniform gradient without the shadows.

IMG_4327 A.jpg
 
If you made the photo's I would suggest side lighting as well, otherwise you'll end up with those kind of shadows...
 
Ye i made the photos, and i did use lighting on the side but there was still a shadow but i will try ur method now , hopefully i can master it and it dosen't take 2 long
 
I was just wondering , is it faster to cut the picture out it self and put it on a white background for example? would that be faster?
 
Yes it would since the setup is mostly used for that purpose, to get an easy cutout.
But you'll have to take in account the glass coloring due to the existing background so it would be best to place it on a gradient background containing the background colors.
 
Isolate the object with the pen tool to make a selection of it and place it as the top layer.
Just beneath that layer make a new layer and use the gradient tool with the darkest sampled color below and the lighter one up.
Now you have a gradient background with the object on top and no distractions.
Btw, when making the foto's be sure to place your light in a way there are no shadows.
 
Lambert is correct, a gradient would be the way to go, taking sample colours from top to bottom would be a good idea

Here's a quick sample

Untitled.jpg
 
Last edited:

Back
Top