What's new
Photoshop Gurus Forum

Welcome to Photoshop Gurus forum. Register a free account today to become a member! It's completely free. Once signed in, you'll enjoy an ad-free experience and be able to participate on this site by adding your own topics and posts, as well as connect with other members through your own private inbox!

How to correct color shift in a corner of a photograph


Nikon Junkie

New Member
Messages
4
Likes
0
Hello, this is my first post.
I have a scanned image from a 35mm negative. The negative wasn't developed properly and in the lower right corner the color has shifted to amber. I have been trying to figure out a way to correct this. So far nothing I've tried has worked. Does anyone have a strategy on to approach this?
I'll attach a copy of the image so you know what I'm referring to.
 

Attachments

  • ValleySnow06.jpg
    ValleySnow06.jpg
    218.2 KB · Views: 6
All i did was make an isolation copy via quick mask selection of the area you asked about, then moved the colour sliders around, i also applied a new blank layer filled with a colour to get away from the cold blue/pink hue to the overall image.
cadj.jpg Lot's of ways to get what you desire.
 
Paul's suggestion about isolating the various areas using layer masks and CC'ing them separately is right on the mark, as his observation that you not only have a problem with magenta in the LRHC (lower right hand corner), but you also have some really funky, intensely saturated, cold cyan-blue tree colors. BTW, I have seen this come from development errors, as well.

The way I attacked these problems was to bring your image into PS through ACR as a smart object, and then make two more independent copies of that object. In one, I attempted to fix the magentas in the LRCH. In the 2nd, I attempted to fix the bizarrely colored trees, and I made no ACR changes whatsoever to the 3rd copy (which I placed at the bottom of my layer stack).

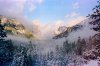
I put completely black layer masks on the two upper layers, and then painted in white where I wanted their corrections to come through. This gave me the 2nd frame in the attached GIF animation.

However, even after correcting the magenta cast in the LRCH, I did not like the large patch of snow there, so I cloned in some shrubbery (which became the 3rd frame in my GIF animation).

I have been in the mountains all my life and have experienced many landscapes where there is a beautiful soft blue-magenta light permeating the scene. Often this is a precursor to the wonderful phenomena called, "Alpenglow". So, rather than trying to "correct" these colors throughout the entire image, I left them in the distance and in the sky.

See what you think.

Tom

PS - It looks like my 3 frame GIF animation is not showing up in the in-line preview -- only the first frame is visible. So, to see the other two frames (ie, the results), click on the preview to see the full sized version.

PPS - BTW, I also attempted to reduce some of the grain in the clouds, but may have softened them too much.
 

Attachments

  • ValleySnow06-tjm01-3ACRsmartCopies-ps02_clone_in_veges-sRGB_for_GIF-01.gif
    ValleySnow06-tjm01-3ACRsmartCopies-ps02_clone_in_veges-sRGB_for_GIF-01.gif
    970.3 KB · Views: 12
Last edited:
BTW, here's what the 3rd frame (ie, my final result) looks like without the animation. BTW, that image also has a problem with a horizontal stripe running across the top 10% or so of the frame. I didn't have the time to bother with this.

T
 

Attachments

  • ValleySnow06-tjm01-3ACRsmartCopies-ps02_clone_in_veges-sRGB_for_GIF-03_frame3_all_efx.jpg
    ValleySnow06-tjm01-3ACRsmartCopies-ps02_clone_in_veges-sRGB_for_GIF-03_frame3_all_efx.jpg
    281.6 KB · Views: 25
Thank you for your replies.
Your skill level in PS is way above mine.
Following your suggestions I've duplicated the layer and created a mask. But no matter how much I try and feather the edges of the mask I always have an obvious transition line. That is exacerbated by the fact that I am also struggling to match the color of the rest of the trees. I'm using the color balance adjustment layer - is that what you used?

Also, as you have pointed out - I have noticed the other flaws in this scan, but I will address those only if I can fix this big problem in the corner first.
 
OK, I've made some progress. It finally dawned on me to vary the opacity of the mask in various sections. Thanks again for your help.
 

Back
Top