
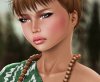
What is the best way to achieve the lighting on this image? I'm specifically looking at the edge lighting on her face, neck and jaw-line. Is there an easy method I'm not thinking of to make it look as natural as possible? I've tried just using a paint brush but I can't get it to look natural. Are there filters or auto-methods to perfect it?
Photoshop Gurus Forum
Welcome to Photoshop Gurus forum. Register a free account today to become a member! It's completely free. Once signed in, you'll enjoy an ad-free experience and be able to participate on this site by adding your own topics and posts, as well as connect with other members through your own private inbox!
You are using an out of date browser. It may not display this or other websites correctly.
You should upgrade or use an alternative browser.
You should upgrade or use an alternative browser.
How to achieve this lighting effect?
- Thread starter sixxy
- Start date
dv8_fx
Retired Administrator
- Messages
- 13,760
- Likes
- 4,789
I don't know of a plug-in that can do this. But such is the magic of post work.
I seem to recognize this image.... a render of a 3d model. And whoever did this could have used the paintbrush in airbrush mode. I surmise the girl is on its own layer which makes it easier to airbrush the hilites along the edges separately on layers - erasing where needed to get the thin hilites and lowering the layer opacity. Same goes for the glints around the eyes.
There is no one way in doing this. But a whole lot of trial and error in order to develop a postwork style .
I'll check for a postwork tutorial . It's for 3d modelling but the procedure is applicable to even flattened images or portraits.
ibclare
Queen Bee
- Messages
- 11,033
- Likes
- 4,638
This appears air-brushed. Not a method I can help with much. What I would do to simulate this effect (till you find better :} ) is use a selection edge. Paint white with a soft brush at 100% so that it bleeds over the selection edge (marching ants). Then take an eraser at low opacity and finesse the strength and width of the line. I did the same thing along the jaw with pale gold. Again, it doesn't look the same but it mimics the result. On a separate layer I brushed 100% white, varying opacity and hardness, across the entire eye and lid then selectively erased it. This layer I lowered the opacity of a bit.

Paul
Former Member
- Messages
- 12,878
- Likes
- 7,023
Those 'edges' are pen or brush strokes on almost the final top layers of the image, with the opacity and saturation levels altered.
You could also try making a layer copy of the whole face and then pulling the border box corner out slightly so it over hangs on the left side giving you that edge you desire, then do as said earlier.
You could also try making a layer copy of the whole face and then pulling the border box corner out slightly so it over hangs on the left side giving you that edge you desire, then do as said earlier.
Smokey2011
Well-Known Member
- Messages
- 120
- Likes
- 5
there's no "filter" or "auto method" to achieve this.
It's artistic, manually hand-painted airbrush techniques.
What irks me is the vast majority of Photoshop users are looking for auto-methods to do everything for them.
There is an incredibly massive world of manual painting capabilities in photoshop that very few people seem to be aware of.
Everyone's looking for a "file/edit/filter..." type deal but all of this stuff produces cold, digitally automated-looking results.
The paintbrushes in Photoshop are unlimited: chalk brushes, airbrushes, pastel brushes, ink brushes, watercolor brushes- you name it. All of these can simply be used to produce natural looking media with free hand painting and drawing, assuming you're using a tablet. With only a mouse, your capability with the program is running less than 50%.
As for this image- it's so easy. There's no "edit/adjustments/auto-filter" or anything like that being used here.
It's a low-opacity layer placed ontop of the image. A soft brush was used to paint in the highlighted edges. Then, a soft eraser is used to erase the excess airbrush that may have leaked outside of the cheeks/jaw area. It was done zoomed in very close. Pressure sensitivity is also a must for this, which again comes down to using a tablet.
I wish users would stop thinking of Photoshop as a program that simply does everything for us- and start to use it as a painting, drawing and artistic tool to accomplish our results by hand.
clarkenstein
Member
- Messages
- 21
- Likes
- 12
Hey smokey, what's with the belligerent attitude? The poster asked how do you make the light on the edges, not how do you airbrush. You're right that many people look for PS to do everything automatically so to speak and that many users are not artists, at least not in drawing and painting. But, who's to judge who should or shouldn't use Photoshop and ask a question or two. No one is going to listen to you if you're yelling at them. Maybe take a softer approach friend; keep it cool. 
Fatboy73
Guru
- Messages
- 613
- Likes
- 356
It's called rim lighting, and as a comic book colorist I used it all the time.(And smokey was a little harsh, but completely 100% right)
My method of achieving it is this:
Select the object you want to put a rim light on. With a poly lasso, pen tool or optimally you would have the object o a separate layer.
Once the object is selected, grab a completely soft round brush(size around 200-250) on around 10% opacity. you need two colors here, one a slight shade of your main object color, the other a very light yellow or what ever color your main lighting on the object is.
In long strokes(a pen tool is invaluable here, but a mouse will work) brush your darker shade around the edge of your object, blending it as you stroke in and making a smooth transition from dark to light. As you can see from the example pics, you don't want to come in too far. If the transition is completely smooth, you can use the blur tool to smooth things out a bit.
Once your shadow is laid down, create another layer over the original, set to hard light blending mode. With your light yellow color picked, and your soft brush on 10% opacity(size around 30-40) set to screen blending mode. Using long strokes, slowly brush in your rim light. You can go over each stroke until the desired brightness is achieved.
I did this exact method with this pool ball, the only difference is the lines are hard and crisp instead of fuzzy, because of the obvious material difference.
I'm not saying you'll get it on the first, second, or even third try. But if you practice it will come to you.")
My method of achieving it is this:
Select the object you want to put a rim light on. With a poly lasso, pen tool or optimally you would have the object o a separate layer.
Once the object is selected, grab a completely soft round brush(size around 200-250) on around 10% opacity. you need two colors here, one a slight shade of your main object color, the other a very light yellow or what ever color your main lighting on the object is.
In long strokes(a pen tool is invaluable here, but a mouse will work) brush your darker shade around the edge of your object, blending it as you stroke in and making a smooth transition from dark to light. As you can see from the example pics, you don't want to come in too far. If the transition is completely smooth, you can use the blur tool to smooth things out a bit.
Once your shadow is laid down, create another layer over the original, set to hard light blending mode. With your light yellow color picked, and your soft brush on 10% opacity(size around 30-40) set to screen blending mode. Using long strokes, slowly brush in your rim light. You can go over each stroke until the desired brightness is achieved.
I did this exact method with this pool ball, the only difference is the lines are hard and crisp instead of fuzzy, because of the obvious material difference.
I'm not saying you'll get it on the first, second, or even third try. But if you practice it will come to you.
Attachments

Last edited: