What's new
Photoshop Gurus Forum

Welcome to Photoshop Gurus forum. Register a free account today to become a member! It's completely free. Once signed in, you'll enjoy an ad-free experience and be able to participate on this site by adding your own topics and posts, as well as connect with other members through your own private inbox!

How do I stretch out part of the color spectrum on my image?


Robin_Claassen

New Member
Messages
4
Likes
2
What I'm trying to do is stretch out the green part of the color spectrum that includes most of the pixels in this image
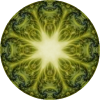
T1BBJQY.png.
, so that the redder colors are shifted in the red direction, the bluer colors are shifted in the blue direction, and only the the pixels the are in a narrow range around the mean color of of the original image stay green.


What I'm doing is trying to convert it into blocks (basically pixels) in Minecraft (a computer game that emphasizes creative expression through building with virtual blocks) through a third-party image-to-Minecraft-blocks program, in a manner that preserves as must detail as possible. Unfortunately, since there are a limited number of different Minecraft blocks in the green part of the spectrum, much detail is getting lost in the conversion (example:
uTP4HLE.png).
So I think that what I need to do is make it so that greater portion of the color spectrum is used by the image, so that a greater portion of Minecraft's limited color palette can be used, and more detail can be preserved.

I'm guessing that there's a way to do that in Photoshop, but despite spending some time searching (probably using the wrong search terms), I haven't been able to find how to do so. If anyone could help me, I'd appreciate it. Thanks!
 
Last edited:
Please excuse my ignorance, but can you clearly define exactly what you mean by "stretch out"??????
 
Please excuse my ignorance, but can you clearly define exactly what you mean by "stretch out"??????

Please excuse my inarticulateness, and thank you for showing some interest in my request for help. What I mean is this: Lets assume that 98% of the pixels in my image above fall into this yellow-green range of the color spectrum:

Ag4CFj3.png


What I mean by "stretching" (there must be another term that people who are more experienced at graphics editing than I use, I just don't know what it is) that part of the color spectrum is making everything on the red end of that range get more red, and everything on the blue end of the range more blue

JTY1lkf.png

so that after the stretching, those 98% percent of pixels in my image would be spread across nearly the entire spectrum, and any pixels that had been outside of that narrow yellow-green range would all be squeezed into a narrow blue-magenta range:

OVuiD6X.png

I imagine that the way something like that would work is that a pixel of the most extreme (reddest) yellow of the initial narrow spectrum that included most of the pixels in my image would be transformed all the way to magenta, and a pixel that initially had a hue halfway between the mean yellow-green of my image and that most extreme yellow would be transformed to a hue that was half the distance along the color spectrum between it's original hue and magenta (which would be an orange-red color).

Hopefully I'm being adequately articulate now. Please let me know if I'm not. It must not be too uncommon for somebody to have an image like mine that's mostly made up of colors from a narrow part of the spectrum that they want to increase the range of colors displayed in. The tool to perform this operation must be out there, and I would guess that it's included in Photoshop.
 
Last edited:
Just guessing..........................like this?

Maybe something like that. Basically every pixel in that image seems to be in on the red-magenta-blue half of the color wheel, though. What I'm hoping to find is some way of transforming my image so that the colors are spread out across the spectrum, with every area of the spectrum represented to a significant degree, to make the most of the limited color palette of the program I'll be converting it to, and help ensure that the most detail possible is preserved in that program's limited color palette.

What I really care about is the details of the shape and the relationships between the colors being preserved (just moving the colors away from each other to make the differences between them stand out more. Part of what I'll be doing in the program I'm converting this image to is adding some 3-dimesionality to it, taking cues from the implied 3-dimesional shapes in the original image, so preserving more detail of that original image will give me more information to use to build that 3-D shape. It's not important that any particular color be in any particular place, because that can be tweaked later.

You do seem to have managed to broaden the range of colors represented in the image at least a bit in your version (though it seems a little off, maybe? as if the relative color change was more extreme in some areas, instead of all existing color differences being exaggerated evenly). I'd be curious to know how you did that.
 
Last edited:
One way to approach this is to use a PS filter called HSL/HSB. As I recall, it was included with everyone's copy of PS until about 5 or so years ago. It was removed for a couple of years, and now is available again either directly from Adobe or from 3rd party sites.

What it does is break down a conventional RGB image into either HSL or HSB. After application, the distribution of hues of the original image will appear as a grayscale image in the red channel, saturation in the green, and either "L" or "B" of the original will appear in the blue channel. One is then free to manipulate these grayscale images with the full range of PS's tools.

For example, if the hues are compressed into a small range, one can use the "Levels" or "Curves" tool to stretch this narrow range out to occupy the full range of hues available.

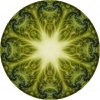
For easy comparison, here's your starting image again:

01-original-T1BBJQY-tjm01-hue_range_expanded.jpg

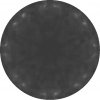
Here is the grayscale representation of the hues in the starting image:

02-grayscale_representation_of_original_hues_in_image-T1BBJQY-tjm01-hue_range_expanded.jpg

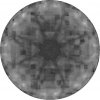
Here is the grayscale representation of the hues after their range has been expanded using the "Levels" control:

03-grayscale_representation_hues_after_hue_range_expansion-T1BBJQY-tjm01-hue_range_expanded.jpg

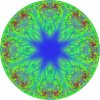
And finally, here is the image after reconstruction back to a conventional RGB image using the HSB/HSL tool in "reverse" mode.

04-final_RGB_image_after_hue_range_expansion_and_reconstruction-T1BBJQY-tjm01-hue_range_expanded.jpg

I hope this is what you were looking for.

Tom M

PS - One of the problems you will commonly encounter when expanding such a small range of hues by such a large factor is that you will typically run into quantization artifacts. For example, if the starting image was ever a JPG saved at an ordinary quality level, the JPG compression block will stand out like the proberbial "sore thumb". Because of this, if you ever intend to do such manipulations, make every effort to obtain your starting image, as a 16 bit per channel file, either a PSD or a TIF.
 
PS - More info on the in and out existence of Adobe's native HSB/HSL filter is here:
https://feedback.photoshop.com/phot...does_not_work_in_cc_2014_mac?topic-reply-list[settings][filter_by]=all&topic-reply-list[settings][reply_id]=14972181#reply_14972181

When I gave the brief history of it in my previous post, I forgot that there was a period when it could be downloaded from Adobe as part of their optional "Multiplugin", and currently, it is included with CC 2015. At least, I see it when I fire up 2015 and I don't remember doing anything special to install it when 2015 came out.

T
 
Thank you very much for your help, Tom. That's amazing. It does appear to be exactly what I'm looking for.

I'll look into getting that filter tomorrow, and I'll play around with converting different variations to see what I can get to convert into Minecraft best, with the most detail preserved. I'll report back here. Thank you again!
 
Last edited:
Here is another approach that takes a small amount of finesse yet works.

I just took the image and used a single Hue Sat adjustment Layer. The only colors in original is yellow green, lots of yellow and tad of orange. I selected the green colors and adjusted the boundary and shifted to blue and then chose red and adjusted the boundary and then shifted to magneta. I also set the blend to color of the Hue/Sat layer to Color so the the luminosity of the original image would be used.
T1BBJQY-adj.jpg
 
Hi John - That's another good way to approach this problem, and probably more intuitive to most people than my method, and doesn't require the HSB/HSL plugin.

FWIW, I'm pretty sure it is mathematically equivalent to my method except applying an appropriately funky "curves" transformation to the hue channel instead of the simple "levels" transformation that I used.

Good one, John.

Tom

PS - If I get a chance, for fun, I'm going to "funk-ize" my transformation of the hue channel and see if I can get something that Jerry Garcia would be proud of, LOL.
 
Just for yucks, to bring out more detail, I applied a histogram equalization to the grayscale hue image after my previous expansion of the hue range, did a hue rotation, and finally came up with the attached (even more) psychedelic version, LOL.

Obviously, there are lots of ways to tweak this process, and the more you tweak it, the more the hidden artifacts show up, but still great FUN!

Tom M

05-final_RGB_image_after_hue_range_expansion_reconstruction_HistoEQ_hue_rotation-T1BBJQY-tjm01-h.jpg
 

Back
Top