
Photoshop Gurus Forum
Welcome to Photoshop Gurus forum. Register a free account today to become a member! It's completely free. Once signed in, you'll enjoy an ad-free experience and be able to participate on this site by adding your own topics and posts, as well as connect with other members through your own private inbox!
You are using an out of date browser. It may not display this or other websites correctly.
You should upgrade or use an alternative browser.
You should upgrade or use an alternative browser.
how do i fix this photo?
- Thread starter goct
- Start date

Steve
Retired Administrator
- Messages
- 7,868
- Likes
- 1,506
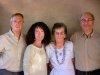
You should have no problem fixing it in CS5.
I opened in in ACR went to HSL/Grayscale and slid red to +70 and that took care of the red.
I then opened it in PS and Isolated the lady's face on the left and used the burn tool to darken it.
I desaturated here face a bit, and then raised exposure on the whole image.
For the bra strap try the clone stamp.
I did a fast job.
Spend more time for better results.
Practice using layers they're very helpful and important.
I've been trying to UL a pic to show you and I'm having a problem.
I'll post an image later
Steve
Retired Administrator
- Messages
- 7,868
- Likes
- 1,506
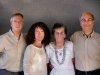
OK I reset my modem and uploaded the image.
Spend more time and get better results.
I used burn but isolate the face and use curves would probably look better.
You have all the tools you need in CS5

You can also spend more time on the men's faces to brighten them, I did nothing.
Even out the background and eliminate the shadows would help to.
Spend more time and get better results.
I used burn but isolate the face and use curves would probably look better.
You have all the tools you need in CS5
You can also spend more time on the men's faces to brighten them, I did nothing.
Even out the background and eliminate the shadows would help to.

Tom Mann
Guru
- Messages
- 7,222
- Likes
- 4,343
I'm still running short on time, but the following screen grab of my layer stack (with some annotations) should give you an overview of my approach.
When I first worked on your image, to save myself time, I used a feature that is only available in the current Creative Cloud version of PS and is not in CS5, namely, the ability to use ACR within PS itself, not just as a front end to it. In fact I also used another, somewhat advanced feature: I used ACR as a smart object/filter, so I could go back and tweak each of the ACR layers endlessly, LOL.
Unfortunately, your comment that you were using CS5 didn't come in until after I posted my tweaked image, so, when I realized that you didn't have this feature, this morning, I converted my approach for the two men to conventional adjustment layers (ie, which are available in CS5). However, I let my previous work on the women (which used the ACR approach) stand. You can see how much more compact the code is using ACR.
I have to run, but the attached should get you off to a good start. More details to come.
Tom
PS - I also realized that in my previous version, I didn't deal with the bra strap. I just did a quick fix, and will also explain the technique that I used on it.
Attachments
Tom, you're awesome. Thanks for the detailed description. I can open the photo in ACR from CS5 . Don't know what the diffence is from your program, perhaps more features?
Well, I'm going to practice Look forward to hearing from you some more. I appreciate your time!
Gail
Well, I'm going to practice Look forward to hearing from you some more. I appreciate your time!
Gail

Steve
Retired Administrator
- Messages
- 7,868
- Likes
- 1,506
With a low rez image like you posted I just blurred the area.Pretty good job on the bra strap Steve, how should I even out the skin tone, where the stap was removed?

With a high rez image you need detail which means time and effort.
You can do a 10 minute fast and dirty job like I did that looks OK for the family, or take an hour or more (or maybe much more) isolating the area using layers, masks, layer adjustment masks, etc. to make a flawless image.
It takes time to learn.
What you need to do is start with the highest possible quality image.
Shoot at the highest possible setting of your camera.
Memory is cheap.
Tom Mann
Guru
- Messages
- 7,222
- Likes
- 4,343
Hey, Hoops, I *really* liked how you moved the neckline of the blouse to hide the strap instead of replacing the strap with fake skin. Very nice. That looks much better.
I also really liked your idea to better control brightness and contrast throughout the image, especially the guys at the extreme left and right sides. Viveza is indeed a great tool for this.
If I were going to work on this image seriously (ie, not just as a tutorial to illustrate some of the initial fixes / methods), I would have to do something about the background. Subjects should NEVER be lined up against a wall, and certainly never so close to a wall that it's also in focus (given the lens and f-stop being used).
I also would try to break up the monotony of all the tan colors in the image -- a tan background, tan shirts and sweater, . Introducing some hue contrast or even just desaturating the background a bit instead of the massive field of tan would add a bit more visual contrast / interest. The way it currently looks, I feel like the picture was taken right after a sandstorm passed, LOL.
One could drop in a completely different background, but to preserve a bit of the original feel, one can work with it ... maybe something like the attached.
@Gail - The difference between ACR in the latest version and ACR in CS5 is that with the latest version, it's much easier to have multiple ACR versions, you don't have to go back and forth in and out of PS. You can stay in PS all the time. This may not sound like a big deal, and isn't absolutely essential (as you saw) to getting the job done, but practically, I find that this is a big help. It gives you feedback on your changes immediately. There is a nice video descriptions of ACR as a filter here:
http://tv.adobe.com/watch/creative-...adobe-camera-raw-as-a-filter-in-photoshop-cc/
If you have any other questions, just ask!
Cheers,
Tom
Attachments
chrisdesign
Guru
- Messages
- 4,223
- Likes
- 6,236
I'm still running short on time, but the following screen grab of my layer stack (with some annotations) should give you an overview of my approach.
When I first worked on your image, to save myself time, I used a feature that is only available in the current Creative Cloud version of PS and is not in CS5, namely, the ability to use ACR within PS itself, not just as a front end to it. In fact I also used another, somewhat advanced feature: I used ACR as a smart object/filter, so I could go back and tweak each of the ACR layers endlessly, LOL.
Unfortunately, your comment that you were using CS5 didn't come in until after I posted my tweaked image, so, when I realized that you didn't have this feature, this morning, I converted my approach for the two men to conventional adjustment layers (ie, which are available in CS5). However, I let my previous work on the women (which used the ACR approach) stand. You can see how much more compact the code is using ACR.
I have to run, but the attached should get you off to a good start. More details to come.
Tom
PS - I also realized that in my previous version, I didn't deal with the bra strap. I just did a quick fix, and will also explain the technique that I used on it.
Great effort in explaining, and, like always an excellent result. The OP is over the moon.
hoops
Member
- Messages
- 15
- Likes
- 9
Hey, Hoops, I *really* liked how you moved the neckline of the blouse to hide the strap instead of replacing the strap with fake skin. Very nice. That looks much better.
I also really liked your idea to better control brightness and contrast throughout the image, especially the guys at the extreme left and right sides. Viveza is indeed a great tool for this.
If I were going to work on this image seriously (ie, not just as a tutorial to illustrate some of the initial fixes / methods), I would have to do something about the background. Subjects should NEVER be lined up against a wall, and certainly never so close to a wall that it's also in focus (given the lens and f-stop being used).
I also would try to break up the monotony of all the tan colors in the image -- a tan background, tan shirts and sweater, . Introducing some hue contrast or even just desaturating the background a bit instead of the massive field of tan would add a bit more visual contrast / interest. The way it currently looks, I feel like the picture was taken right after a sandstorm passed, LOL.
One could drop in a completely different background, but to preserve a bit of the original feel, one can work with it ... maybe something like the attached.
@Gail - The difference between ACR in the latest version and ACR in CS5 is that with the latest version, it's much easier to have multiple ACR versions, you don't have to go back and forth in and out of PS. You can stay in PS all the time. This may not sound like a big deal, and isn't absolutely essential (as you saw) to getting the job done, but practically, I find that this is a big help. It gives you feedback on your changes immediately. There is a nice video descriptions of ACR as a filter here:
http://tv.adobe.com/watch/creative-...adobe-camera-raw-as-a-filter-in-photoshop-cc/
If you have any other questions, just ask!
Cheers,
Tom
Hi mate. Cheers. Viveza is great. Just started using it. Briliant software.
Great work on the background and the orange everywhere to mate. Much better.
''like the picture was taken right after a sandstorm passed''
Might have been an idea to just photoshop them infront of the pyramids. Problem solved lol