What's new
Photoshop Gurus Forum

Welcome to Photoshop Gurus forum. Register a free account today to become a member! It's completely free. Once signed in, you'll enjoy an ad-free experience and be able to participate on this site by adding your own topics and posts, as well as connect with other members through your own private inbox!

How can I stop this from looking rubbish?!


obibup

New Member
Messages
2
Likes
0
Hi Everyone,

I'm trying to cut somebody out of a photograph. The problem is, their silhouette is against someone who's IN the photo, who I want to keep. I can cut the person out, but not without leaving a horrible looking contrast between the person I want to keep and the dark background.

I've no idea what to do. I think it has something to do with the selection tool, but every youtube video just shows how to cut people out of a photo and place them into somewhere else- which isn't what I'm looking for.

Can anyone be so kind as to help me with this?

Many thanks
 

Attachments

  • IMG_0237.jpg
    IMG_0237.jpg
    1.9 MB · Views: 6
  • NIKKI ANDY TIFF-Edit-Edit-2.jpg
    NIKKI ANDY TIFF-Edit-Edit-2.jpg
    1.6 MB · Views: 7
Suggest trying this..select the area you want to disappear, then Edit/Fill . Set Fill contents to Content Aware, Normal and apply. You may have to use the clone tool a bit also.
 
I presume you are concerned about the partial person on the extreme RH edge of the image.

If that is the case, using some combination of the content aware fill tool (as Larry suggested), and/or the clone tool will do away with this (partial) person and one can fill that area with a dark, almost featureless tone.

However, in my opinion, the partial person on the RH edge is only a minor part of what I consider to be the most serious problem with this image, and that is that the entire background is much too distracting.

Specifically, the viewer's eye is drawn to the high contrast (and blown highlights) of these background people. In addition, I find the quality of the blur on these people to be poor, especially when it interacts with the accidental overlay of 2 or 3 people just to the left of the (partial) person discussed above. Although it's only my personal preference, I would do just about everything I could to reduce the visual attraction of the people in the background short of removing them completely. It's obvious that the photo is about the central couple, and one wants to give them some context, but this amount of detail in the background is unnecessary.

As an example (see attached), in this area, I dramatically decreased the contrast, slightly blurred them, added a bit of grain, gave them a sepia color, etc. I also added a thin frame. Frames like this tend to cause the viewer's eye to bounce back into the frame if it strays too close to the edge. Without a frame, in an image like this, there is a propensity for the viewer's eye to stray completely out of the image.

Anyway, this is just my personal opinion. I'm sure other folks will come along with other suggestions about improving this image.

Cheers,

Tom
 

Attachments

  • NIKKI_ANDY_TIFF-Edit-Edit-2-tjm01-acr-ps01b_698px_wide-01.jpg
    NIKKI_ANDY_TIFF-Edit-Edit-2-tjm01-acr-ps01b_698px_wide-01.jpg
    236.4 KB · Views: 41
The 2nd one that he posted certainly has been 'shopped - he slimmed down the arm and did some other things. I'm not quite so sure about the 1st one, but I think it has as well.

T
 
Thanks for all the suggestions everyone, some good points have been made. I got called away on business after making the post and this is the first time I've had the chance to reply. All your suggestions have been duly noted, however my main problem isn't getting rid of the kid on the left side of the photo (as you can see I've already managed this in the second photo) but rather the contrast between the brides back and the new black background that has replaced the small child, which I think may or may not have something to do with how I'm selecting the object I'm trying to cut out.

It looks, for want of a better term, "clearly photoshopped". The first photo has a light surrounding the whole body, the second one looks like she's been cut out of a previous picture and pasted. This is what I'm trying to avoid. I've tried getting the selection tool to include the light with varying results (including refining the edge) but it still looks decidedly "off". I think I either need the light or I need the brides back to blend in with the background a bit more.

Please note that the black and white editing is just there for show so you could get an idea of what I meant with the contrast between the brides back and the black background, I intend to do a proper job of it once I've sorted getting the child out of the picture.

Of course I should have just taken the right photo in the first place and saved myself this headache, but I do feel that there's a good photo in there waiting to get out.

Should I be considering any other alternatives instead of cutting the child out? Painting over perhaps?
 
Here is a try at this. I first did a Levels adjustment by using the dark and light eye droppers. Then, I did some creative cloning in her hair and on the background. Then applied a conventional vignette. Once done, I took it back into levels and up-ed the midtone contrast to emphasize the bride and groom. (this is a screenshot and quickly done) Edit: Also it could stand using the blur tool just a bit on the edges of her hair and hand to soften those hard pixels)
PS2.JPG
 
Last edited:
if you want the light on the body just have the original layer , then put the new layer with the child out on top ,add a layer mask and paint with a soft brush the area of light you want
 
the blown highlites and distractions are taking away from the subjects just a quick edit
 

Attachments

  • IMG_0237.jpg
    IMG_0237.jpg
    98.7 KB · Views: 15
Last edited:
The backlit / rim-light effect that you are seeing in the example image(s) is extremely common in wedding photography, particularly, for the "1st dance" of the B&G. It is such a widely sought-after effect (by both couples and photographers) that many technique articles and descriptions are available on the web, e.g., http://ptgmedia.pearsoncmg.com/images/9780321646873/samplechapter/05_CapturedLight_96-117.pdf.

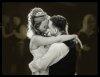
If the photographer sets the flash power just a couple of stops too strong, the rim lighting effect starts to look like what is seen in the examples (ie, 1st two photos posted in this thread). This does not look at all like a "cut-out" effect to experienced photographers -- it's an entirely expected result of the lighting.

Even though the overly strong rear strobe was a bit of an error, backlighting in such photos is such an expected effect (almost a cliche) that in my tweaked version of the OP's shot, I let the overly hot rim-lighting stand instead of trying to "fix" it by reducing it to nearly zero as seen in posts #8 and #10, thereby artificially making the scene look almost like it was a dull, low contrast, front lit shot instead of a high contrast back lit one.

A second lighting error was also made in the sample images: The strobe in back of the couple spilled way too much light on the people nearest the strobe and burned them out. The photographer should have narrowed the emission angle and moved the rear flash forward a bit, towards the couple.. That is utterly trivial to do with an assistant and any modern, professional grade, remotely triggered hotshoe flash (...there is a zoom control on almost all of these), and only slightly more difficult to do with older units (... by adding flags, barn doors, or the like).

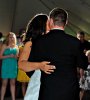
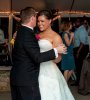
To illustrate the difference between back and front lighting, and why one should not attempt to completely "fix" too hot rim lighting, below, I attached two of my own images from a wedding that I shot about a year ago. Unfortunately, like the photographer who shot the example image(s) in this thread, my newbie assistant (who was holding the remote flash) needed to step in front of the crowd (that was in back of the couple), not just be even with them, so I also got a bit too much spill in my backlit photo. Fortunately, I didn't burn out the hair highlights or the neighbors as badly as in the example photo.

Bottom line recommendation: Don't "fix" an effect that is expected, and was almost certainly set up intentionally by the photographer.

Just my $0.02,

Tom
 

Attachments

  • 20120505192108-D7R_7270jpg-acr-ps02a_800px_hi-01b_698px_hi_for_web.jpg
    20120505192108-D7R_7270jpg-acr-ps02a_800px_hi-01b_698px_hi_for_web.jpg
    89.7 KB · Views: 9
  • 20120505202845-D7R_7294nef-LR3-jpg_900px-01-2b_698px_hi_for_web.jpg
    20120505202845-D7R_7294nef-LR3-jpg_900px-01-2b_698px_hi_for_web.jpg
    128.5 KB · Views: 9
i like backlit subjects , in this instance there was just too many blown highlites distracting me , i didnt try too fix the hightlites just reduce the blown areas leaving some backlighting , the major blown area in her hair was just too much imo , my edit was a very quick fix id spend a lot more time if it were my image , i fixed the blown area in the backround mans arm , the area of the mans face or womens hair on the right i cant remember now which it was and also the big distraction of her hair , the part that i still would work on would be the very bright highlite between thier faces , it has the basics of a good photo but the photographer didnt quite do it right
 

Back
Top