What's new
Photoshop Gurus Forum

Welcome to Photoshop Gurus forum. Register a free account today to become a member! It's completely free. Once signed in, you'll enjoy an ad-free experience and be able to participate on this site by adding your own topics and posts, as well as connect with other members through your own private inbox!

HELP with taking out parts of an image


Gal Kimhi

Member
Messages
18
Likes
1
Hi there Gurus...

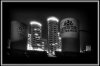
i took this picture a couple of days ago (the writings are in hebrew, in case you're wondering... i live in Israel..)
anyhow.. i want to take out the buildings on the right and left of the water heaters, leaving the skyscrapers in the middle. i'm quite a novice at Photoshop and i cant seem to find a good way to do it without having a horrible result.... i tried doing it using the clone stamp and spot healing brush, but i just cant seem to get a good transition of the background sky from dark black to lighter grey once i take the buildings out...

any suggestions???

thanks
 
Can you provide a link to the picture? Not sure about anyone else but it is kinda hard to know what you need to do without a bit of a visual aid.
 
OOPS!cant believe i forgot the image... lol...View attachment 36897
Not sure about anyone else. But I think you were on the right track with the clone tool. At least that is how I would do it. Thing with the clone tool is, it does take awhile to remove objects with it. And sometimes it helps to turn the flow of the brush down.


EDIT: Forgive me if I over stepped my bounds here.I did this with the clone tool. It is very sloppy. But it works. I only did the one side to demonstrate. http://i8.photobucket.com/albums/a13/DisturbedShifty/1-1.jpg

(I hope that link works. Photobucket has been giving me fits all day)
 
Last edited:
oh it looks very nice!
but how did you manage to make that smooth transition? i never manage to get it right? is this from lowering the flow?
 
oh it looks very nice!
but how did you manage to make that smooth transition? i never manage to get it right? is this from lowering the flow?

Yes. Lowering the flow and going over the same area over and over gives you a smoother transition. And making sure you sample from the area that has the same color. Again, the flow can come into play with that.

And I also used the blur tool to smooth it out as well.

Never go to the Library without your shotgun.
 
I used a different approach. It's not perfect as I did this very fast!

I removed the original background, using the Brush Tool, Pen Tool, and the Polygonal Lasso Tool, and I created a layer mask.

SS_03.png

SS_02.png

Then I created a new layer below the masked layer. I selected the Gradient Tool and opened the gradient editor. I clicked on the left color stop (circled) and sampled the above the towers (arrow), I did the same with the right color stop and sampled the sky on the right hand edge. I then created a gradient on this new layer.

SS_05.png

I also added two more highlight layers (They are not that good!). I created the highlights using a soft brush and white. I then lowered the layer opacity to my liking. When done, I combined all the visible layers to a new layer (shift + alt/opt + cmd/cntrl + E). Then I used the Blur tool to tame down the hard edges on this new layer.

SS_06.png

Just another of many ways you can do this.
 
Yeah, I mentioned I did it really fast. You should take your time and do a better job. The beauty is that you can always go back and make changes.

SS_07.png

This is for demonstration purposes, it's not meant to be a final or completed image.
 
Last edited:
I might also add that the original image looks fine the way it is!
If you must remove the buildings, why not just crop it?

SS_08.png
 
I agree with a tight crop and masking the rest Cloning will take a bit of time but go slow and you will like


Sent from my iPhone using Tapatalk
 
How 'bout an old-fashioned "burn-in-the-edges" treatment.

I kinda like straighter verticals on architecture / equipment shots, and thought this one could benefit from a bit of edge treatment after the edges were burned in. Total time < 2 min. More time => better results.

T
 

Attachments

  • 1-tjm01-acr-ps03_698px_wide-01.jpg
    1-tjm01-acr-ps03_698px_wide-01.jpg
    138.9 KB · Views: 13

Back
Top