I am trying to shade an image to achieve a desired effect but, after several tutorials, I haven't been successful. I have tried various masks and gradient shadings, but, evidently, I haven't deciphered the right order of tasks. I want a headshot that looks like those depicted in this video:
. I begin the process by selecting a photo, cropping it, removing the background, and cleaning up the image. As you can see in the video, I need to darken a portion of the headshot. This is the point where I have trouble. When I use the gradient tool, it adds back a "black background" to the image when it is placed in the video program. So, when the headshot is moving, it has a dark rectangular background around the headshot instead of a "cut-out silhouette." How can I shade a portion of the "cut-out silhouette" so it doesn't re-introduce a background. I feel confident that there is some combination of masking, gradient settings, and other tools that I haven't tried that will work. Oh, and if you haven't figured it out, I am quite a Photoshop rookie. 
Photoshop Gurus Forum
Welcome to Photoshop Gurus forum. Register a free account today to become a member! It's completely free. Once signed in, you'll enjoy an ad-free experience and be able to participate on this site by adding your own topics and posts, as well as connect with other members through your own private inbox!
You are using an out of date browser. It may not display this or other websites correctly.
You should upgrade or use an alternative browser.
You should upgrade or use an alternative browser.
Help with shading an image
- Thread starter fox456
- Start date
- Messages
- 23,872
- Likes
- 13,629
Hello and welcome to the forum.
Your best option to achieve the half shadow effect is to use a Curves Adjustment layer and it's corresponding layer mask to impart a "burn" effect using the images own natural coloration darkened with the Curves adj layer. Set the mask to "Hide All" or black. Then use the Brush Tool and a nice soft round brush set to white and lower the opacity. Select the layer mask and slowly paint in the areas you want to be darkened............or shadowed.
Your best option to achieve the half shadow effect is to use a Curves Adjustment layer and it's corresponding layer mask to impart a "burn" effect using the images own natural coloration darkened with the Curves adj layer. Set the mask to "Hide All" or black. Then use the Brush Tool and a nice soft round brush set to white and lower the opacity. Select the layer mask and slowly paint in the areas you want to be darkened............or shadowed.
Wow! Thanks for your quick reply. I am attempting to follow your directions. I have loaded a .png file into Photoshop. I created a new layer mask using the commands, Layer/New Adjustment Layer/Curves... . I didn't see how to set the mask to "Hide All," so I just used Ctrl-I to Invert it from white to black. However, when I "paint" on the mask using a soft brush, the icon of the mask changes, becoming white in places but the image itself doesn't change (so I can't see the actual modifications). I tried not inverting the mask, leaving it white and painting on that mask. It turned black in spots, but no changes in the image itself. [I am not well versed with masks in general, but I'm learning]. I thought your "Hide All" might be referring to the new adjustment layer itself, so I tried "hiding" it by clicking the little eye, but that just turned off the layer and I couldn't paint on the mask.
Also, I was wondering if I am supposed to adjust the little "Curves" graph at some point.
Oh, and I just noticed a "Layer Style" called "Gradient Overlay." Would this possibly be useful?
Also, I was wondering if I am supposed to adjust the little "Curves" graph at some point.
Oh, and I just noticed a "Layer Style" called "Gradient Overlay." Would this possibly be useful?
Last edited:
- Messages
- 23,872
- Likes
- 13,629
No.Oh, and I just noticed a "Layer Style" called "Gradient Overlay." Would this possibly be useful?
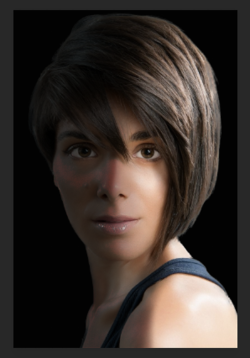
Did this really fast for demo so it's not perfect............you take your time!
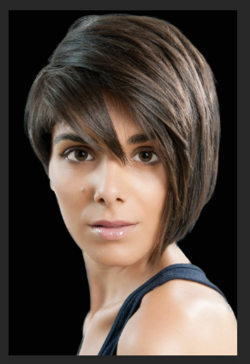
Before
After
Properties of the Curves adj layer along with layers panel showing the 3 layers that make this image up.
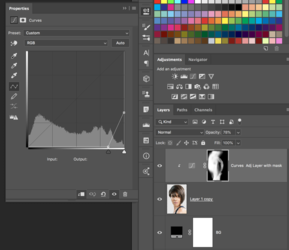
EDIT NOTE: I see where I clipped the adjustment layer to the girls image. This is called a clipping mask. Right click the layer you want to clip to the layer below, then choose Create Clipping Mask.
@IamSam
Thanks again for your directions. It seems like there are few steps to accomplish the shading I want, but I still cannot replicate what you have done. I am attaching a couple of screen shots that might help figure out the problem.
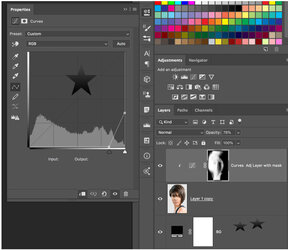
Question 1 (marked by 1 star in image above) - Am I supposed to be altering this graph? I have not so far.
Question 2 (marked by 2 stars in image above) - I have no idea how to get this layer added. Do I need it?
Question 3 - I tried painting on my image. White shows up on the mask, but no shading on the image itself. I thought maybe the image would have the shading after saving it, but it did not. Am I supposed to be able to see the shading as I brush?
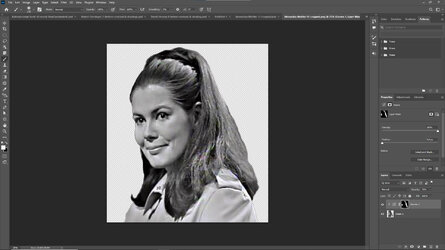
This is what my screen looks like after adding the Curves Adjustment Layer and creating the Clipping Mask to it. (Yes, I am using OLD images for this project.) As you can see, I cannot tell how my brushing is affecting the image when I paint.
Thanks again for your directions. It seems like there are few steps to accomplish the shading I want, but I still cannot replicate what you have done. I am attaching a couple of screen shots that might help figure out the problem.

Question 1 (marked by 1 star in image above) - Am I supposed to be altering this graph? I have not so far.
Question 2 (marked by 2 stars in image above) - I have no idea how to get this layer added. Do I need it?
Question 3 - I tried painting on my image. White shows up on the mask, but no shading on the image itself. I thought maybe the image would have the shading after saving it, but it did not. Am I supposed to be able to see the shading as I brush?

This is what my screen looks like after adding the Curves Adjustment Layer and creating the Clipping Mask to it. (Yes, I am using OLD images for this project.)
 As you can see, I cannot tell how my brushing is affecting the image when I paint.
- Messages
- 23,872
- Likes
- 13,629
Yes. After adding the Curves Adj Layer, disable it's layer mask by holding shift and clicking the mask. Darken the image image as dark as you wish the shadowing to be on the curves adjustment layer. Then re-enable the layer mask by holding the shift key and clicking on the mask. Now, when you use your brush on the layer mask, it will darken the subject where you want.Question 1 (marked by 1 star in image above) - Am I supposed to be altering this graph? I have not so far.
This is a BG or Background color layer. I used it because my subject layer had it's bg removed............so it was transparent. I needed a dark bg.............hence the bg layer.Question 2 (marked by 2 stars in image above) - I have no idea how to get this layer added. Do I need it?
If you had not made a state change in the Curves adj layer, you would not see any shading. Please see question 1.Question 3 - I tried painting on my image. White shows up on the mask, but no shading on the image itself. I thought maybe the image would have the shading after saving it, but it did not. Am I supposed to be able to see the shading as I brush?
I apologize.............I did not realize that you had very little experience with Ps! I would have explained things better. I wrongly assumed that you knew about adj layers and layer masking.
