What's new
Photoshop Gurus Forum

Welcome to Photoshop Gurus forum. Register a free account today to become a member! It's completely free. Once signed in, you'll enjoy an ad-free experience and be able to participate on this site by adding your own topics and posts, as well as connect with other members through your own private inbox!

Help with restoring and old photo


John Lepri

New Member
Messages
3
Likes
0
Hi, I am just learning photoshop and was trying to restore an old photograph. I did a lot of the repair work like removing dust, dirt, cracks and stains but I am having a hard time with the color correction. Spent a bit of time trying to manipulate the RGB curves but cold not get it right. Guess that's were my lack of experience comes in. Any help, tips pointers would be appreciated.

Thanks in advance.

Horse-Corrected2.jpg
 
There are several problems that all make this a difficult retouching problem. Probably the most serious is that the photo has degraded in different ways in different areas. This is a common problem and is usually due to some areas being exposed to light, while other areas are shaded; some areas being in contact with different materials with different chemistry, different water content, different acidity, etc.

Such uneven aging makes a simple global "fix" impossible. To use what you tried as an example, the "curves" that would fix one are would likely be totally inappropriate for a different area of the print.

If there are just two different areas with a fairly sharp, simple boundary between them, one can fix each area separately and then stitch them together. Unfortunately, that's not the situation here. There are many different areas with different amounts of red, purple, yellow, contrast, maximum black density, etc. in each. The only real way to handle this is to treat it as if you were re-coloring a B&W print.

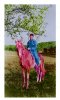
However, since there is some color information present, before I convert the image to B&W, I try to make some quick global adjustments to get the image as good as possible, realizing that the colors at this stage are never going to be very good. Below is the result of global adjustments that I applied in ACR. Compared to looking at the version you posted, it's even easier at this stage to see the different types of degradation in the print. For example, the front of the horse is a different color from his rear.

Horse-Corrected2-tjm01_acr01-ps02a-01_only_acr.jpg

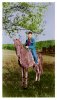
Once I had a better sense what it might look like in color and got the tonal values fairly good, I then converted it to B&W and did a really quick colorizing job. There have been many previous thread in this forum on good ways to re-color a B&W image - you should look them up. I have absolutely no doubt that other gurus here could do better than I did, but I just wanted to give you a quick idea of what could be done.

Horse-Corrected2-tjm01_acr01-ps02a-03.jpg

Cheers,

Tom M
 
No bad there Tommy, :mrgreen:..... To bad about the blur ( horses face) No way around that without getting really detailed and maybe even replace it with similar.
 
Wow - Tom appreciate your help. As you described that makes a lot of sense. I was thinking the different amount of fading could be an issue, because as you pointed out the rear of the horse seams to be the right shade of brown but the front was not. I will have to read up on how to do recoloring. Nice to see what an experienced user can do in a short amount of time.

Not a easy picture to start with for a beginner - but I have learned a lot even to get it to this point. Thanks again.
 
Yup, iDad, I didn't have the time or inclination to make this a serious effort, just give the OP a taste of what could be done and point him in a good direction.

T
 
Hi John - Glad to have helped. Often, even a crude demo is much better than an endless description of some procedure.

If you have any questions as you delve into this, don't hesitate to come back and ask.

All the best,

Tom
 
I took a shot too. Tom, always "lays me in the shade" but this bordered on a complete restoration of color. I used Black and White adjustment layers primarily. Other processes as required.View attachment 35929
 

Attachments

  • Horse Colorization.jpg
    Horse Colorization.jpg
    327.3 KB · Views: 32
Last edited:
I like Larry's grass, trees and sky much better than mine, but I like my rider better, so how 'bout a little collaboration!

Larry-ALB-Horse_Colorization-TJM_horse_rider-01.jpg

If anyone else wants to work on the horse, particularly, drop in a replacement for his blurry head and weird color coat, be my guest!
 
Tom,Reworked mine a bit. I still like the clothes on your rider Tom. I made another attempt on sharpening the motion blur in the horses head. I had used PS CC Smart Sharpen. I used Redfields Sharpion filter and applied it two or three times..decent . I attempted to match the horses rear color to the front end. I made a curves adjustment to that area selected to darken it up from the other one. (sorry, I didn't save it for comparison, I know I sinned..please forgive me) I did little to the riders face except a small amount of hue adjustment. The grass, trees and all was done with Black and White adjustment layers by selecting various areas and varying the color a bit for the shadows etc, This is hardly a single button adjustment.
 
Last edited:
Time, patience, a lot of layers, a lot of adjustments, a lot of masking and it could be done. I didn't put a huge amount of time into this but just to demonstrate. You need to take each area and treat it separately.
 

Attachments

  • Horse-Corrected2.jpg
    Horse-Corrected2.jpg
    74.5 KB · Views: 35
I like Larry's grass, trees and sky much better than mine, but I like my rider better, so how 'bout a little collaboration!View attachment 35930If anyone else wants to work on the horse, particularly, drop in a replacement for his blurry head and weird color coat, be my guest!
Here is it is with some sharpening. Used Smart Sharpen and Redfield Sharpion 3 times. The smoothed it out some with Nik's Define skin brush. Not perfect, but better than before I think.
 

Attachments

  • Toms Horse.jpg
    Toms Horse.jpg
    292.8 KB · Views: 25
Last edited:
Some amazing work! Tom and Larry – thank you so much for showing me what can be done with this photo. Reading through your post it sounds like I have a long learning curve ahead of me but it is nice to have an image as an example of what could be closer to a finished product. Larry – for some reason your last post didn’t show your reworked image. When I click on the “attachment 35933” I just get an Invalid attachment specified message.

Hawkeye – very nice image. Nice coloring and rework. Like the subtleness of the colors.
 
Fixed it John, sorry. For some reason it didn't make it to the post.
Some amazing work! Tom and Larry – thank you so much for showing me what can be done with this photo. Reading through your post it sounds like I have a long learning curve ahead of me but it is nice to have an image as an example of what could be closer to a finished product. Larry – for some reason your last post didn’t show your reworked image. When I click on the “attachment 35933” I just get an Invalid attachment specified message.

Hawkeye – very nice image. Nice coloring and rework. Like the subtleness of the colors.
 
Here is my recoloring try :)

First i made the image black and white to get rid of those colors. Then adjusted some brightness and contrast. After that you have to color each part separately, make new layer and set the mode to color:

color.jpg

Choose brush and below those tools on left, choose color you want to use. Then start painting over the image and it gives you transparent color. After you've painted one part, for example horse. Duplicate that layer and change mode Color -> Overlay. It highlights darks and lights and gives it contrast. Then reduce the opacity to make it look like you want. Do this for every part of your photo and after all that. Do some more adjustments like brightness and contrast, change curves etc (place these adjustment layers on top). Play with those adjustments to get an image you are happy with.

And for horse head i used Smart Sharpen (Filter -> Sharpen -> Smart Sharpen)

Hope this helps you :)


horserecolor.jpg

horsecolor.jpg
 
Last edited:

Back
Top