What's new
Photoshop Gurus Forum

Welcome to Photoshop Gurus forum. Register a free account today to become a member! It's completely free. Once signed in, you'll enjoy an ad-free experience and be able to participate on this site by adding your own topics and posts, as well as connect with other members through your own private inbox!

Help with professional looking pictures


Owens92

Member
Messages
5
Likes
1
I've recently started to sell some products online and its going OK for now. the company i use to sell my products has suggested i take professional photos of my items and have them clear and with a white background.

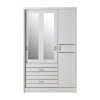
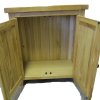
i tried already and thought i had done alright but would really like a second opinion the small cabinet is one i have taken the background off while the white wardrobe is done by someone else. I've also attached one i have tried to do while keeping the shadow on it. but i think i should just stick to clear white backgrounds as i can't get it to look right with the shadows. rsz_2d_side_open.jpgrsz_2d_side.jpgrsz_wayfair_proff.jpg
thanks in advance for the help.
 
What tool have you used? seems the countourn need more sharpness , in my opinion you need to use the pen tool in this case.

Cheers!
 
What tool have you used? seems the countourn need more sharpness , in my opinion you need to use the pen tool in this case.

Cheers!
i used the quick selection tool and inversed it to get rid of the background. I'm going for just plain white background now no shadows, any idea how to remove the rough/blurred edges from around the sides? or is that because i'm using the quick selection tool to delete the background?
 
i used the quick selection tool and inversed it to get rid of the background. I'm going for just plain white background now no shadows, any idea how to remove the rough/blurred edges from around the sides? or is that because i'm using the quick selection tool to delete the background?

While there are many more experienced people here to guide you, I'll give you the pointers that I've learned.
1) Do not delete or erase the background. Use a mask instead.

2) As was mentioned by Argos, the pen tool is better for this situation since you can create a selection with straight lines.

3) I'll admit to overusing the quick selection tool too. You may be able to get by with that if you then use Refine Edge and turn up Smooth and Contrast. Then select Create new layer with mask. I suspect the corners may suffer. You can then directly edit the mask by Alt clicking on the mask and then paint in more white with the brush where needed. Creating rectangles with the selection tool to fill or brush in will give you sharp edges, but all of this is more work than using the pen tool from the start. Still, learning to alter the mask directly is a useful skill.

4) It is easier if you start with clean background when you take the picture. It is cheap to buy a green screen or a neon green sheet or even a white sheet and take the photos with the item on the sheet. A long time ago, I assisted a photographer that shot inventory pictures for auctions and bankruptcies. Half of my job was putting the item on a sheet with rod through the top and then shaking the sheet while he shot the photo. I guess the exposure was long enough that the sheet turned into a smooth blurred white background. He never touched anything up.
 

Back
Top