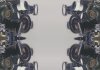
The fundamental problem is that there are small variations in brightness as you move vertically, up and down, just inside the "real" image on either side of the central rectangle. However you replace the central rectangle, this new fill layer has to match this variation. In addition, the shadows from the lenses nearest that edge are a bit truncated by the central rectangle and have to be smoothly blended / filled-in.
If it were me, if it was at all possible, I would take a step backwards and cut out the lenses again, except this time leaving more room for the shadows near the edge to remain complete. Doing so will save you a good bit of fiddly work later.
Whether you can re-do the initial cutout or not, the next step I took was to use the "single column marquee" tool and select a column of pixels just inside the real image. Copy this column of pixels to a new layer.
Magnify the image tremendously so you can see the selection and this tall, extremely thin column of pixels. Go to "edit / transform / scale". Handles will appear on your selection. Pull the center handles left or right (depending on which side you are working on) to stretch the single row of pixels all the way across to the other side of the image to obtain the basis of your new fill layer.
Because the shadows of a couple of the lenses extend to the very edge, there is a good chance you will have darker bands extending horizontally across where these lenses are. I took care of them using the patch tool, dragging the patch selection into regions of the fill that didn't have the shadows.
Next, make a careful selection of the central rectangle, allowing little indentations where the shadows of the lenses extend near the border.
Use this selection to mask the fill you just generated using the transform / scale operation.
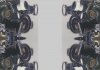
Merge the fill layer with the original layer, and fix up any minor discontinuities along the edges using the patch and clone stamp tools. To smooth the fill vertically, use a bit of vertical motion blur. I probably didn't use quite enough as I can still see some horizontal color banding.
If you do the above steps carefully, you should get something like the attached file.
HTH,
Tom M
PS - Because the forum software tremendously compresses full rez uploads, the in-line image will have all sorts of artifacts. To see the original, full-rez version without these artifacts, just click on the in-line thumbnails.

")