What's new
Photoshop Gurus Forum

Welcome to Photoshop Gurus forum. Register a free account today to become a member! It's completely free. Once signed in, you'll enjoy an ad-free experience and be able to participate on this site by adding your own topics and posts, as well as connect with other members through your own private inbox!

Help wanted: A true duotone.


tryblinking

New Member
Messages
3
Likes
0
Hi all, hope someone might be able to help with a conversion question.

I’ve been looking for years to find a way of converting an RGB image to the closest approximation possible using 2 inks. My aim is to create a colour image which doesn’t immediately feel like a duotone.

Say I have a snowy mountain RBG image, with mostly shades of oranges and blues. I know I can achieve a dark brown and a dark teal by overprinting with different halftone combinations of a rich orange a rich blue spot ink, so achieving contrast should be possible.

My question is, how do I convert from RGB to “Orange-Blue” not CMYK, and create two separations for these two inks, starting with my RGB image?

The process I'm looking for doesn't involve converting to greyscale first. Once a colour image is converted to greyscale, the possible colours reproducible with a duotone must lie on a line or curve from top left to bottom right of the colourspace, as all colours of the same luminence are converted to the same value of grey. If equal amounts of both inks are used for all tones then that line is of course just straight, but even varying the ratios for lighter and darker tones would still only bend the curve.

What I'm trying to find is a process which retains and includes the difference between the colours when creating a duotone.
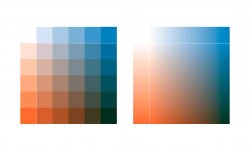
B92DDDAF-5276-41DD-862A-FD13E7E767AC.jpeg

To help explain what I mean, I've made an overprint example using spot process blue and orange 21C. I'm looking for a way to convert a colour image from RGB to the colourspace that results from overlaying just two halftone separations, of blue and orange. This should approximate a colour image using only the colourspace shown on the right.

I’ve asked around and people seem pretty stumped, even though it feels like this should be possible. I hope someone knows the answer.

Thanks for your time
M
 
Just curious- what is your final use for this file? Are you printing it - offset? Silkscreen? Or are you just preparing it for viewing on a screen?
I'm asking since how the image will be rendered has an impact on how you prepare the file.
- Jeff
 
HI @tryblinking
What you describe is not a duotone in photoshop from my understanding. A duotone will map each grayscale value to a specific color (and you choose that mapping)
What you are describing is two independent grayscale curves that control two different spot colors (which you choose) and the gray level determines how much ink is put down. Light values put down little ink and dark values of the grayscale puts down more ink.

So here is a two step process with the first step being the easiest.
You set up channels so you have two spot channel colors (e.g. blue and orange). Each being its own channel controls the amount of ink by the underlying grayscale or the channel.
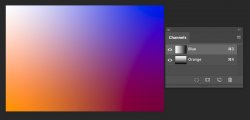
As for the example below, I made the underlying channel for orange being a vertical gradient from bottom to top as black to white. For the blue channel, I made the grayscale gradient horizontal from left to white as white to black. This creates the color pallet that you desire (or close) and you can adjust the spot color by double clicking on the channel and click on the color chip which goes to the color picker panel.

Two spot colors.jpg

Now the harder part of the effort.
You need to specify how to separate all values of RGB (three grayscales) own into two grayscales. As an example approach, I used Channel mixer The Red Channel a combination of Red and Green. I made the Green channel black (all components zeroed out), and the Blue Channel mostly just the blue component.

Then I deleted the Green channel (which made the Red and Blue channels spot colors), Doulbe clicked on the Red Channel Thumbnail where it lets me choose the spot color and made it orange (renamed the channel as Orange) and then double clicked on the Blue channel and made it Light Blue (and then renamed it Light Blue).

You can go in and change the spot color and tweek it in on the fly with the desired color for you image (which I did).

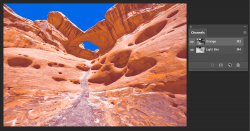
Below is the original image and the second image is the two spot color version.
Hope this helps
John Wheeler

canyonlands-1730077_1920.jpg


Two tone version:

Screen Shot 2021-01-09 at 10.41.55 PM.png
 
What you are describing is two independent grayscale curves that control two different spot colors (which you choose) and the gray level determines how much ink is put down. Light values put down little ink and dark values of the grayscale puts down more ink.

View attachment 118193


Two tone version:

View attachment 118195

Yes John, I think you’ve solved it. That’s pretty much what I was asking for. Perhaps a darker pair of inks could improve the contrast.

As for the output and use @JeffK, oddly I haven’t quite decided. It could be getting images printed as large canvasEd, or even producing two separations to paint from by hand at a large scale.

Living in Norway, this time of year never fails to both simplify the palette of the landscape to these combinations of blue and orange, and to reignite my interest in reproducing that effect digitally.

I’ll have a try using the process you’ve outlined @thebestcpu and see what it can produce. Thank you so much for taking the time and care to answer my question.

M
 
You're welcome @tryblinking and let me know if you need any more help or explanations of the process.
I've never tried to reduce an RGB image down to two spot colors so it was a fun learning project for me too.
John Wheeler
 
Now the harder part of the effort.
You need to specify how to separate all values of RGB (three grayscales) own into two grayscales. As an example approach, I used Channel mixer The Red Channel a combination of Red and Green. I made the Green channel black (all components zeroed out), and the Blue Channel mostly just the blue component.

John, could you elaborate on this process? I tried going straignt to simply deleting the green channel from the RGB and then picking the orange and blue for the new channels; it worked to an extent, but lacked contrast. I assume the first part I hopped over helps with that.
Once I have them both, where can I adjust the curves for these two channels?

Thanks.
M
 
Hi @tryblinking
Others may jump in to help as I am no expert on the spot color approach I mentioned. Yet here are the techniques that I know are available from using them myself in the example I provided

In the Channels panel, select the Spot Channel you want to modify. Here are some examples of how you can modify that particular spot channel

- Use Cmd+I (Cntl + I on PCs) to invert the channel (I used this initially since spot channels are subrtractive while RGB channels are additive

- You can use any of the Image > Adjustment tools such as Curves and adjust the channel to meet your needs

- You can paint on the channel with any shade of gray (or black or white with the brush set to a lower opacity) to change specific areas of the channel

- You can also set up selections to limit which areas are being adjusted.

There are probably more ways yet hope this helps you along

John Wheeler
 

Back
Top