Photoshop Gurus Forum
Welcome to Photoshop Gurus forum. Register a free account today to become a member! It's completely free. Once signed in, you'll enjoy an ad-free experience and be able to participate on this site by adding your own topics and posts, as well as connect with other members through your own private inbox!
You are using an out of date browser. It may not display this or other websites correctly.
You should upgrade or use an alternative browser.
You should upgrade or use an alternative browser.
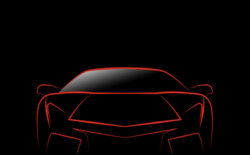
HELP outlining the front of a car?
- Thread starter jlabrie
- Start date
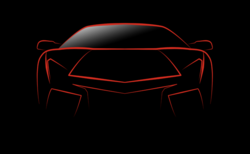
There are several ways you might go about this, depending on the specific image you have in mind. The obvious way to me is to use the Pen Tool to create the path of the specific edges you want to capture.
Another choice is to use filters. Below is an image of a car (left), to which I applied a Find Edges filter (middle) and then a threshold filter (right). Once you've got that far, you can mask-out any lines or details that you don't want to arrive at the stark outline similar to your example. Your last step would be to select the black and replace it with red or any other color.
Another choice is to use filters. Below is an image of a car (left), to which I applied a Find Edges filter (middle) and then a threshold filter (right). Once you've got that far, you can mask-out any lines or details that you don't want to arrive at the stark outline similar to your example. Your last step would be to select the black and replace it with red or any other color.
Attachments
- Messages
- 23,906
- Likes
- 13,636
I agree, the easiest way would be to use the Pen Tool set to path and stroke the path with the Brush Tool.
I would only do half the car.
Car.
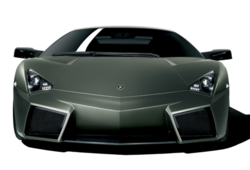
Car divided in half.
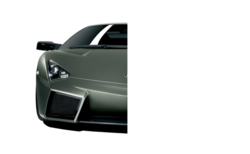
On new and separate layers, Pen Tool Paths stroked with the Brush Tool set to simulate pressure.

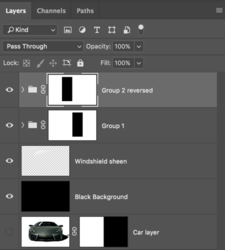
Car layer turned off, Pen stroke layers turned into group, trimmed excess strokes with layer mask added to the group, added a black background.
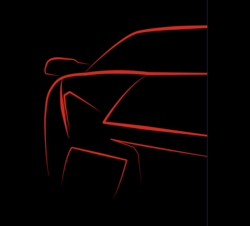
Duplicated the group, used Free Transform to turn it around and the Move Tool to move it into place.
Added sheen to windshield/screen using Pen Tool to make a selection and the Gradient Tool.
If you need more detailed instructions, please ask.
I would only do half the car.
Car.

Car divided in half.

On new and separate layers, Pen Tool Paths stroked with the Brush Tool set to simulate pressure.

Car layer turned off, Pen stroke layers turned into group, trimmed excess strokes with layer mask added to the group, added a black background.

Duplicated the group, used Free Transform to turn it around and the Move Tool to move it into place.
Added sheen to windshield/screen using Pen Tool to make a selection and the Gradient Tool.


If you need more detailed instructions, please ask.
thank everyone so much for helping me on this post i’ve read everyone’s and appreciate it all. this particular post is good for me it’s got the step by step instructions. But how do you get the curves on the outline of the car so sharp and precise when using the pen tool?I agree, the easiest way would be to use the Pen Tool set to path and stroke the path with the Brush Tool.
I would only do half the car.
Car.
View attachment 79581
Car divided in half.
View attachment 79582
On new and separate layers, Pen Tool Paths stroked with the Brush Tool set to simulate pressure.
View attachment 79583
Car layer turned off, Pen stroke layers turned into group, trimmed excess strokes with layer mask added to the group, added a black background.
View attachment 79584
Duplicated the group, used Free Transform to turn it around and the Move Tool to move it into place.
Added sheen to windshield/screen using Pen Tool to make a selection and the Gradient Tool.
View attachment 79585
View attachment 79586
If you need more detailed instructions, please ask.
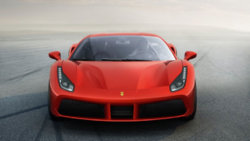
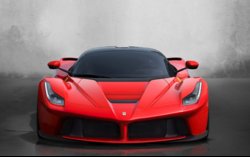
And yes i’m pretty new to photoshop aswell but hang in there with me if you can lol. the lamborghini outline was a perfect demonstration pic but i’m trying to do a car with more curves like this ferrari, anybody got a quick simple tutorial?
Attachments
- Messages
- 23,906
- Likes
- 13,636
The Pen Tool will create any curved line you desire. Are you familiar with the Pen Tool? If not, here are some tutorials:But how do you get the curves on the outline of the car so sharp and precise when using the pen tool?
Video Tutorials on the Pen Tool:
Written Tutorials on the Pen Tool:
http://psd.fanextra.com/tutorials/become-a-master-of-the-pen-tool-in-under-30-minutes/
http://www.photoshopessentials.com/basics/custom-shapes/
http://design.tutsplus.com/tutorials/photoshops-pen-tool-the-comprehensive-guide--psd-718
http://helpx.adobe.com/en/photoshop/using/drawing-pen-tools.html
- Messages
- 23,906
- Likes
- 13,636
For me, the same technique I used above would apply to the Ferrari as well. Which lines you choose will be the important part more so than the technique itself. Once you've mastered the Pen Tool, you will see just how easy this can be.And yes i’m pretty new to photoshop aswell but hang in there with me if you can lol. the lamborghini outline was a perfect demonstration pic but i’m trying to do a car with more curves like this ferrari, anybody got a quick simple tutorial?
yeah i’m just having trouble using the pen tool i cut the image in half by cropping it and i try using the pen tool to line it up straight but i just can’t seem to do the curves, which points to grab in order to make it curve the right way just confuses me, and my other issue is how do you get the pen tool line to that thick red or blue colored line and make them so sharp like that? i’m trying to do it on this ferrari. thanks guys!For me, the same technique I used above would apply to the Ferrari as well. Which lines you choose will be the important part more so than the technique itself. Once you've mastered the Pen Tool, you will see just how easy this can be.
Attachments
update: this is making me mad i don’t know how you guys make it so simple outlining the lambo like that i can’t get it right, i have the background as the car, then i have a new layer using the pen tool but it’s so hard by clicking and the freehand pen tool doesn’t get straight lines, and i don’t understand using the control key to change directions or whatever... is there any way i can use the magic wand tool because that seems to outline it just fine although i don’t know what i would do after that again i’m trying to do it on this rari
Attachments
Last edited by a moderator:
- Messages
- 23,906
- Likes
- 13,636
Ok, there's no need to be frustrated. I anticipated that you would have some trouble learning the Pen Tool since almost everyone does. I can assure you that it will be worth the effort to learn. If you planning on making a similar effect as the one you show in your first post, then it can only be made using the Pen Tool. The magic Wand Tool will not work. You need to make a commitment to learning how to use the Pen Tool or move on to a different project that's within your current Ps skill set.
Remember, if you need further explanation on any of the steps, just ask.
OK, let's look at how I cut the car in half.
Open your car image.
Duplicate by pressing Cmd/Cntrl + J
Turn off the orginal car layer (background).
Select your Move Tool.
Go to VIEW > NEW GUIDE > select VERTICAL and position 50%
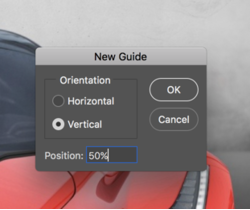
This will add a new vertical guide.
If the guide is not exactly in the center of the car, you can move the car or you can move the guide.
Since it won't matter much, just move the guide.
With the Move Tool, mouseover the guide, when the cursor changes, click and drag the guide to where you want it.
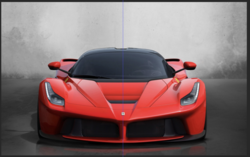
Now select the Rectangular Marquis Tool.
Go back to VIEW > and click on SNAP. Go back to VIEW and make sure guides is selected under SNAP TO.
Make a selection of either side of the car you wish to keep.
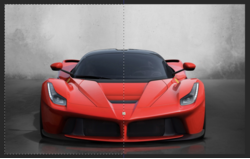
At the bottom of the Layers Panel, click on the "add layer mask" icon.
Should look like this now.........

This is what your layers panel should look like.
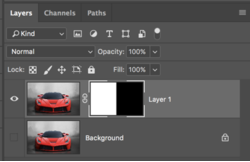
If you don't want to look at the transparency grid, you can add a layer between the car layers and fill it with the color of choice.
Next you would add a new layer at the top of the layers, this will be the first layer you will use as you begin to create the red lines with the Pen Tool.
Now all you need to do is to learn the Pen Tool. I know it seems difficult but it's actually really simple once it makes sense to you.
Remember, if you need further explanation on any of the steps, just ask.
OK, let's look at how I cut the car in half.
Open your car image.
Duplicate by pressing Cmd/Cntrl + J
Turn off the orginal car layer (background).
Select your Move Tool.
Go to VIEW > NEW GUIDE > select VERTICAL and position 50%

This will add a new vertical guide.
If the guide is not exactly in the center of the car, you can move the car or you can move the guide.
Since it won't matter much, just move the guide.
With the Move Tool, mouseover the guide, when the cursor changes, click and drag the guide to where you want it.

Now select the Rectangular Marquis Tool.
Go back to VIEW > and click on SNAP. Go back to VIEW and make sure guides is selected under SNAP TO.
Make a selection of either side of the car you wish to keep.

At the bottom of the Layers Panel, click on the "add layer mask" icon.
Should look like this now.........

This is what your layers panel should look like.

If you don't want to look at the transparency grid, you can add a layer between the car layers and fill it with the color of choice.
Next you would add a new layer at the top of the layers, this will be the first layer you will use as you begin to create the red lines with the Pen Tool.
Now all you need to do is to learn the Pen Tool. I know it seems difficult but it's actually really simple once it makes sense to you.
the detail and the step by steps really do help me understand everything a little more,thank you for putting so much work into these little tutorials instead of a 20 minute youtube video. yes overtime i will get better i’ll get the hang of it but for now i just have to keep practicingOk, there's no need to be frustrated. I anticipated that you would have some trouble learning the Pen Tool since almost everyone does. I can assure you that it will be worth the effort to learn. If you planning on making a similar effect as the one you show in your first post, then it can only be made using the Pen Tool. The magic Wand Tool will not work. You need to make a commitment to learning how to use the Pen Tool or move on to a different project that's within your current Ps skill set.
Remember, if you need further explanation on any of the steps, just ask.
OK, let's look at how I cut the car in half.
Open your car image.
Duplicate by pressing Cmd/Cntrl + J
Turn off the orginal car layer (background).
Select your Move Tool.
Go to VIEW > NEW GUIDE > select VERTICAL and position 50%
View attachment 79661
This will add a new vertical guide.
If the guide is not exactly in the center of the car, you can move the car or you can move the guide.
Since it won't matter much, just move the guide.
With the Move Tool, mouseover the guide, when the cursor changes, click and drag the guide to where you want it.
View attachment 79662
Now select the Rectangular Marquis Tool.
Go back to VIEW > and click on SNAP. Go back to VIEW and make sure guides is selected under SNAP TO.
Make a selection of either side of the car you wish to keep.
View attachment 79663
At the bottom of the Layers Panel, click on the "add layer mask" icon.
Should look like this now.........
View attachment 79665
This is what your layers panel should look like.
View attachment 79666
If you don't want to look at the transparency grid, you can add a layer between the car layers and fill it with the color of choice.
Next you would add a new layer at the top of the layers, this will be the first layer you will use as you begin to create the red lines with the Pen Tool.
Now all you need to do is to learn the Pen Tool. I know it seems difficult but it's actually really simple once it makes sense to you.
- Messages
- 23,906
- Likes
- 13,636
fredfish
Guru
- Messages
- 887
- Likes
- 1,247
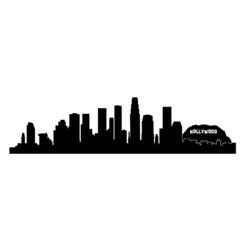
how do i create the red line with the pen tool? i still can’t get the curves on the pen tool but i am trying to make the outline of the los angeles skyline similar to how you did it with the car
I completely understand your frustration with the pen tool - most people find it difficult to begin with, it is worth hanging on in there.
If you have PS CC18 try using the new curvature pen tool, it is a lot easier.
Cheers
John
so how do i make 2 pictures as layers in the same window so i can put them together? For example the photo of the outlined city in the background (top) with the photo of the lambo in the front (bottom)? and thank you for the help
Attachments
- Messages
- 23,906
- Likes
- 13,636
Just so that I'm not confused, you asked for help showing you how to do these techniques for yourself, but you have not asked any further questions other than how you can combine the two sample images that I created for demonstration purposes. Surely your not planning on using these low quality screenshots for any kind of logo for you business like we discussed in a Private Conversation? If this is your plan, you need to contact me in a Private Conversation (PC) before you do.so how do i make 2 pictures as layers in the same window so i can put them together? For example the photo of the outlined city in the background (top) with the photo of the lambo in the front (bottom)? and thank you for the help
well no not exactly, i like the picture you created for the outline of Los Angeles, but im still going to outline a ferrari and put those two together if i can do that. I just dont know how to group them togetherJust so that I'm not confused, you asked for help showing you how to do these techniques for yourself, but you have not asked any further questions other than how you can combine the two sample images that I created for demonstration purposes. Surely your not planning on using these low quality screenshots for any kind of logo for you business like we discussed in a Private Conversation? If this is your plan, you need to contact me in a Private Conversation (PC) before you do.

