What's new
Photoshop Gurus Forum

Welcome to Photoshop Gurus forum. Register a free account today to become a member! It's completely free. Once signed in, you'll enjoy an ad-free experience and be able to participate on this site by adding your own topics and posts, as well as connect with other members through your own private inbox!

Help needed with cropping an image to fit in a frame cutout.


derekc

New Member
Messages
4
Likes
0
I am trying to print some family photos onto 15 x 10 cm paper to fit in a multi cutout frame. The frame cutouts (which are labelled as 15 x 10) are 13.7 x 8.8 cm, to allow the paper to sit behind the cutout without falling out. What I want to do is to set the printer to 15 x 10 paper, but guarantee that the subject is showing completely in the cutout. I realise that I need to leave some space around the subject to allow for this, but is there any way of superimposing a ruler on the image to check that the subject will be completely showing, without having it smaller than necessary? I am using the latest version of Photoshop.

Derek
 
There are several ways to do this, such as activating the Ruler and adding Guides at precisely measured places. But Photoshop also has a grid that can be superimposed onto your image to aid in placement, which is very easy to do and I think could work well here.
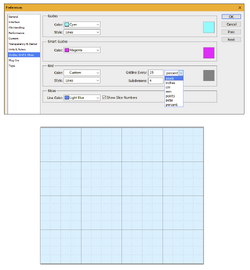
  • Go to View>Show>Grid. This gives you a superimposed grid, like below.
  • Before you do that, go to Edit>Preferences>Guides, Grid & Slices. This setting allows you to calibrate the grid in inches, cm, etc. and to set intermediate subdivisions. You can tailor the grid to your specific project.
  • Here's what the settings look like.
  • Separately, I'm also attaching a tutorial down below on how to use guides.

1733156580261.png


There are several ways to do this, such as activating the Ruler and adding Guides at precisely measured places. But Photoshop also has a grid that can be superimposed onto your image to aid in placement, which is very easy to do and I think could work well here.
  • Go to View>Show>Grid. This gives you a superimposed grid, like below.
  • Before you do that, go to Edit>Preferences>Guides, Grid & Slices. This setting allows you to calibrate the grid in inches, cm, etc. and to set intermediate subdivisions. You can tailor the grid to your specific project.
  • Here's what the settings look like.
  • Separately, I'm also attaching a tutorial down below on how to use guides.

View attachment 148362


Thanks for quick and helpful reply. I will try this later!
Derek
 
H @derekc
Here is another way of using guides.

The total height of your paper is 15cm, yet the cutout is 13.7 cm. That means you need an edge of .65 cm from top and bottom
The total width of your paper is 10 cm, yet the cutout is 8.8cm, so you need an edge of .6 cm on the left and right

With rulers turned on and set to cm, zoom in to the upper left corner of your image and drag from the ruler, and a guide will be pulled out, and it will show the exact positioning in cm near your cursor.

Pull from the top ruler to make the guides at the top and bottom.
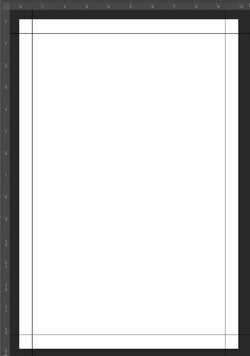
You would get an overall image with guides that look similar to the following image.

Screenshot 2024-12-02 at 9.32.17 AM.jpg

Place your image on a layer above the white background, and adjust your image size to cover at least the area of the guides.

Note that another way to give you flexibility is to select the white area outside your picture and use the Edit > Generative Fill command to fill in those areas so the positioning of the image so the positioning of your image is much more flexible.

John Wheeler
 
As Rich stated,there are several ways to do this!

Here's another way. Building a template. This is similar to the guide and grid, just a different take on the technique.

We know that our image is 15cm x 10 cm. So create a document to that size.
The document serves as the Outer boundary
Screen Shot 2024-12-02 at 10.54.18 AM.png

We know that our border is 13.7cm x 8.8cm
Use the rectangle Tool to create an Inner boundary.
Center by hitting Cmd/Cntrl +A, use the Move Tool and the Horiz & Vert center alignment tools in the tools option bar.
Screen Shot 2024-12-02 at 10.58.25 AM.png

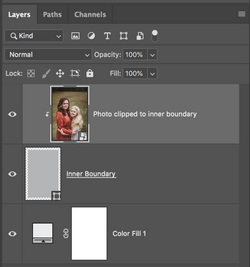
We want our image to be within the border constrained to the inner boundary.
All we need to do is to drag and drop our images. This method will open the image as a smart object. Or use FILE > PLACE EMBEDDED.
Then clip the image to the inner boundary layer via clipping mask.
You then use Free Transform on the image layer to adjust the image to fit within the inner boundary. Since this image was opened as a Smart Object,
you can always come back and make changes to the images size or position with ease.
Screen Shot 2024-12-02 at 11.03.36 AM.png

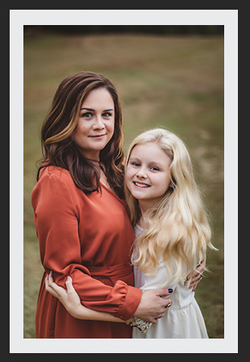
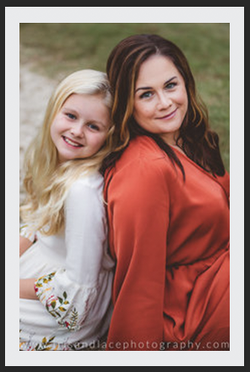
When satisfied with the fit, un-clip the image layer.
Save and print.
Screen Shot 2024-12-02 at 11.06.58 AM.png

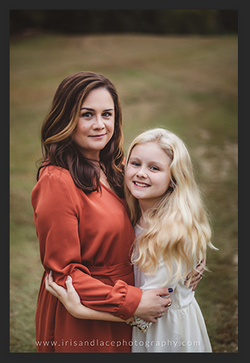
Or leave it clipped and save with the border.
Screen Shot 2024-12-02 at 11.09.01 AM.png

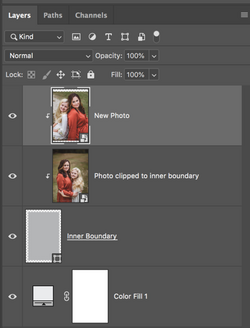
Rinse and repeat by turning off the image layer (optional), and then dragging and dropping a new image above the the inner boundary layer (or the old image layer) and clipping.
Screen Shot 2024-12-02 at 11.51.59 AM.png
Note that the new (Clipped) photo will show in the document when it's the uppermost layer.
Screen Shot 2024-12-02 at 11.52.42 AM.png
 
H @derekc
Here is another way of using guides.

The total height of your paper is 15cm, yet the cutout is 13.7 cm. That means you need an edge of .65 cm from top and bottom
The total width of your paper is 10 cm, yet the cutout is 8.8cm, so you need an edge of .6 cm on the left and right

With rulers turned on and set to cm, zoom in to the upper left corner of your image and drag from the ruler, and a guide will be pulled out, and it will show the exact positioning in cm near your cursor.

Pull from the top ruler to make the guides at the top and bottom.
You would get an overall image with guides that look similar to the following image.

View attachment 148363

Place your image on a layer above the white background, and adjust your image size to cover at least the area of the guides.

Note that another way to give you flexibility is to select the white area outside your picture and use the Edit > Generative Fill command to fill in those areas so the positioning of the image so the positioning of your image is much more flexible.

John Wheeler
Thanks for taking the trouble to reply!!
 
As Rich stated,there are several ways to do this!

Hears another way. Building a template.

We know that our image is 15cm x 10 cm. So create a document to that size.
The document serves as the Outer boundary
View attachment 148364

We know that our border is 13.7cm x 8.8cm
Use the rectangle Tool to create an Inner boundary.
Center by hitting Cmd/Cntrl +A, use the Move Tool and the Horiz & Vert center alignment tools in the tools option bar.
View attachment 148365

We want our image to be within the border constrained to the inner boundary.
All we need to do is to drag and drop our images. This method will open the image as a smart object. Or use FILE > PLACE EMBEDDED.
Then clip the image to the inner boundary layer via clipping mask.
You then use Free Transform on the image layer to adjust the image to fit within the inner boundary.
View attachment 148366

When satisfied with the fit, un-clip the image layer.
Save and print.
View attachment 148367

Or leave it clipped and save with the border.
View attachment 148368

Rinse and repeat by turning off the image layer (optional), and then dragging and dropping a new image above the the inner boundary layer (or the old image layer) and clipping.
View attachment 148369
Note that the new (Clipped) photo will show in the document when it's the uppermost layer.
View attachment 148370
Thanks very much for reply.
 

Back
Top