What's new
Photoshop Gurus Forum

Welcome to Photoshop Gurus forum. Register a free account today to become a member! It's completely free. Once signed in, you'll enjoy an ad-free experience and be able to participate on this site by adding your own topics and posts, as well as connect with other members through your own private inbox!

Help creating this effect


sukipop

New Member
Messages
4
Likes
0
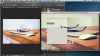
Hi all,Could anyone give me some tips on how to create this washed out effect, or perhaps point me to a tutorial? I've included the original image and the end result/effect I'm after. I'd like to be able to emulate this effect with other images.Thanks for your help.
 

Attachments

  • Screen Shot 2014-04-01 at 3.35.06 PM.png
    Screen Shot 2014-04-01 at 3.35.06 PM.png
    210.2 KB · Views: 31
  • OPS.jpg
    OPS.jpg
    97.5 KB · Views: 32
Last edited by a moderator:
Removed your advert in second image - leaving up as it could help others, in answer to the question though just apply a new layer filled with white then drop opacity.
 
Thank you for responding Paul. Adding a white layer and dropping the opacity does make it looked washed out, it also looses the richness/depth in the orginal image – i.e. the wood gets washed out in a way that it doesn't in the original image. So I'm hoping there's another way to reproduce this effect without losing that depth.

I should add that it wasn't an ad, as you suggested. I had taken a screen shot of an image I saw on a homepage. I'm not affiliated in any way with that page.
 
Screen Shot 2014-04-02 at 9.43.42 AM.pngI'm posting another screen shot which does not make mention to the site but shows the effect im after. When you compare it to the white layer with lowered opacity, I'm hoping you can see the difference...as subtle as it may be.
 
Open the original.
Duplicate the original and set it's layer mode to overlay.
(You can also try the soft light mode as well when done to see which looks better.)
Add a Gaussian blur of about 8.0
Lower the opacity.
Add a Curves Adjustment layer to reduce brightness. Increase the red slightly.

Screen Shot 2014-04-01 at 10.32.40 PM.png
 
Thanks IamSam. I followed your advice and got closer to the desired effect. I think the one thing that's missing is the sepia/yellow wash over the image. I've attached a screen shot of my attempt following the above suggestions and the original which illustrates this wash I'm trying to describe (blocked out any reference to the webpage it was taken from).
 

Attachments

  • Screen Shot 2014-04-02 at 7.32.19 PM.png
    Screen Shot 2014-04-02 at 7.32.19 PM.png
    621.4 KB · Views: 0
Yeah, you would need to play with a few adjustments, I was just demonstrating a basic technique.

Here I've added H&S and decreased both. I also added a Photo Filter adjustment layer and added the hue.

Closer, but still needs some adjusting.
Screen Shot 2014-04-02 at 7.23.00 AM.png

One thing I would add, I don't know why I didn't earlier, is that on the second or duplicated layer, I would convert that to a smart object. This way you could change the G blur.
 

Back
Top