What's new
Photoshop Gurus Forum

Welcome to Photoshop Gurus forum. Register a free account today to become a member! It's completely free. Once signed in, you'll enjoy an ad-free experience and be able to participate on this site by adding your own topics and posts, as well as connect with other members through your own private inbox!

Help combining two simple images


Larvic390

Member
Messages
6
Likes
0
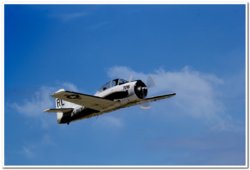
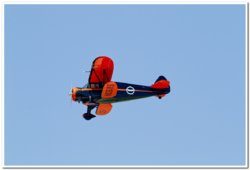
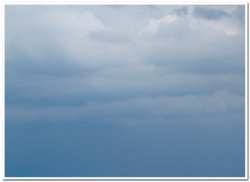
I am using PSCs5 and I am trying to combine an image of an airplane with a blue sky background with an image of clouds. So far I have been unsuccessful even though I have watched many tutorials and tried the “Dummies” approach.
I would be willing to take an online course to achieve my goal,but I would prefer not spending time on extraneous matter. Any suggestions as to an online recommendation or where I can find a clear directive?
 
Last edited:
Hello and welcome to PSG.

Please post your results so we can see were you may be going wrong. Thanks.
 
Here are the two files I am trying to combine. The third file is the results. When I make the cloud opacity lower the clouds “wash out”. The opposite occurs with the airplane.

I’ve tried the brush tool to lighten the airplane but the edges become highlighted and the plane appears discolored.

I’m sure I am missing a simple step.

5641E0A7-B95B-455B-81CD-89D0E942C734.jpegBA83E44F-A536-4D17-975C-6F89823E34E5.jpeg647E8A8D-9D23-4286-968F-ACC2530BC5DA.jpeg
 
Put the plane picture first.
Drag the sky picture to the plane tab holding shift and apply an 'overlay' blend mode to it. But now you see the clouds on the plane so add a layer mask to the sky picture and brush away the plane without touching the prop parts sticking out of the contour..
(You can make the plane layer active and make a selection of the plane without the prop parts sticking out of the contour, inverse the selection, make the sky layer active and add a layer mask.)
Now the plane it visible as in the sky...


Untitled-1.jpg
 
My goal was to have the clouds behind the airplane.

Thank you for your help, Eggy. The layer mask step slowed me down because I was not sure which mask type to use. I used “reveal all.” I also had to adjust the brush setting.

I also lost the clouds’ brightness compared to the image you provided. Nevertheless, I really appreciate your taking time to help. I have attached my final effort.
 

Attachments

  • 44485F9C-1E67-4E5B-B679-404B96AF152A.jpeg
    44485F9C-1E67-4E5B-B679-404B96AF152A.jpeg
    484.9 KB · Views: 4
You can look at Eggys example and see that his layer mask was white in color, this indicates a reveal all layer mask.

Double check your cloud layers blending mode because your clouds should be as bright a Eggy's example. Make sure it's set to overlay. Make sure the cloud layer is on top of the plane layer.

I just tried myself and it seems to work fine for me..
Screen Shot 2018-04-03 at 9.43.29 AM.png

Can you post a screen shot of your layers panel?
 
You can look at Eggys example and see that his layer mask was white in color, this indicates a reveal all layer mask.

Double check your cloud layers blending mode because your clouds should be as bright a Eggy's example. Make sure it's set to overlay. Make sure the cloud layer is on top of the plane layer.

I just tried myself and it seems to work fine for me..
View attachment 85970

Can you post a screen shot of your layers panel?
 
I thought I was on target. Cloud layer on top, overlay mode,layer mask in white, but results not the same. My white layer mask did not have an airplane image in it.

I used the “place” function to move the sky image. My second attempt lightened a dark sky while the sky in the first attempt was just the opposite.

I am missing something.
 

Attachments

  • BDC99C39-89F3-4382-902E-F63B32F75B0B.jpeg
    BDC99C39-89F3-4382-902E-F63B32F75B0B.jpeg
    415 KB · Views: 1
  • C59E64B2-295A-4D91-B1BE-F4172C037E00.jpeg
    C59E64B2-295A-4D91-B1BE-F4172C037E00.jpeg
    342.2 KB · Views: 1
  • D35533DB-6E49-4E11-BA71-183334C14B0D.jpeg
    D35533DB-6E49-4E11-BA71-183334C14B0D.jpeg
    391 KB · Views: 1
Hey,

The same technique used for one set of images, will not always work for another set. In this case, just a regular layer mask and a Curves adjustment layer clipped to the plane image would work better. The Curves adjustment compensates for the lighting difference between the plane and it's new (and darker) background.
I used a white layer mask and the Brush Tool Set to black to mask out the original sky from the planes image.
The main problem you will experience is in blending the propellers...........this will be the challenge, which is why it's best to use a blending mode if at all possible.
Screen Shot 2018-04-06 at 8.09.48 AM.png
Screen Shot 2018-04-06 at 8.10.52 AM.png

Here are some good layer mask tutorials

Photoshop:Understanding Layer Masks

Masks: Editable Selection

Layer Masks

How to use layer masks in Phtoshop

Blending photos together: Photoshop layer mask tutorial
 
Thank you for your help. I’ll give it another try, and I’ll certainly look at your suggestion edition.

One last question: how does one know which technique to use?
 
how does one know which technique to use?
Composites containing two similarly lit photos benefit from the blending technique.
Composites containing two differently lit photos require layer masks and adjustment layers to compensate for the lighting differences.
 

Back
Top