What's new
Photoshop Gurus Forum

Welcome to Photoshop Gurus forum. Register a free account today to become a member! It's completely free. Once signed in, you'll enjoy an ad-free experience and be able to participate on this site by adding your own topics and posts, as well as connect with other members through your own private inbox!

Help, can't fill in empty area.


xtal_01

New Member
Messages
3
Likes
3
OK .... I am still new at Photoshop so let me try to explain the problem I have been working on all day.

I have a drawing with a transparent background (it is going to be used for a heat transfer on a Tee Shirt).

I have people sketched on it ... each color is on a different layer.

So, now I have blank areas like peoples faces.

The hair is white and on one layer ... the outline of the face is black and on another layer.

I thought I could just take my magic wand ... click in the open area ... then fill that area ....

NO!

I understand what is going on ... if i take just the paint can and click on the face, all the background turns that color .. that is because I don't have a shape (or outline) defined.

I could just draw the face .. but lots of drawing and tracing inside the outline of the hair and face .. plus I need go to around the mouth and eyes ...

I can't pick the outline as it is on two or three layers.

So, how can I define the inside transparent area and fill it?

I hope this makes sense ....

I did find I can cheat ... turn it into a png and use the fill but there must be a "right" way of doing this.

I have included a snip of the picture ... just trying to get a flesh color onto the face area (and not the background).

Thanks .... Mike
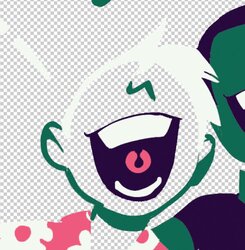
face.JPG
 
Here's one way:
  • This will work if all of your color layers have a Normal blend mode and 100% opacity.
  • Create a new layer below all other layers.
  • Using a hard brush, paint your fleshtone color into the interior of the face. You don't need to paint very carefully because, if you stray over the line, the colored layers above will block your "mistakes".

Here's a more precise way:
  • Create a new, empty layer for your fleshtones. It doesn't matter where this layer sits in the layer stack.
  • Set your foreground color to the desired fleshtone.
  • Hopefully, you know how to create a selection from any of your colored layers by clicking with the mouse. To do this, you hold down the Ctrl key and click the mouse onto the little thumbnail icon in the layers palette.
  • Do this now for the green layer. That will make a selection of the green.
  • While that green selection is still active, hold down Shift+Ctrl and click on the icon for the white layer (hair). You've now selected both green and white simultaneously.
  • Do the same thing and add a selection for the black area in the middle of the face.
  • You've now simultaneously selected the green, white and black. Go to Select>Inverse to invert the selection. With the inverted selection active, you can paint your fleshtone in a new layer with a hard brush.
  • (Note: before I edited this, I mistakenly said you could paint the fleshtone using Edit>Fill>Foreground Color. That will work, but it will also paint fleshtone into the background outside of the face, which you don't want.)
 
Last edited:
Here's one way:
  • This will work if all of your color layers have a Normal blend mode and 100% opacity.
  • Create a new layer below all other layers.
  • Using a hard brush, paint your fleshtone color into the interior of the face. You don't need to paint very carefully because, if you stray over the line, the colored layers above will block your "mistakes".

Here's a more precise way:
  • Create a new, empty layer for your fleshtones. It doesn't matter where this layer sits in the layer stack.
  • Set your foreground color to the desired fleshtone.
  • Hopefully, you know how to create a selection from any of your colored layers by clicking with the mouse. To do this, you hold down the Ctrl key and click the mouse onto the little thumbnail icon in the layers palette.
  • Do this now for the green layer. That will make a selection of the green.
  • While that green selection is still active, hold down Shift+Ctrl and click on the icon for the white layer (hair). You've now selected both green and white simultaneously.
  • Do the same thing and add a selection for the black area in the middle of the face.
  • You've now simultaneously selected the green, white and black. Go to Select>Inverse to invert the selection. With the inverted selection active, you can paint your fleshtone in a new layer with a hard brush.
  • (Note: before I edited this, I mistakenly said you could paint the fleshtone using Edit>Fill>Foreground Color. That will work, but it will also paint fleshtone into the background outside of the face, which you don't want.)
AWESOME!!!!!!!!!!!!!!!

After watching a bunch of videos, I just figured out the first method you explained ... worked great! I even realized that the guy who started this drawing (a loooong story ... trying to finish up work someone else started) .... did this ... I can now see how colors extend under other layers.

I will have to try the second method. Your explanation is great ... I was trying to figure out how to select more than one item.

Thanks again !!!!!!!

Mike
 
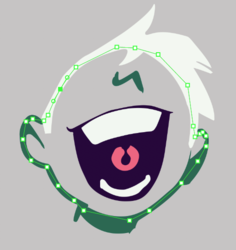
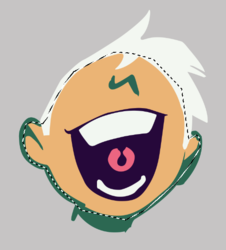
Rather than use the Brush Tool, you can also use the Polygonal Lasso Tool or the Pen Tool to create a path/selection an fill with flesh color.
I'm throwing this in because for me, it's much faster, easier and accurate to use this technique.

Create a new layer below the other layers.

Path (Created here with the Pen Tool)
Screen Shot 2022-05-16 at 11.23.35 PM.png
Path converted to selection or the selection of the Polygonal Lasso Tool
Screen Shot 2022-05-16 at 11.23.45 PM.png
Filled.
Screen Shot 2022-05-16 at 11.24.02 PM.png
Deselect the selection.
Screen Shot 2022-05-16 at 11.24.17 PM.png
 
Rather than use the Brush Tool, you can also use the Polygonal Lasso Tool or the Pen Tool to create a path/selection an fill with flesh color.
I'm throwing this in because for me, it's much faster, easier and accurate to use this technique.

Create a new layer below the other layers.

Path (Created here with the Pen Tool)
View attachment 129629
Path converted to selection or the selection of the Polygonal Lasso Tool
View attachment 129630
Filled.
View attachment 129631
Deselect the selection.
View attachment 129632
Awesome !!!!!!!!!! I will give this a try ... Thanks so much !!!!
 

Back
Top