What's new
Photoshop Gurus Forum

Welcome to Photoshop Gurus forum. Register a free account today to become a member! It's completely free. Once signed in, you'll enjoy an ad-free experience and be able to participate on this site by adding your own topics and posts, as well as connect with other members through your own private inbox!

Gradients test


SharmaN

Active Member
Messages
30
Likes
3
Hi, Gurus as part of a learning process I am trying to recreate a header image I come across. I am sure the original images they used gradients tool. So I tried to recreate the same one. I created a new layer above the image and I clip masked it and then converted it to a smart object as I want to work non-destructive manner. Then I using color picker selected the colors of the original image and used the gradient from left to right. aI think I can able to achieve the one am looking for. But I wish I would like to learn it in a proper way from the gurus. I am attaching all the images and also the layered PSD am working on. I am using the latest build of Photoshop 2020. Thank you

PS: BTW How to attach the PSD files? It's saying " The uploaded file is too large. "

These are the examples am trying to achieve that Gradient effect on the image

ss1.jpg

ss2.jpg

ss3.jpg

This is Photoshop screenshot.Since its not allowing me to add PSD
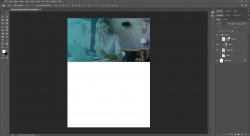
ps_environment.jpg
 
Last edited:
No problem. You have the right idea, just the wrong technique.

We're going to color the whole image and then subtract.

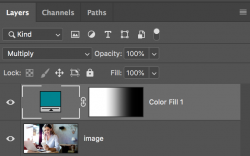
Just use a a Solid Color Fill Adjustment layer and apply a gradient (Foreground to Transparent preset), using black as your foreground color, to the adjustment layers-layers mask.
Set the Solid Color Fill Adj. layers blending mode to "Multiply" or just lower opacity if needed.
Screen Shot 2020-08-07 at 6.45.09 PM.png
Screen Shot 2020-08-07 at 6.45.56 PM.png

Note: In your PSD, there's really no need to make the gradient layer a smart object. Changing the gradient in the PSB file would be the same as changing it in the PSD file. You're not gaining anything and you have to bounce back and forth between the documents (after saves) to see the changes...............unless your viewing side by side.
 
No problem. You have the right idea, just the wrong technique.

We're going to color the whole image and then subtract.

Just use a a Solid Color Fill Adjustment layer and apply a gradient (Foreground to Transparent preset), using black as your foreground color, to the adjustment layers-layers mask.
Set the Solid Color Fill Adj. layers blending mode to "Multiply" or just lower opacity if needed.
View attachment 114454
View attachment 114455

Note: In your PSD, there's really no need to make the gradient layer a smart object. Changing the gradient in the PSB file would be the same as changing it in the PSD file. You're not gaining anything and you have to bounce back and forth between the documents (after saves) to see the changes...............unless your viewing side by side.

Thank you
 
A simple gradient will also do the job...
Yes it will. But what I forgot to mention is that by using the Color fill adjustment layer is that you can change the color of the gradient after you have set the gradient. This is easier than setting a new gradient every time..................some gradients are hard to set perfectly.

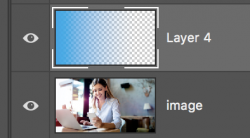
Edit: I was assuming that we were referring to a gradient layer like this.....
Screen Shot 2020-08-08 at 9.25.29 AM.png

These colors were edited in a matter of seconds and the gradient is exactly the same.
Screen Shot 2020-08-08 at 7.53.01 AM.png
Screen Shot 2020-08-08 at 7.53.13 AM.png
Screen Shot 2020-08-08 at 7.53.47 AM.png
 
When I posted above, I had not seen illusions PSD. He used a Gradient Fill Adjustment layer in which the color is also edited without changing a set gradient.

The Color Fill Adjustment layer requires a double click on the layer icon which opens the Color Picker, adjust the color in the color picker, close. Done.

First option: The Gradient Fill Adjustment layer requires that you set your foreground color by clicking foreground color which opens the Color Picker, set your color then close. Then double click the layer icon which opens the Gradient Fill window, click to open the gradient editor, click the preset in the gradient editor, close the gradient editor, close the Gradient Fill window. Done
Second option: The Gradient Fill Adjustment layer requires that you double click the layer icon which opens the Gradient Fill window, click to open the gradient editor, click the color stop, click the "Color" window, which opens the Color Picker, set your color then close, close the gradient editor, close the Gradient Fill window. Done.

One only takes slightly longer than the other.

For me, I would only use the Gradient Fill Adjustment layer if I were dealing with a multi-colored gradient. It's much better in that situation. Both techniques work perfectly if your plan is to set a gradient of a certain color and leave it alone. I think in terms of my experience with clients.............they always want to see changes and options.

Just something else to consider.
So both ways it's non-destructive. Great explanation.Thanks a ton
 

Back
Top