What's new
Photoshop Gurus Forum

Welcome to Photoshop Gurus forum. Register a free account today to become a member! It's completely free. Once signed in, you'll enjoy an ad-free experience and be able to participate on this site by adding your own topics and posts, as well as connect with other members through your own private inbox!

Gifs


rebekah

Member
Messages
13
Likes
0
Hi i am using photoshop elements 15 and i am trying to edit a gif. I saved it to my computer as a gif and when i opened it in photoshop it came up as 120 layers. i added a text layer as the final layer and then saved it as a gif (it wouldnt allow me to click on animated when i saved it). when i opened it its like it saved the last layers only - its like aphoto with no movement.
Any help would be great or even a video tutorial suggestions would be good.
Thanks
 
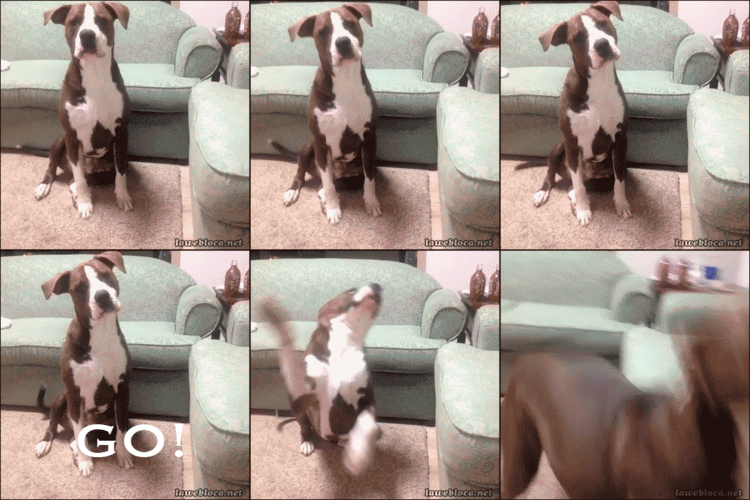
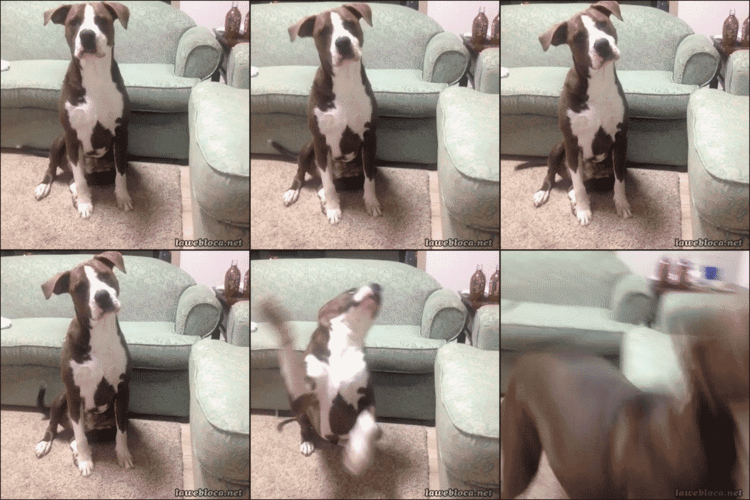
Just to elaborate. This is the gif. When i open it in photoshop elements 15 it has 50 layers. I can save it as an gif and click animation. When i open a
layer 51 and add text and try and save it wont let me click animation anymore and it saves as a single photo. I am confused?
Thanks
 

Attachments

  • dog.gif
    dog.gif
    1.9 MB · Views: 2
sorry just one last update. I managed to do another layer as a text layer but it only appears on the last frame of the gif
 
I don't know anything about Elements, but I have done a few frame animations with Photoshop. It is not a particularly intuitive skill, and you basically have to work it out yourself, or ask on forums like this. You need to watch the relation ship between frames and layers, and which layer is turn on for particular frames. To make text appear on all frames, select all the frames (you can do this with Shift click) and turn the text layer on. You might need to turn it off, and then back on again to have it active on every frame.
 
Hi thanks for your reply but im still a bit confused. When i look at videos explaining frames it shows framing a partcilaur layer like a photo frame not gif frames?
thanks for your relly
 
Ok, let me see if I can help. I'm not at all familiar with PsE and I don't know if anything I explain will work.

I opened the dog GIF in Ps. In my timeline I had 50 frames, and in my layers panel, I also had 50 corresponding layers.

The first thing I did was to highlight the first frame in the timeline, go to the last frame in the timeline and hold the shift key and click on frame 50.
This selects all the frames.
Then I right clicked and chose "Dispose" from the dropdown menu.
Screen Shot 2017-11-29 at 7.37.13 PM.png

Then I went to the layers panel, chose layer 50 and added a new layer on top of that.
I used the Type Tool to type the word, "go" on the new layer.
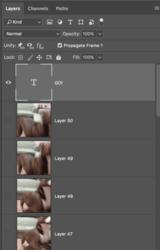
Screen Shot 2017-11-29 at 7.37.41 PM.png

I then deactivated that layer (turned the eye off).

Next I went back to my timeline and clicked on frame 30.
You will notice that the layer 30 in the layers panel should be the only layer active (eye on) when frame 30 is selected.

I then wen to my text layer and activated it as well.
Doing this ads the text "go" to frame 30.
Now frame 30, layer 30, and the text layer are active.

I then repeated the above process through frame 36.
Screen Shot 2017-11-29 at 7.50.31 PM.png

I now have the word "go" in my GIF.
dog_01.gif

Just remember, the frames coordinate with the layers. If you want to add text to more than one frame/layer, you need activate the text layer as well.
 
It gets complicated when you have multiple objects moving independantly. I did the animation below as a tongue in cheek entry to the Photoshop forum banner challange, and I actually learned a new trick while doing so into the bargain.

The easiest way to produce a frame animation is to produce the layers with something like Free Transform Step & Repeat, then start the frame animation, and then Make frames from layers. So I made the Q layers and used S&R to make them vanish into the distance, and discovered that this also produces a nice perspective effect. As the letter gets smaller, it appears to slow down, which is what it would do in real life because far off things appear to move more slowly than close up things. I grouped the layers which let me Free Transform all of the layers to have the right start and end points, and made the frame animation.

You now have 17 layers (in this case) so you have to produce the letter A layers, which are also grouped and FT'd into position, and manually select each frame and turn on the appropriate layer. It helps a lot to rename the layers so that they have numbers that match the Frame numbers.

Then do the same with the rotating corona but you have to work it out so that a full rotation matches the number of frames (360° / 17 frames) and manually turn on those layers which are also grouped to help avoid confusion.

Animated-forum-banner.gif

The sort of tips I might give are to select the first frame when adding layers, and be diligent about what frame is selected when moving objects. It is much easier to select frame one and fix out of place objects, than having to hunt through them all.
 
thanks ive been looking at this all evening but when i open the gif i have the layers as normal down the right hand side but i dont have the frames visable. Do i need to switch it on or something?
i think ive understood the rest so once i can do that hopefully i can do it. Thanks for your help guys i really appreciate it.
 
thanks ive been looking at this all evening but when i open the gif i have the layers as normal down the right hand side but i dont have the frames visable. Do i need to switch it on or something?
I'm fairly certain that PsE 15 does not have a timeline like Ps does. YOu can only work from the layers panel.


I'm not at all certain in what or how to advise you to proceed. I'm very sorry.
 

Back
Top