Sure
@Ky-leo
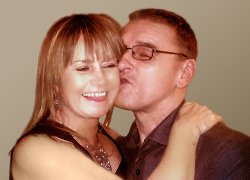
This was not my most methodical approach yet I am particularly fond of the camera raw filter and usually use that early on.
I am not sure I will remember all the steps and in which order I did them (some I started and then scraped)
Decided on cropping and replacing the background early to focus on the subjects.
I started by isolating the subjects with Select > Subject and tuned it up by hand with various tools. Converted to Layer Mask and used the Select and Mask to tune up the selection to be a bit more realistic (though it could have been better)
One of the bigger challenges or me was there was little image data in the highlights on the moms are a face. Those because a lot worse when trying various tonal adjustments (that was an uggh feeling of what to do)
In Camera Raw Filer
- Adjustment Brush on arm with reduced Texture and reduce Clarity
- Adjusted white balance
- Adjusted
- Reduced Texture overall
- Increase Clarity overall
- Reduced Sat of yellow and orange
- Increased Luminosity of Red and Orange
- Reduce Luminosity of Yellow
- Moved Hue of reds more a bit towards orange
Second Camera Raw Filer applied
- Healing Brush on moms face to remove distractions
- Used adjustment brush on moms bace with reduced Texture and clarity so smooth out the lines/wrinkles
Back in photoshop and used healing brush on parts of arm to smooth out rough colorization along upper portion of arm
Added Layer with Color Blend on top and sampled arm color closer to hand and applied to whole arm
That's what I remember
John Wheeler


