
Photoshop Gurus Forum
Welcome to Photoshop Gurus forum. Register a free account today to become a member! It's completely free. Once signed in, you'll enjoy an ad-free experience and be able to participate on this site by adding your own topics and posts, as well as connect with other members through your own private inbox!
You are using an out of date browser. It may not display this or other websites correctly.
You should upgrade or use an alternative browser.
You should upgrade or use an alternative browser.
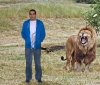
First attempt...
- Thread starter Potatoes
- Start date
RTContent
Power User
- Messages
- 472
- Likes
- 180
It's good, but not perfect. I would suggest that you add a shadow on the ground (notice the shadow of the lion and try to imitate that). Also the exposure of the guy is a bit off. If you look at the white shirt and then the white flower on the tree hopefully you'll understand what I'm talking about. In my head I would imagine these two things to be similar in brightness. The original photo of the lion is very sharp so I would also suggest sharpening up the guy and perhaps add additional contrast.
I like how you've tried to blend him in using the grass to come up around his shoes, however if you notice the lions legs and how the grass behaves around them you can see that it needs to be a little sharper.
I like how you've tried to blend him in using the grass to come up around his shoes, however if you notice the lions legs and how the grass behaves around them you can see that it needs to be a little sharper.
yes its a good fist attempt , still a way to go to blend him in , shadows definitley help i use the burn tool at 30-40 percent
did you use refine edge if not always refine edge a selection, i think you did , there is a red line down his left leg get rid of that
did you use refine edge if not always refine edge a selection, i think you did , there is a red line down his left leg get rid of that
Thanks for all of the help guys, I appreciate it!
I re-touched some of the colors up, but I am having a really difficult time adding a realistic looking shadow. Comes out too yellow/dark. Couldn't get the shoes to look any better either (had to start that over).
I re-touched some of the colors up, but I am having a really difficult time adding a realistic looking shadow. Comes out too yellow/dark. Couldn't get the shoes to look any better either (had to start that over).
Last edited:
Thanks for all of the help guys, I appreciate it!
I re-touched some of the colors up, but I am having a really difficult time adding a realistic looking shadow. Comes out too yellow/dark. Couldn't get the shoes to look any better either (had to start that over).

the shoes looked better in the first one , add a layer mask and use black paint brush to reveal the first photo of the shoes , that part of the original picture was good , did you try using the burn tool for the shadow , maybe even soft slightly around his head and torso with the blur tool
hope you dont mind i had a go as im learning too , pretty hard image to get looking real i think as your picture is really two dimensional
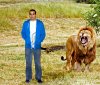
added a shadow using 60 percent burn tool - its on the wrong side its better if you learn , if you look at the lion the shadow on the man should be in the same direction but you can seehow you can make a shadow, sharpened your face and adjusted colors on levels , then as a final i had a look through filters and liked the blue filter
added a shadow using 60 percent burn tool - its on the wrong side its better if you learn , if you look at the lion the shadow on the man should be in the same direction but you can seehow you can make a shadow, sharpened your face and adjusted colors on levels , then as a final i had a look through filters and liked the blue filter
Attachments
Last edited:
couldnt help myself added a bit more color and changed the shadow lol , keep practicing , sometimes you have to walk away for ten minutes to see whats wrong with the picture not saying mine is perfect as im not really happy with it like i said im learning be doing it about six weeks , there are guys here that work magic
Attachments
Last edited:
Inkz
Guru
- Messages
- 2,358
- Likes
- 1,554
When you are happy with your model placement, you need to adjust the Hue/Sat and Colour Balance of the background and the model to get the two images to blend together.
Some time, a cheating way of blending an image to the bg is to lower the Saturation slightly.
Some time, a cheating way of blending an image to the bg is to lower the Saturation slightly.
- Messages
- 23,889
- Likes
- 13,633
Potatoes, your first attempt was your best so far. The feet looked the best in this one. The main problem is getting your subject to appear or blend with the ambient and diffuse lighting of the scene. Observe the light directionality that appears on the Lion itself and in the scene compared to the individual. You should notice that the Lion is in a light setting where the sun is directly overhead and the subject is lit from the front and below. The subjects shoulders are dark when they should be well lit. This would not happen if he were actually standing there.
As has already been mentioned, getting the shadow right is important. Notice the shadow of the Lion. It's directly below him. The darker grass to the Lions left side (our right) is coincidence. Egosbar's shadow is not correct for the lighting.
Blending the the hard edges of the male subject will be the last thing to accomplish. I usually use a toned down smudge tool for this process at higher magnification.
Here is my latest attempt. I added grass back around the shoes and tried to smooth the lines around the guy to make him not stick out as much. Messed with the colors a little bit more, but still not getting realistic shadows, which has been my main problem. This is fun, but very frustrating! :cool2:
Last edited:
Don't forget shadows.
The guy needs a shadow.
That's the main problem that I've been trying to work with. Seems whatever setting I use with the burn tool the grass becomes too black or yellow looking. Doesn't look like a shadow at all, just weird grass.
Might have to check some tutorials or something to help me with this.
besmirched
Power User
- Messages
- 221
- Likes
- 94
I think you will have a hard time selling this composition as believable. The light source for the guy is not the same as the background.... which after reading all the replies was what IamSam said. I couldn't agree with you more Sam.
Last edited:

yeah i tried and a very hard one to believe , just looks too two dimensional no matter what you play with , im sure someone can do better , when you use the burn tool play with the percentages , the more you run over the shadow the darker it gets , you need it to blend the same color as the lions
with the first shadow i purposely did it wrong , the second one im not happy with either but its not my pic i just wanted to show how much range you had to play with , i just followed the shadow of the lion , i did try hues lighting etc on the man itself and not matter what i did it just never looked right ,
could be a photo you may need to de saturate a lot , maybe even try a black and white
certainly looked like a shadow to the our right of the lion
Last edited:
besmirched
Power User
- Messages
- 221
- Likes
- 94

And don't forget to have some fun experimenting
")
Steve
Retired Administrator
- Messages
- 7,868
- Likes
- 1,506
That's the main problem that I've been trying to work with. Seems whatever setting I use with the burn tool the grass becomes too black or yellow looking. Doesn't look like a shadow at all, just weird grass.
Might have to check some tutorials or something to help me with this.
The shadow is pretty easy once you learn how to do it.
Duplicate the guy, name the layer Shadow, use levels to make it dead black.
If there's any color or highlights in the Shadow layer paint it black.
Use Transform and move the Shadow layer into the approximate location where it looks right to you.
Make sure the feet of the guy and the shadow layer line up.
Lower the opacity on the shadow layer to about 40%
Use Gaussian blur on the shadow layer
Play with opacity, transform, and additional blur until you're satisfied.
The bigger challenge is color match and directional lighting on the subject.
You also have to deal with saturation, resolution and contrast differences.