What's new
Photoshop Gurus Forum

Welcome to Photoshop Gurus forum. Register a free account today to become a member! It's completely free. Once signed in, you'll enjoy an ad-free experience and be able to participate on this site by adding your own topics and posts, as well as connect with other members through your own private inbox!

Eye black help?


andoneballer

New Member
Messages
4
Likes
0
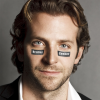
I am trying to edit this one photo and I was wanting to add eye black (the black lines under football players/baseball players eyes) but I can't figure out how to nor are their any youtube videos :(. Anyone have an idea on how to do this?
 
Black is very hard to add to skin realistically...one way I have used is the Burn Tool set to midtones and about 60% exposure. This preserves some of the underlying skin texture and looks fairly convincing. This is just one simple method.
 
Black is very hard to add to skin realistically...one way I have used is the Burn Tool set to midtones and about 60% exposure. This preserves some of the underlying skin texture and looks fairly convincing. This is just one simple method.
I will be using Photoshop cs6.
 
Painting on the eye black then setting the layer blending mode to hard light or multiply and adjusting the opacity will also reveal the skin texture. That might work for you.
 
Again, this is not perfect, but this is using the Burn Tool............

Barack Obama Smile 7_01.png
 
I found a better way.

I made two templates for the eye black areas. I transformed them to suite their position. Turn them off and leave them separated.

With the original layer (or a copy) highlighted I cmd/cntrl + clicked one of the two templates to create a selection, I then feathered this selection by 2 (should have gone less in this example maybe 1.2 or 1.5).

I then selected a black and white adjustment layer which I clipped to the original. Adjust to your liking.

Repeat for other eye black.

BradleyCooper_01.png

Screen Shot 2013-07-03 at 9.53.31 AM.png
 
BTW, since it looks like this thread has died, I should fess up and say that I didn't even bother trying to recreate the look of black face paint from scratch. Instead, from another photo, I stole some patches of skin that already had black smudges on it. ;-)

I quickly found a head shot of a (American) football player with black smudges on his face. He was much, much heavier than Obama, Caucasian, in a completely different light, and had his head tilted in the wrong direction. So, I quickly adjusted these aspects to roughly match the Obama head shot, and then used the patch tool to bring the black smudges from the athlete's face to Obama's. Other than a tiny bit of clean-up work around the edges, that's all that I had to do. The patch tool let the original texture of Obama's skin show through, as well as preserving the irregular, spotty texture of the charcoal smudges on the athlete's face without having to do anything else.

I find this technique to be very fast and usually gives high quality results with hardly any fuss.

HTH,

Tom M
 
just paint on black on a new layer with the blend mode set to soft light. If you need it to be darker, just duplicate the layer.
 
Icarus, suggestions without an accompanying demo are vastly less credible than ones accompanied by a demo. Why don't you show us exactly how good your suggested technique is?

T
 
I found a better way.

I made two templates for the eye black areas. I transformed them to suite their position. Turn them off and leave them separated.

With the original layer (or a copy) highlighted I cmd/cntrl + clicked one of the two templates to create a selection, I then feathered this selection by 2 (should have gone less in this example maybe 1.2 or 1.5).

I then selected a black and white adjustment layer which I clipped to the original. Adjust to your liking.

Repeat for other eye black.

View attachment 34208

View attachment 34209
I know this is asking to much but could you tell me step by step what to do. I don't know how to create a template and some of the other stuff you had noted was also confusing. Thank you :D
 
Hey AB,

Per your PM request as well as here, I have made a short video tutorial on this technique.

Watch the video in full screen and at 720p. Pause frequently so you can read...... sorry, it's kinda fast and cramped!

If you have any questions that's not covered by the vid, please ask here!

edit: In case some of you are wondering why I did not merge the two selections and adjust simultaneously, I found you could not get the two to match this way! Only when separated and adjusted individually could you get them to match!

 
Last edited:

Back
Top