What's new
Photoshop Gurus Forum

Welcome to Photoshop Gurus forum. Register a free account today to become a member! It's completely free. Once signed in, you'll enjoy an ad-free experience and be able to participate on this site by adding your own topics and posts, as well as connect with other members through your own private inbox!

Extract gradient backgrounds quickly


Busta

Member
Messages
7
Likes
0
Hi and thanks for your time.

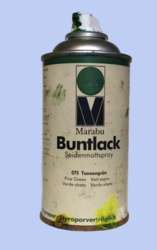
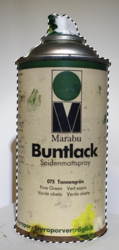
What the best way to extract this tin of paint?

I have about 30 of these photos that i took of different spraycans. I bought a white piece of paper and shined a torch onto the subject as i though it would be far easier to edit if i needed to. Actually to be honest i though i would just have to take out the rotating moter stand thing out. What i didn't factor in was the gradient that the torch light produced.

Ive tried cloning areas around but the gradient is making it hard to blend with a soft brush.
Ive tried picking colours and painting as i go around.

Tried the magnet lasso tool etc the pen tool scares me.

Basically what i though would be a simple process is now taking me ages.

I would just be happy now if i could just extract the tin from the background as this seems to be the quickest way to go i think.

its been a while since ive used photoshop and only have photoshop 7.

Sorry if this seems like a noob question ( it probably is )

Im happy to have a go myself again but if i can get advice on the best approach then ill just go for it rather than flip back and forth in tool frustration.

Thanks again.
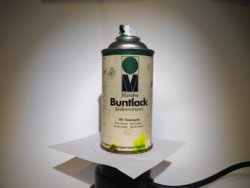
IMG_20200306_113440.jpg
 
I should add i first use the ruler to draw a line down the side the rotate using arbotary rotation then crop image to a square to start.
 
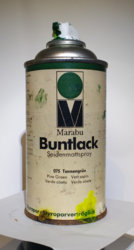
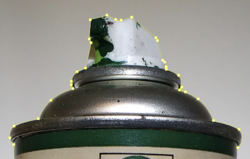
Here is the image with the path I made. Cut your path at least at 300% magnification. Cut in a few pixels. The fewer the points = a smoother mask.
IMG_20200306_113440.jpg
 
Whats this fill thing called i cant seem to turn it off.

As i created a path with the pen tool it filled from point to point. Now the path is in line with the start its filled the whole thing and i cant see the subject.

ANy idea how to get rid of it or what its called so i can search.

Thanks

Path fill Noooo.jpg
 
Here is the image with the path I made. Cut your path at least at 300% magnification. Cut in a few pixels. The fewer the points = a smoother mask.
View attachment 110759

" Cut your path at least at 300% magnification."
Ahh ok.
I was using the magnifier glass then whilst -drawing- i pressed space bar to bring up the hand so that i can move around. I didnt check what magnification but will now.

"Cut in a few pixels."
Cut in!! Ive not been doing that, part of me doesn't want to destroy the can or have super sharp cut outs, this probably doesn't make any sense and i think ultimately you are right as it prob wont be noticable and you would always have the original anyway.

"The fewer the points = a smoother mask."
Draging the handles tends to take me out of the screen atm and trying to get the right curve is a bit fiddly prob because im not used to it, i guess. Also have i done to many points?

OK here is where i lose you. Mask!!! s

Smoother, is that a smoother line?
Is a line a mask or can become one?

I thinka pen path can become a selection ( ants ) in fact i was going to use the selection to protect the can as i worked on the background then invert it as i corrected the can. Is this the best way to go or does that bring up masks again.?


PPS thanks for your great advice so far actually, its helping to lower the frustration levels. :)
Thanks
 
Last edited:
Whats this fill thing called i cant seem to turn it off.
Set the Pen Tool to path here:
Screen Shot 2020-03-13 at 7.46.49 AM.png

OK here is where i lose you. Mask!!! s
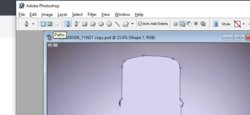
Yes. Once you have your path created using as many points as needed but as few as possible....
Screen Shot 2020-03-13 at 7.52.54 AM copy.png

.....right click and chose "make a selection"..
Screen Shot 2020-03-13 at 7.57.20 AM.png

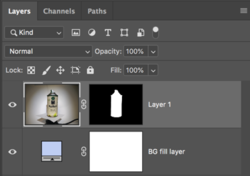
.....then go to LAYER > LAYER MASK > REVEAL SELECTION
This will add a layer mask
Screen Shot 2020-03-13 at 8.00.46 AM.png

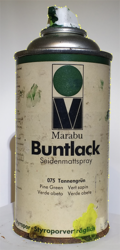
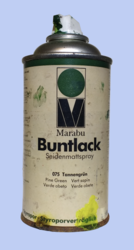
With a background color fill layer, you have a properly selected object with it's original background removed.
Screen Shot 2020-03-13 at 8.01.26 AM.png
 
Thanks.

"Set the Pen Tool to path here:"
I have Ps7 so the menu is prob layed out a little differently. Thanks to your prompt it seemed i had selected -shape layers- (button), next to it is a -Paths- (button). When i now click on -Paths- the path disappears. Does this mean i have to do it again as a "path" not a "shape layer"?

Haha WOW this is subjective lol "Yes. Once you have your path created using as many points as needed but as few as possible.... "

You clearly have a better idea than me and ill use your example of this many/few balance points. You have used way more than me but i think you may have done a far better job as i just put a straightline down the side on the straight can edge but you seem to have followed some dents into the subject.

Im impressed.

So sorry for asking and if you have deleted it please dont worry but is there a larger pic of the path you did. Im thinking if i use that as an example to replicate from some fine someone who knows the best point spacing then maybe ill get a feel of it a little more.

More of a plus side from me is it does seem to be a little quicker each time i do it ( use the pen tool )

Masks, i dont think ive ever knowlingly used many before so ill have to come back to that.

Thanks again.

PS did you use an unsharpen mask layer overlay!?! withing the pen path?

path crop.jpg
 
Does this mean i have to do it again as a "path" not a "shape layer"?
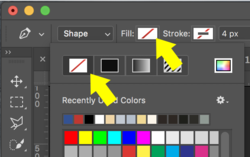
Well.........not in CC. You would just set your fill to "no color".

Screen Shot 2020-03-13 at 9.20.33 AM copy.png

I don't remember how to do this in Ps7...........sorry. You may have to do it again with the Pen Tool set to path.

You have used way more than me but i think you may have done a far better job as i just put a straightline down the side on the straight can edge but you seem to have followed some dents into the subject.
Well, this is strictly up to you. I use more points because I like to include every single variance (curve and dent) of the subject. But I have been using the Pen Tool for many years now and using more points does not slow me down.

but is there a larger pic of the path you did.
Screen Shot 2020-03-13 at 9.29.37 AM.png

The more you use the Pen Tool, the easier and faster it will become.

Masks, i dont think ive ever knowlingly used many before so ill have to come back to that.
Layer masking and masks are the only non destructive method!!! They are an absolute MUST!! In case you don't know, a path can easily be altered (edited) at any time so the masks can be edited without destroying the original image layer.
 

Back
Top