What's new
Photoshop Gurus Forum

Welcome to Photoshop Gurus forum. Register a free account today to become a member! It's completely free. Once signed in, you'll enjoy an ad-free experience and be able to participate on this site by adding your own topics and posts, as well as connect with other members through your own private inbox!

Exposure Problem


WarrenG

Well-Known Member
Messages
46
Likes
15
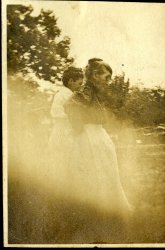
Need advice on techniques, methods, tools, etc. to fix the exposure problem in the photo below. I've triedseveral things without good results - masking and using levels, curves, burn tool, camera raw filter, etc. The attached image is in jpg format since I can't load a tiff format. Have provided a link to a tiff format on my Google drive if someone wants to experiment on the photo. I scanned it at 600dpi


Aunt Mattie & Stella.jpeg
 
Hi WarrenG
Very tough image yet need to ask about the original.
Does it look just like what you have posted. Sometimes scanners reflect the light directly back depending on the surface reflection (if its too shiny).
Under those circumstances you can usually get a better picture by using a copy stand with lights off to the side (instead of a direct light from the scanner).
If there is any chance of starting with a better original would be a big help.

Barring that, try the Camera Raw Filter and using the Dehaze and Clarity sliders and see if you get something a bit better
Just a suggestion
John Wheeler
 
Thanks, John. Yes, the original looks the same as what I posted. I tried the dehaze and clarity sliders in CR but didn't do much.
 
Hi WarrenG
Very tough image yet need to ask about the original.
Does it look just like what you have posted. Sometimes scanners reflect the light directly back depending on the surface reflection (if its too shiny).
Under those circumstances you can usually get a better picture by using a copy stand with lights off to the side (instead of a direct light from the scanner).
If there is any chance of starting with a better original would be a big help.

Barring that, try the Camera Raw Filter and using the Dehaze and Clarity sliders and see if you get something a bit better
Just a suggestion
John Wheeler
John,
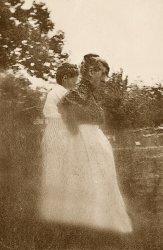
Thanks again for your suggestions. I finally found a way to eliminate most of the expoaure problem by using a technique I found in a PS Restoration & Retouching book (3rd edition) by Katrin Eismann & Wayne Palmer. Their technique adds a Curves adjustment layer with no adjustments and blending mode set to Multiply. I converted the image to B&W first and then added the Curves Layer. I set the mask to black and then painted over the exposure problem with white set at 15%. I repeated the process again. From there I selected the dress and filled the selection with white at 20%. Ended up with this result - not great but the passable.

Aunt Mattie & Stella PS.jpeg
 
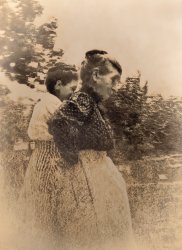
I cropped out the lower portion with no detail, used ACR for denoise, contrast, luminosity, etc., numerous curves adjustments applied via the mask, cloning in
frequency separation to remove some of the flaws and retain texture then added a light vignette in ACR.

Aunt-Mattie-&-Stella.jpg
 

Back
Top