What's new
Photoshop Gurus Forum

Welcome to Photoshop Gurus forum. Register a free account today to become a member! It's completely free. Once signed in, you'll enjoy an ad-free experience and be able to participate on this site by adding your own topics and posts, as well as connect with other members through your own private inbox!

Does anyone know how i would go about making the below effect


cmckernan93

New Member
Messages
4
Likes
0
hi guys

does anyone know how to make the below effect, i seen example below and want to replicate it or something similar
1614354701723.png

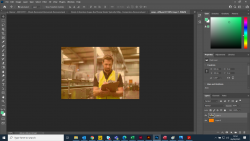
I have made something below and was just wondering if i am on the right lines, i have used an orange layer mask and was just wondering is this the best way to replicate this or how i can cut this image to the ripped edges look of the above image
1614354769048.png
 
For the ripped edge effect, you can use a Clipping Mask. There are many YouTube videos that teach how to do a clipping mask.
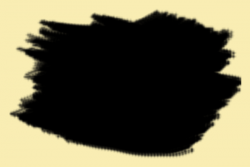
  • Start with a plain background of any color. I used pale yellow.
  • On a new layer, create any shape you want. It does not matter what color you choose—I used black. For jagged edges, I used one of the standard Photoshop media brushes with rough edges.
1614359630094.png

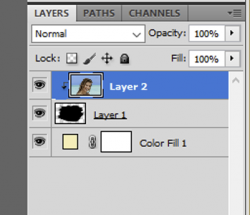
  • On a new layer above that, import the image that you want to fit inside your black, jagged shape.
1614359809609.png

  • Right-click on this layer (the young lady) and a drop-down list will open. Choose "Create Clipping Mask". A clipping mask will force the image to fit into the jagged shape of the layer immediately below her.
  • Once you've created the clipping mask, you can use the Move tool on the young lady to best position her within your jagged shape.
1614360135055.png

In the layers palette, when you have successfully created your clipping mask, you should see a small bent arrow next to the layer. Below, the little arrow comes from Layer2 and points down to Layer1.

1614360517302.png
 
As usual, there are many ways to accomplish effects in Ps.

Just use a simple layer mask.

Open your subject image.
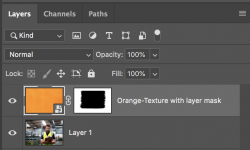
Open your texture layer and place it above the image layer in your layers panel.
Add a layer mask to the texture layer.
Set you foreground and background colors to default by hitting D on your keyboard.
Click on the layer mask. You will see white brackets around the layer mask.
Use your Brush Tool and an appropriate brush to add strokes to your layer mask.
You can hold the shift key while making the stroke and this will keep it in a perfect horizontal or vertical line.

Screen Shot 2021-02-27 at 12.09.13 AM.png

Screen Shot 2021-02-27 at 12.09.22 AM.png


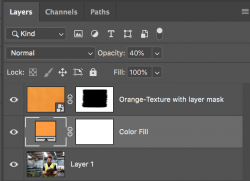
If you want to add an orange tint to the subject image, just place a new color fill adjustment layer set to the same color as the texture above the subject layer and below the texture layer, and then lower the opacity to suit. You could also use blending mode options.

Screen Shot 2021-02-27 at 12.11.22 AM.png

Screen Shot 2021-02-27 at 12.11.31 AM.png
 

Back
Top