1. Draw a polygon with a required number of equal sides (eg. in your case perfect pentagon/star: I used a star) beginning from the center of canvas, using option/alt + Shift to ensure the polygon grows proportionally from the center.
2. Draw a circle (shape tool: U) with no fill and only stroke, again proportionally from the center until the circumference meets the polygon: the polygon works as a equi-distance divider.
3. Select a ellipse tool (shape tool: U) and set the options as: FILL & STROKE ON, define px values for w and h to make a tiny dot (bigger than the line width of the large circle)
4. With the ellipse tool selected, click once near one of the circle-star cross points.
5. Once a tiny filled circle shape (dot) is created, CMD-t to turn on a free transform around the dot shape. Then, click inside the transform box, but do not select the center pivot point, and move the dot shape until the center pivot point are positioned at the circle-star cross point.
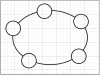
6. Repeat step 5 to position 5 dot shapes to each of the circle-star cross points.
7. Optional: Select all 5 dot shape layers and Cmd-E to collapse into one shape layer (possible in CS6, not sure in other versions).
8. Select all (or collapsed) dot shape layer AND the big circle shape layer, and link the layers together by clicking chain icon.
9. Cmd-t to free transform > change the shape of circle to an ellipse that you want (dots will also move together).
10. Place a new shape (spade in my case: with white fill and black stroke) with defined size at the option.
11. Cmd-t to free transform > move the shape, similarly to step 5, until the center pivot point is snapped to one of the dots along the big ellipse.
12. Repeat step 11 to place the same shape snapped to each of 5 dots along the ellipse.
13. Select all the 5 shapes (spades) and the big ellipse layers (and dots: this is optional) and link them together: maybe even generate a group
14. Now, you can use Cmd-t to free transform the 5 equi-distantly arranged shapes along the ellipse to different dimensions/angles, etc
Have a good day~
Rev