What's new
Photoshop Gurus Forum

Welcome to Photoshop Gurus forum. Register a free account today to become a member! It's completely free. Once signed in, you'll enjoy an ad-free experience and be able to participate on this site by adding your own topics and posts, as well as connect with other members through your own private inbox!

Dark image on a dark background


PBoyd

Member
Messages
5
Likes
1
Hi all,

I'm a Photoshop newbie and new to the forum as well. I have a 2 part question, please. Image is attached for reference.
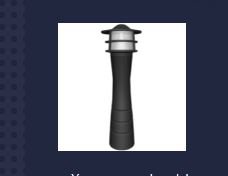
  1. I have a black product image on a white background. First, I'd like to remove the background. This is one thing I actually know how to do (I think!) using the background eraser tool; however, it never works perfectly for me. I always end up erasing too much or don't get quite close enough to the edges. Is there a better way to use the background eraser tool or some settings within that make it work a bit better?
  2. After erasing the background, I'd like to add a "glow" (for lack of a better word) around the whole product image. I'm putting the image on a dark background and because the paint on the product is black and the background for my email blast is dark blue, the product photo gets lost. I don't want to change the color of the image, but I'd like it to stand out against the dark background. Any suggestions there, please?
Thank you in advance for any suggestions or tips! Excited to be part of this group!

Capture.JPG
 
If you add a glow around the product image as you described, you'd be separating the product from the background.
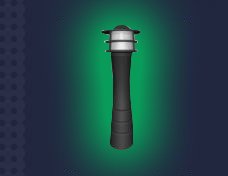
Is this what you're trying to describe:

product glow.jpg

Just place your product on a separate layer, fill in the white area with Edit-Fill and then using Blend if, add an outer glow. Is this what you're trying to do?

A dark object on a dark background isn't a great choice to give you any contrast...
 
@JeffK That is exactly what I was hoping to do! I'm a complete Photoshop novice (I need to enroll in a course) so I don't know how to phrase my questions properly yet.
I appreciate the help! I'll give it a go and see if I can get my image to look like yours.
Thanks so much!
 
@JeffK I'm sorry, but I don't know exactly where to begin. Would you please explain the steps as if to a 5 YO? I've attached my image for reference, if that helps.
Thank you!

Seastar.jpg
 
Actually you did explain correctly - I just wanted to make sure I understood it.

That's a huge product shot so I'm going to scale it down to 1/2 size just for purposes of explanation.

BTW - one thing I wanted to mention earlier is don't use the eraser tool - once you erase images or parts of images, you can get them back. Use masking instead.

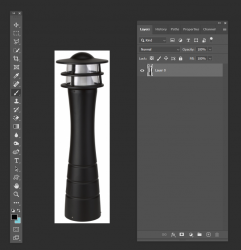
Open your product image on it's own layer:

1631052909138.png

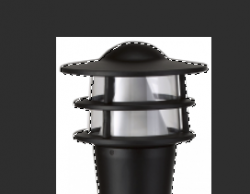
Select your product using a selection tool, ie quick selection, so that you can see "marching ants" around your product:

1631053068215.png

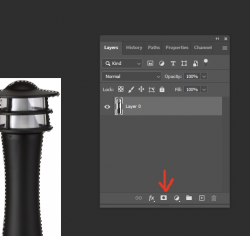
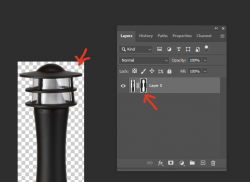
Now go down to the bottom of the layer panel and click the mask button:

1631053168834.png

What you'll see is the mask next to the product in the layers panel and checkerboard panel showing the background is now transparent:

1631053315436.png

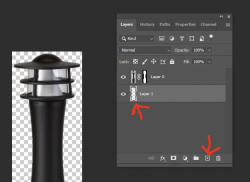
Now to add a dark blue background click on the plus icon in a box at the bottom of the layer panel - this will open a new layer:

1631053448417.png

(*Alternate - place your dark background as a separate layer and drag it underneath your product)

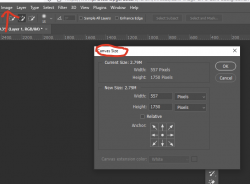
Now go up to the top menu, click on Image-Canvas size - this is the dialog box you'll see:

1631053691731.png

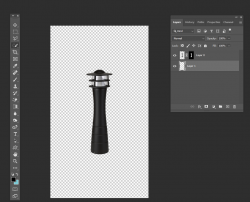
For the time being, just n=make the width 2000 pixels wide and 3500 pixels in height - here's what your workspace will look like:

1631053900037.png

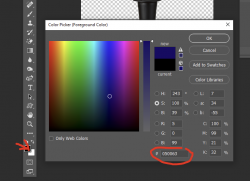
Now to pick a color background, just take your cursor and click and the black box in the bar on the left - a dialog box will open.
Enter the color number 050063 - this is just a dark blue I picked. The click OK:

1631054391386.png

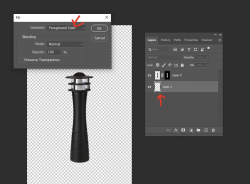
Now go that empty layer in the layer stack, click on that empty layer so it's active, then go up to your menu bar and click on Edit - Fill and choose Foreground Color:

1631054589560.png

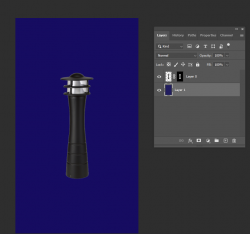
Now that empty layer is filled with a dark blue and since it's underneath the product, it doesn't hide the product.

1631054697627.png

Now using your cursor double click on the product layer - not the image of the product but just to the side of the mask:

1631054782919.png

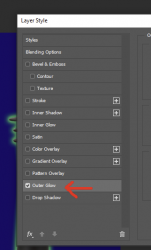
That's going to open the Layer Style dialog box - now click on the Outer Glow option:

1631054929201.png

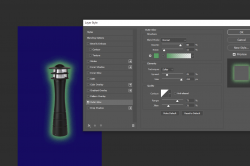
The workspace next to it will alter how the out glow looks.. You can also choose a color by clicking on the color box and choose whatever color you want.
I happened to choose green. You can watch the changes on your image in real time as you push those sliders around:

1631055154111.png

There are other ways to add glows but this is probably the easiest approach. And again, instead of a custom color background, you can place your product on a different background.
Just make sure the product is on its own separate layer with a transparent background.

If you have any questions, please don't hesitate to ask! :)

- Jeff
'
 
Here is one more easy way -

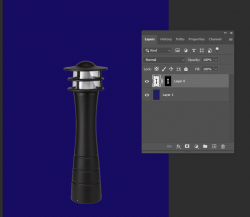
You have the product on one layer and the dark background on another layer underneath:

1631064495200.png

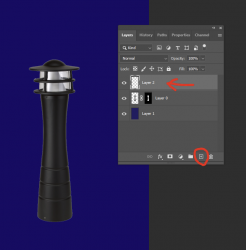
Now click on your add a layer button - thats at the bottom of the layer stack and has a cross in a box -

1631064590706.png

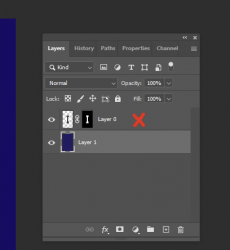
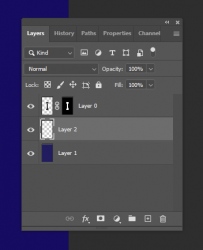
Now drag that empty layer down underneath the product so it's between the product and the dark blue layer:

1631064660744.png

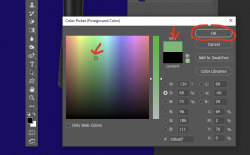
Now with that layer active, click on the color picker with you cursor to bring up the color chooser. If you don't see colors in the large box and just black, click on the black vertical bar to bring
back your color choice. Now click around the color choose until you find a color you like. Then click OK.

1631065061152.png

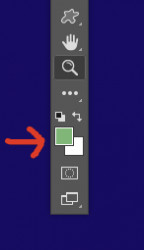
Now that black box you originally clicked on should turn the color you chose:

1631065104990.png

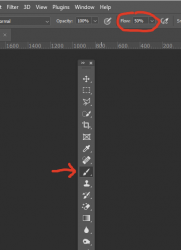
Now click on your brush tool and set the flow to around 50%:

1631065213623.png

Now you've got a brush loaded with green color.

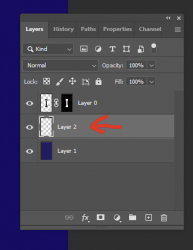
Go back to your layers panel and activate the empty layer by clicking on it:

1631065297503.png

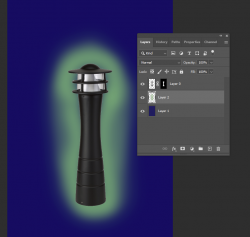
Now begin painting around your product on the middle layer with a soft brush at 50% flow. You'll get a nice soft glow:

1631065512377.png

You can change your flow to further soften the glow or increase it to make it harder. You can paint large or small, however you like.
Because you're painting on that middle layer, and underneath the product, it won't cover your product. It will look like the glow
is surrounding it.

The difference between this method and the one first showed is that the first follows the shape of the product you're adding the glow too.
This is more freestyle.

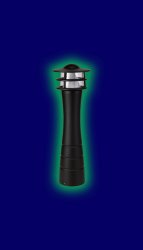
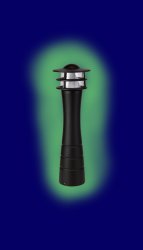
Here's what the finished piece would look like:

Seastar edited paint glow.jpg

You can turn off the paint layer, and a new layer, and paint a different color to see the difference.

Let me know if you have any questions!

- Jeff
 
@JeffK Oh my word...that worked BEAUTIFULLY!! And (major deal here), I was able to follow your very helpful instructions!!
Thank you SO much for taking the time to include visuals with your instructions! I have been struggling with this for months now!
Thank you again!!! Success!!
 
@JeffK Oh my word...that worked BEAUTIFULLY!! And (major deal here), I was able to follow your very helpful instructions!!
Thank you SO much for taking the time to include visuals with your instructions! I have been struggling with this for months now!
Thank you again!!! Success!!
Excellent! Glad to help! 😀
 

Back
Top