What's new
Photoshop Gurus Forum

Welcome to Photoshop Gurus forum. Register a free account today to become a member! It's completely free. Once signed in, you'll enjoy an ad-free experience and be able to participate on this site by adding your own topics and posts, as well as connect with other members through your own private inbox!

cut out bold effect


Messages
24
Likes
0
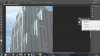
Hi I am just wondering how to achieve this effect (as seen in the following attachments).

The buildings have bold colours with barely any detail. Is this something that can be done using photoshop filters or does it need to be done by hand i.e drawing outlines with pen tool then filling with colour?

I've tried the cutout filter but the building appears to be a bit too detailed. I just want the colours to be reduced to 2-4 colour blocks?

Thanks.
 

Attachments

  • art-deco-chicago-wedding.jpg
    art-deco-chicago-wedding.jpg
    85.1 KB · Views: 29
  • deco1.jpg
    deco1.jpg
    233.7 KB · Views: 1
Give us a sample to work on because those two are handmade and not photoshopped. Or with Photoshop or Fireworks but with 2 hours work or much more...
 
Hi I've just tried this by hand. Traced over the building using paths...but I cannot seem to fill the subpaths?

As you can see, I've traced over the windows/lines and I want them to be filled in dark grey and the rest of the building white...how do I do it? The "fill subpath/stroke" is greyed out for some reason?
 
Managed to get the building white (path 1), but when I try to get the blocks/windows (path 2) filled with dark grey...it either deletes the white background or just will not fill in the path with grey.


I select the paths as shown in the picture...select "fill subpath" with colour...nothing happens.

If I select "fill subpath" with stroke...it works...but I cannot edit the brush or colour. The fill/stroke options on the top left of the screen is unclickable.


*EDIT*

Managed to sort it out...sort of...I didn't realise you had to create paths in different layers. Originally they were the same layer...even though different paths were selected...it still affected other paths in the same layer...
 

Attachments

  • paths2.jpg
    paths2.jpg
    243 KB · Views: 4
Last edited:
I'm not fond of paths, boring. Anyway, you did the tough job. As you can see on the last photo you sent, you can transform your path into a selection. Do it then fill your windows (shift F5) with the colour you want. With the magic wand clicking in the white of the building, (tolerance 0) do another selection and fill it too. You may also cut out the sky to fit better with your style. It should work. It's fast but not as precise as vectors. So zoom in to check and fix problems if needed. Good luck!
 
Thanks...the main issue I have now is I am unable to change the stroke brush/colour/size.

I select a path...Go to stroke fill...but I cannot change the options?
 
I'm not in front of your screen but did you save your job, close the file and reopen it? Or close Photoshop and reopen it. Then see if you can change the brush. Otherwise did you try when you are using your brush to, at the same time, pressing alt and right click then moving your mouse from right to left to change the size and from up to down to change the hardness? Or brackets? Or just right click on the work when using your brush?
 
Hi thanks. I'm afraid it doesn't work. I select a path...go to stroke fill...it fills it...but I cannot change the stroke size/colour.

What could I be doing wrong? Is the stroke selection in the upper left corner of the screen? If so...when I click on it...nothing happens.


Can anyone help me with this please?
 
Issues with path...

Hi I have two issues with the pen tool/path.


Firstly, When I trace a line using path, I want to stroke fill. However I cannot change the stroke options. It will not let me change colour or the stroke size. What should I be doing step by step?


Secondly, I'm trying to copy an area of an image using the pen toon then paste it on a different layer. For example...a tree...I go around the tree (correct layer is selected) using the pen tool...I make new selection then I copy it...paste it on the the new layer...it either pastes a blank image of the tree outline rather than the actual tree itself or it just doesn't paste. It just seems so strange that such a simple task ...is made overly complicated by PS.

It's making me incredibly stressed out as I've been trying to do this for the past two hours.

Thanks.
 
Re: Issues with path...

When you stroke or fill the foreground color is used. When you use the stroke a path icon, it will use the last tool that was active before you made the path. If you want use a brush to stroke the path for instance, select it and set the color and options first, then stroke the path.

To copy and paste, make certain you have the proper layer selected, make your selection then hit Ctrl+J.
 
Hawkeye is absolutely right!

You can't use EDIT > FILL OR STROKE to fill or stroke a PATH, you need to have converted your path to a selection for these to work.

Always save your paths.

You can, as Hawkeye states, set up your brush tool for the size your wish to stroke a path with, then create a new layer, RIGHT click the selected path or paths, select stroke path or subpaths, select Brush Tool, hit OK.

Selected paths
Screen Shot 2014-04-27 at 12.43.33 PM.png

Right click, select stroke subpaths..
Screen Shot 2014-04-27 at 12.48.11 PM.png

Select Brush Tool, hit OK...
Screen Shot 2014-04-27 at 12.48.20 PM.png

Done.
Screen Shot 2014-04-27 at 12.45.05 PM.png

Right click and select fill paths/subpaths, foreground or any color, hit OK
Screen Shot 2014-04-27 at 12.54.14 PM.png
 
Another reason for the path refusing to stroke is if you have a layer currently selected that cannot be brushed, etc., over, such as a smart layer or an adjustment layer.

As hawkeye said, be sure to select the "proper" layer. If you, for instance, have the mask of an adjustment layer still selected -- actually the adjustment layer itself as it has no pixels -- the copy & paste white is exactly what you will get.
 
Last edited:

Back
Top