What's new
Photoshop Gurus Forum

Welcome to Photoshop Gurus forum. Register a free account today to become a member! It's completely free. Once signed in, you'll enjoy an ad-free experience and be able to participate on this site by adding your own topics and posts, as well as connect with other members through your own private inbox!

creating a Wordpress logo using CS5


Matt_Blackwell

New Member
Messages
4
Likes
0
Hi guys

Go easy on me! I have created a logo using CS5 for my photography website, however I want to copy the logo image so that I can make it transparent and less pixelated. I have tried using the pen tool and even tried to creating the image from scratch. What is the easiest way to trace or draw the attached image myself.
 

Attachments

  • camera lens blades.png
    camera lens blades.png
    2.2 KB · Views: 30
  • photo-logo.psd
    photo-logo.psd
    94.4 KB · Views: 34
Matt use the pen tool to outline your design. Its pretty easy to use if you need a good tutorial check out mister o class on wordpress I have a few tutorials on there that can help. Also the font type is Mistral. If you need help let me know. Also if you cant get this to work tell me.
 
I think redrawing it in Illustrator would be the best way to make it scalable.

This took 5 minutes. It shouldn't be too difficult to re-draw.


Agent
 

Attachments

  • Untitled-1.png
    Untitled-1.png
    7.8 KB · Views: 27
Thanks CoVillans, yeah I had a go with the pen tool,I found that the outline of the circle wasn't perfect. So I thought I could draw a black circle using the ellipse and use the pen tool to trace the blades inside the circle. But that is as far as I can go I have no idea how to accomplish this. Could you provide me with step by steps please?

Thanks

Matt
 
Thanks agentmoeller

With no experience with illustrator at all, this would take me 5 hours I'm sure!!! So how did you do thin then?

Thanks

Matt
 
I trans logos for clients in CS3 ext with the lasso tool it's more precise and time consuming but accurate. There is also a background erasing tool for solid backgrounds and a magic eraser I start with these tools "FIRST" for solid color backgrounds then do my drawing...see this tutorial step by step....

BACKGROUND ERASE TOOL IN PHOTOSHOP -HOW IT WORKS
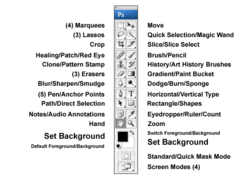
Updated adding Tutorial- since I see you asked for step by step maybe some images will help. To access the embedded eraser tools just right click on the erase tool and see the extended menu for the inner eraser tools...
imgres
imgres
toolbarhint.png


How this works is the center cross hair in the middle of the brush will only remove what ever color you click from the center. As long as it's on the color, only that color will be removed at a time.


Now even though you use these tools, there are times that auto removals wont get fine edges. That being said they will shorten your time in doing the removal overall, so always start with using the background removal tool or magic eraser tool first then (ZOOM) in and refine the edges with the Lasso.

Since zooming in puts every pixel in a block I change the shape of my brush to block at the top of the screen when I am doing this.
For unusually large images, zoom in a lot until each edge resembles a square.

The large the image the more time it takes so just do some until you're tired and save the PSD layered file and pick up where you left off when you return.

Once you have transparent image is complete use rectangular marquee tool to make a rectangle around the area and cut it from it's background create new transparent document (Specify exact dimensions usually either the same width and height of your cropped logo or a little larger then paste it inside and save as PNG file or whatever you need..

Later you can open it and add shadowing and gradient effects , text etc for the web.

Hope that helps.

Mel
 
Last edited:
Thanks Mel for the detailed walkthrough, I used the background removal tool like you suggested and everything turned out just right!

Thanks again.

Matt
 

Back
Top