What's new
Photoshop Gurus Forum

Welcome to Photoshop Gurus forum. Register a free account today to become a member! It's completely free. Once signed in, you'll enjoy an ad-free experience and be able to participate on this site by adding your own topics and posts, as well as connect with other members through your own private inbox!

Colour prints from scanned colour negatives


JoeJ

Well-Known Member
Messages
122
Likes
20
I use a hp scanjet 3970 flatbed scanner for colour negatives, but am unable to invert the scanned negatives to colour prints.

I also use Windows 8.1 and Photoshop CS6.

My computer is a laptop.

Have used the INVERT tab but no success.

Can anyone kindly let me have step-by-step directions to solve this problem please?

Thank you all.

JoeJ
 
Can you provide an example image so that we can make sure a solution will work for you?

Invert should do the trick but of course it depends on the image.

Before posting an example just try 'Invert' again but place a pure 'Black' background behind it.....so bottom layer 'Black', then image with 'Invert' adjustment layer above it.

negative_MT_01.jpg

That should work....not sure why it isn't for you.

Regards.
MrToM.
 
Last edited:
Many thks for prompt reply.

When I invert the image to send to you, what means "place a black background behind it"? Does it mean create a new layer in the layers palette for an image that shows a rectangular figure in black?

Pardon me for bothering you so much, but as a newbie I need all directions spelled out like a child being spoonfed, even though I am an old-age civil service pensioner...

Will take your next message tomorrow, as it is now my bedtime and my eyes are heavy with sleep.

With renewed thanks,

JoeJ
 
No worries at all.

I've added an image to my above post which should make it easier for you to follow.....but any problems just ask.

The normal way would be to just use IAMGE > ADJUSTMENTS > INVERT but you've said this doesn't work?

image_adjustments_invert_MT_01.jpg

What result do you get if not a positive?

Regards.
MrToM.
 
Last edited:
"Invert" will not work. Sorry, but it just isn't that simple. ... even to get only half-way decent results.

First of all, every color negative film that I know about since the 1960's has a uniform orange base color, and all the photochemistry that occurs (ie, that "stuff" that's recording the actual image) takes place above that layer. So, the effects of the orange layer have to be removed before you even begin to concern yourself with the actual inversion process.

Second, the photosensitive layers in different types of color film all have slightly different sets of color sensitive dyes, and each dye has a different curve of density vs exposure, the peak and width of each spectral peak is different, etc.

Third, if the film is at all old, both the orange layer, as well as the photosensitive layers all change with respect to hue, saturation, maximum and minimum densities, the gamma for each of the 3 density vs exposure curves. And to throw another curve ball, some emulsions like the high end Fuji series actually have 4, not 3 photosensitive layers.

Fourth, you have to have your scanner under color management. In other words, you need to have an input device color profile for your particular scanner installed on your system, so the more or less raw numbers that the scanner sends to your computer are interpreted in the correct way. This is very analogous to output device color profiles used to get prints to match the image you send to them.

If you are good at PS, one can usually get a tolerable print on your own using nothing except Photoshop's native tools. The only problem is that a procedure that you devise which works for one frame on one type of film will almost certainly not work for other types of film, and can easily be substantially off even for different frames in the same roll, e.g. underexposed vs properly exposed frames. Trust me -- I've been down this road decades ago.

Everyone that shoots negative film faces this problem. The best results for the do-it-yourselfer come from software systems that have all of the above information for a wide variety of emulsions already stored in its database.

This is one of the best known systems:
http://www.colorneg.com/colorperfect.html?lang=en
http://www.c-f-systems.com/Plug-ins.html

I've never used it, but people that I know that shoot negative film report that it works quite well. Not perfect, but vastly better than trying to do it on your own.

If you want to look over the field, Google {color negative film software plugin}, and you'll come up with something like 1.5 million hits. Most of there are people griping about how hard it is to do, but scattered among them there will be useful information for the DIY'er.

HTH,

Tom M
 
The fellow who made the video did bring up one point that I forgot to mention to the OP: AFAIK, the OP's scanner can only scan reflective targets (eg, prints, not transparencies). This is because the light source is on the same side as the imaging lens in his scanner. In contrast, scanners that can successfully scan transparencies have two light sources, one on either side of the target, either of which can be activated as needed.

The producer of that video does suggest a method to circumvent this: holding the negative up to a source of light. The problem is that the way he demonstrates it (ie, holding the camera and negative by hand) is wildly misleading. The depth of field for typical imaging distances using typical lenses is typically well under a mm or two (see below) at the smallest apertures typically used to avoid extensive diffraction blurring.

DoF_calculation_macro.jpg

This means that you have to hold the negative exactly perpendicular to the axis of the camera to this degree of accuracy, you can't sway relative to the negative strip by more than plus or minus less than a mm, and the negative strip can't curl out of plane by more than a mm. The producer just glosses over this, as he also did when he also "magically" knew what settings to use for each of the 5 sliders in each of the three channels of the Levels adjustment layer. :rolleyes:

Tom M
 
First of all, my renewed thanks for all the trouble you're taking to help me.

I managed to get two layers, one above the other, in the layers palette: one layer was for the white rectangle, the second one for a solid black colour. However, when I then tried to create a layer for the scanned negative, the other two layers vanished ! I clicked on Invert but nothing happened.

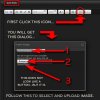
Have also tried to send you an image of a scanned negative, but how to send it?

Kind regards, and thanks afresh.

JoeJ
 
Once again, thank you very much, but sorry to disappoint as I cannot make headway.

Have managed to get three layers on top of each other, as you suggest, i.e. white, scanned negative, black, in that order, with black at the bottom.

I then click Invert---and nothing happens...

A friend told me that my problem is with the scanner software which is not available with Windows 8.1. Is this so? Can I buy this software? Is it pricey?

Renewed thanks and kind regards.

Grateful JoeJ
 
I don't know where you are getting this 'white' layer from, I've never mentioned it but never mind that, it was only something for you to try before we went deeper into it.

So forget the layers for now.

Upload an example image, or part of one, which we can use to see where the problem may be.

Yes, it could quite possibly be that whatever you are using to scan the negatives just doesn't work with your current system, but without seeing an example its impossible to suggest what the problem could be or a solution to make it work.

Regards.
MrToM.
 

Back
Top