What's new
Photoshop Gurus Forum

Welcome to Photoshop Gurus forum. Register a free account today to become a member! It's completely free. Once signed in, you'll enjoy an ad-free experience and be able to participate on this site by adding your own topics and posts, as well as connect with other members through your own private inbox!

Color adjustments reverts when trying to print


Coffee_Girl

Active Member
Messages
39
Likes
8
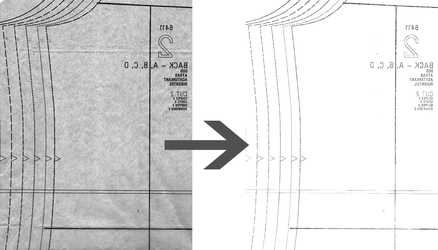
I scanned some images, the images are dark and i am trying to save ink so I use PS > Image > Adjustment > Curve...I make it as highly contrast as possible to remove the gray and leaving the lines (which is what i want). However when I go to print everything just reverts back to the dark gray!
I've tried to make new layers and merge white layers to lighten the image, nothing works. The image just reverts back to the grey, I've even tried to make several layers of curve adjust and making it full on white....still it just reverts. I am a total PS noob so please let me know if anyone can help with this!
0.png

778.png
 
I cannot replicate the problem but...
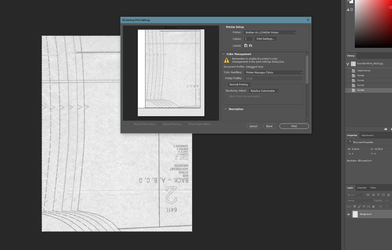
It appears from your screenshot that you are working on a locked 'Background' layer. Whilst not totally the wrong thing to do it may be preventing access to the image, I dunno.

There is very limited info here to go on so it's mainly guess work but try unlocking that layer by clicking the padlock and also try adding your 'curves' as an adjustment layer instead of directly to the image.
Click the small half black / half white circular icon at the bottom of the layers panel and select 'curves' from there...it will become an 'editable' adjustment layer. (Give 'levels' a try too.)

I've no idea if this will change anything, it didn't for me it works just fine, locked or not, but give it a go, you never know with PS.

Failing that, upload the psd file so we can try to replicate the problem with your actual image.

Regards.
MrToM.
 
Two thoughts. I don't know if this will solve your problem, but it's worth a try.
  1. I noticed that your image is a Grayscale. Try changing it to RGB to see if that does anything. Go to Image>Mode>RGB Color.
  2. Instead of using multiple Curves adjustments, as you described, try using a Threshold adjustment. Threshold forces everything to be either pure black or pure white. Play with the Threshold slider to get the best balance of black vs. white.
 
I cannot replicate the problem but...
It appears from your screenshot that you are working on a locked 'Background' layer. Whilst not totally the wrong thing to do it may be preventing access to the image, I dunno.

There is very limited info here to go on so it's mainly guess work but try unlocking that layer by clicking the padlock and also try adding your 'curves' as an adjustment layer instead of directly to the image.
Click the small half black / half white icon at the bottom of the layers panel and select your 'curves' from there...it will become an 'editable' adjustment layer. (Give 'levels' adjustment a try too.)

I've no idea if this will change anything, it didn't for me it works just fine, locked or not, but give it a go, you never know with PS.

Failing that, upload the psd file so we can try to replicate the problem with your actual image.

Regards.
MrToM.
Hi there, ive tried a new adjustment layer and it didnt work even when i "flatten" or "merge" layers.

Something that sort of works is when i go to Image > Mode > RGB color

I dont know what RGB is or what it does but it makes some adjustments work but not all.

When i used my scanner to scan the images, i put it on a "Black And white" mode so when it scans, everything is black and white by default. Not sure if that is the reason why the jpegs are saved in a weird way.


BTW I uploaded my psd file. Thank you!
 

Attachments

Two thoughts. I don't know if this will solve your problem, but it's worth a try.
  1. I noticed that your image is a Grayscale. Try changing it to RGB to see if that does anything. Go to Image>Mode>RGB Color.
  2. Instead of using multiple Curves adjustments, as you described, try using a Threshold adjustment. Threshold forces everything to be either pure black or pure white. Play with the Threshold slider to get the best balance of black vs. white.
Yes RGB works for me but i have to make a ton of adjustment layers to finally lighten it enough to be print able. For some reason every time i lighten it up and then "flatten" it will restore 90% of the original "darker" color so i have to keep making new adjustments and pulling the arrows so that the whole image is pure white and then flatten image and then do it again 7 times. (i included a PSD file of the image) thanks!
 
For some reason every time i lighten it up and then "flatten" it will restore 90% of the original "darker" color.

Yes, it is doing that for me, as well, when I use your PSD file. I've never seen this before. I also tried various alternatives to flattening, such as Stamp Visible, but that didn't work either.

I have no idea why you file is doing this, but I found a way around it:
  • Take your unedited, dark Photoshop file and save it as a PDF file.
  • Once it's saved, open the PDF and then resave it back to a Photoshop file.
  • From here, normal Photoshop techniques are now working for me. (Try a Threshold adjustment rather than Curves. I think you'll like it better.)
 
Ha ha....I did the same thing, converted to a pdf and got the same results....but it doesn't explain the issue, and to be honest I don't actually think there is one.

This image (.psd) is big. The detail on the page is [mainly] just a whole bunch of single pixels, varying in greyscale only very slightly.
When viewing the image @100% it becomes obvious that it's no trivial task to remove 'just' those unwanted pixels.
I tried various adjustments all of which made the image 'look' as if it was clean, but on closer inspection there where still plenty of 'unwanted' pixels remaining.

The problem is the pixels you want to keep are the same colour as those you want to discard, any 'adjustment' is going to work on them both.
In order to differentiate between the two it's going to take something a little more involved. (And no, offhand I don't know what that would be.)

On the other hand, when viewing the 'Print preview', these pixels are exagerated, to show that they are there....the preview cannot be viewed at 100% so this 'exageration' is to make the user aware that there are still printable pixels even if they are not visible when editing...except at 100%.

Keep in mind that 1px of your image needs at the very least 1px of your monitor to be visible, this is 100% or 'Actual pixels'. Any less and those pixels just cannot be displayed.
The renderer for the 'print preview' ignores this as it's trying to alert you of what is 'printable'.

Depending on how large you intend to print this document I don't think you need worry about the 'print preview', the detail, [a single pixel], is just way too small to be printed and will just not be printed.
Obviously the larger you need to print this the more work you'll need to do to remove those pixels.

You'll have to experiment with print size but I reckon for a small-ish print it wont even print those pixels, even though they are there. (And alarmingly visible.)
Try with a small cropped section to test it, I fully appreciate your efforts to save ink, they should launch ships with it to really show off!

Anyway, those are my thoughts, scrambled as they are.

Regards.
MrToM.
 
Last edited:
Thanks for all the help, I agree the image is too large but I can't reduce it as the jpegs are parts of a larger picture and the image needs to be true to size. I'll have to print the images and then piece them together sort of like a jigsaw puzzle.

I can take the advice to save to pdf and then re-save to jpeg but I am working on hundreds of these images at a time so this task is very time consuming.
 
I'm not convinced that saving to pdf is going to be any different, the image will still have unwanted pixels in it...just because you cannot see them does not mean they are not there.

As I said, you'll have to experiment with print sizes, smaller prints should be ok, larger ones not so, which unfortunately sounds the case.

Only you can tell once you try printing a section out, if you can still see those pixels then you'll have to find a way to remove them.
Even If you cannot remove them completely just getting them as light as you can without losing the other detail will mean the amount of ink used will be minimal anyway.

Remember though, the 'print preview' will still probably make those pixels 'darker' to make you aware of them.
PS 'print preview' may have a policy similar to transparent pixels in a marquee whereby anything less thsan 50% isn't shown...it may be similar with the 'print preview'...anything lower than 128 gray doesn't get shown..???

I dunno, PS is a law unto itself.

Regards.
MrToM.
 
I "kinda" figured it out, I transformed the image mode to RGB ...then placed a new layer over the image, "filled" the layer with white, changed opacity to 90%,....the image looks like a blank canvas, but when you print it out...the image shows up as a very very pale gray =P:laugh:
 
Hi @Coffee_Girl

Your problem threw me for a bit and even thought that there could be PSD corruption (but that was not it)

Finally figured it out. There are two issues going on
1) Your image when examined very closely are mostly pixels that are totally black or totally white
2) #1 in combination with a Photoshop viewing shortcut causes the issue to occur.

#2 will not occur when you view at 100% or larger magnification. Under those circumstances, when you apply a curves adjustment Layer (or even a threshold adjustment Layer) will pus the near black pixels to black and the near white pixels to white. When you look at it on a high resolution screen your eye percieveds it as gray.

So here is a solution that will work

Apply a Gaussian blur of about 1.6 pixels and then apply a Threshold adjustment Layer set to about 110. Then to avoid the #2 issue of improper display by Photoshop, stamp the Layers or similarly merge down or flatten and you will have the result you want.

I am not sure why the original scan did not have more levels or gray instead of the mostly black or white pixels yet that is a separate issue

Hope this helps

John Wheeler
 
To add some pictures on to the above post.

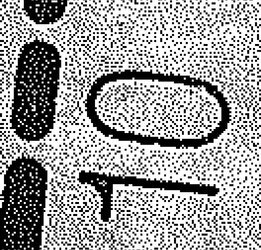
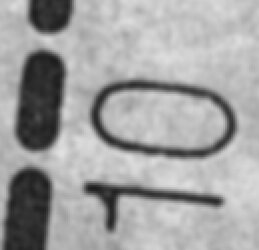
Here is a cut and paste from an 800% view of the scan:

Screen Shot 2023-06-04 at 5.19.58 PM.jpg


Here is the same view with a Threshold adjust Layer applied. You will see that the light gray pixles turn fully white yet for the most part the image has not changed.

Screen Shot 2023-06-04 at 5.20.12 PM.jpg


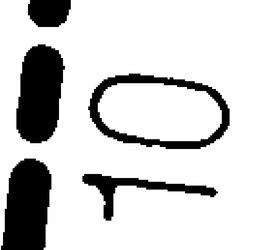
However, if a gaussiian blur of about 1.6 pixels is applied first you get:

Screen Shot 2023-06-04 at 5.20.29 PM.jpg


And then apply a threshold adjustment Layer you get:

Screen Shot 2023-06-04 at 5.20.39 PM.jpg

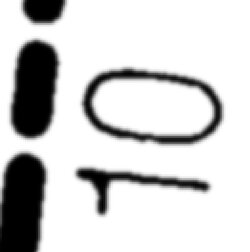
If you do not like the Jaggies you cold use a curves adjustment Layer instead of the Threshold adjustment Layer or just a a 1 pixel Gausisan blur to the above image:


Screen Shot 2023-06-04 at 5.26.23 PM.jpg


Once root cause was understood of what was causing the issue the solution was pretty straightforward.
If you have additional questions just ask away
John Wheeler
 
Hi @Coffee_Girl

Your problem threw me for a bit and even thought that there could be PSD corruption (but that was not it)

Finally figured it out. There are two issues going on
1) Your image when examined very closely are mostly pixels that are totally black or totally white
2) #1 in combination with a Photoshop viewing shortcut causes the issue to occur.

#2 will not occur when you view at 100% or larger magnification. Under those circumstances, when you apply a curves adjustment Layer (or even a threshold adjustment Layer) will pus the near black pixels to black and the near white pixels to white. When you look at it on a high resolution screen your eye percieveds it as gray.

So here is a solution that will work

Apply a Gaussian blur of about 1.6 pixels and then apply a Threshold adjustment Layer set to about 110. Then to avoid the #2 issue of improper display by Photoshop, stamp the Layers or similarly merge down or flatten and you will have the result you want.

I am not sure why the original scan did not have more levels or gray instead of the mostly black or white pixels yet that is a separate issue

Hope this helps

John Wheeler
OMG this worked!!! Absolutely brilliant ! I have been trying to solve this issue for years, even bought the newest PS but it still happens on all versions. I can't believe the solution is so simple! The program that i am using to scan images is the reason why the image is so funky, it scans images in b&w and saves it in jpeg. I am saving this thread for the future. Thank you so much!!
 
You are more than welcome @Coffee_Girl.
Your explanation of the scanning makes sense for why it looks the way it does. Unfortunate that the issue was a problem for so long.
Not sure it's possible yet if you scanned to grayscale instead of just black and white the problem would have been solved as another option to consider too.
Best regards
John Wheeler
 

Back
Top