Photoshop Gurus Forum
Welcome to Photoshop Gurus forum. Register a free account today to become a member! It's completely free. Once signed in, you'll enjoy an ad-free experience and be able to participate on this site by adding your own topics and posts, as well as connect with other members through your own private inbox!
You are using an out of date browser. It may not display this or other websites correctly.
You should upgrade or use an alternative browser.
You should upgrade or use an alternative browser.
- Messages
- 23,906
- Likes
- 13,636
- Messages
- 23,906
- Likes
- 13,636
Open your coin in Photoshop. In the layers panel name it COIN.
Create a duplicate of the COIN layer. It should name itself COIN copy.
Turn off the original COIN layer.
Highlight the COIN copy layer.
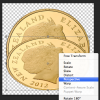
Hit the Command/Control + T keys to enter the Free Transform mode.
Right click within the transform box and choose DISTORT.

Grab the top center handle and pull straight down to about here...

Right click again within the transform box and choose PERSPECTIVE.

Grab the lower right or left handle and move slightly towards the center about like this....

Hit enter of click the checkmark to accept the transformation.
Next, create a new layer above the COIN copy layer. Name the layer GRADIENT.
Hold the Command/Control + mouse click the COIN copy's thumbnail.
This will create a selection around the coin.
Make sure your new layer is Highlighted.
Hit the letter D on your keyboard. This resets your Fore and Background colors to a default of black and white.
Select your Gradient Tool. Open your Gradient Editor by clicking here...

Select the Foreground to Transparent preset....

Create a gradient starting at the bottom and going upwards like this....

When done hit Command/Control + D to deselect, lower the GRADIENT layers opacity to suite.
Next create a new layer below the COIN copy layer, name it EDGE.
Select your Elliptical Marquee tool. Create an ellipse like the following....

NOTE: You can move the ellipse around for positioning while your creating it by holding down the space bar.
Open your COLOR PICKER...

Sample a darker area of the gold color. Click OK.
Fill the the elliptical selection with this newly sample color.
Hit Command/Control + D to deselect.
You should be done....


Create a duplicate of the COIN layer. It should name itself COIN copy.
Turn off the original COIN layer.
Highlight the COIN copy layer.
Hit the Command/Control + T keys to enter the Free Transform mode.
Right click within the transform box and choose DISTORT.

Grab the top center handle and pull straight down to about here...

Right click again within the transform box and choose PERSPECTIVE.

Grab the lower right or left handle and move slightly towards the center about like this....

Hit enter of click the checkmark to accept the transformation.
Next, create a new layer above the COIN copy layer. Name the layer GRADIENT.
Hold the Command/Control + mouse click the COIN copy's thumbnail.
This will create a selection around the coin.
Make sure your new layer is Highlighted.
Hit the letter D on your keyboard. This resets your Fore and Background colors to a default of black and white.
Select your Gradient Tool. Open your Gradient Editor by clicking here...
Select the Foreground to Transparent preset....

Create a gradient starting at the bottom and going upwards like this....

When done hit Command/Control + D to deselect, lower the GRADIENT layers opacity to suite.
Next create a new layer below the COIN copy layer, name it EDGE.
Select your Elliptical Marquee tool. Create an ellipse like the following....

NOTE: You can move the ellipse around for positioning while your creating it by holding down the space bar.
Open your COLOR PICKER...

Sample a darker area of the gold color. Click OK.
Fill the the elliptical selection with this newly sample color.
Hit Command/Control + D to deselect.
You should be done....


MrToM
Guru
- Messages
- 3,595
- Likes
- 3,322
Nice tutorial IamSam.
Quick question...
Is there any advantage to selecting 'Distort' after Ctrl / Command + T ?
Couldn't you just grab the center top handle and scale it downwards after going into free transform mode?
I've tried both ways and can't 'see' any difference, but knowing you there must be otherwise you wouldn't have done it!
Regards.
MrTom.
- Messages
- 23,906
- Likes
- 13,636
Why yes you can. Sometimes the the answer lays in the path of least resistance...............if your getting what I'm saying?SCTRWD said:You can get what you want easily using 3D tools in PS
Paul
Former Member
- Messages
- 12,878
- Likes
- 7,023
You can get what you want easily using 3D tools in PS
Gonna show us then..............please.


