What's new
Photoshop Gurus Forum

Welcome to Photoshop Gurus forum. Register a free account today to become a member! It's completely free. Once signed in, you'll enjoy an ad-free experience and be able to participate on this site by adding your own topics and posts, as well as connect with other members through your own private inbox!

Check how many gradations of color are in the image


PutinHuilo

Well-Known Member
Messages
65
Likes
0
Say i have photo of human face, in 8 bit jpeg i want to measure how many color gradations are on the fase on certain area how do i go about it?

I need ti to clearly show see difference between 8 bit and 12 bit files to a friend.

I currently using posturize adjustment layer, but i don't think this is very scientific approach, is there better way?
 
Hi @PutinHuilo
Different ways demonstrate the difference between an 8-bit image file and a 12-bit image file exist. Yet a few more details might help provide a good recommendation.
- Is this a question of the value of a 12-bit image vs an 8-bit image?
- or is the question about the value of a 12-bit non-JPEG format image compared to an 8-bit JPEG image (with lossy compression?). In this case, there is a big difference depending on the compression level used in the JPEG file. Is that a factor of interest?
- Is this a mathematical question to show the difference between 12-bit and 8-bit or quality level based on what the eye sees? The eye-brain combination is inferior at seeing color resolution and much better at seeing luminosity/edge resolution.

My approach would likely differ based on what you are trying to demonstrate to your friend there

If your friend is questioning the value of 12-bit non-lossy files vs 8-bit lossy compression JPEGs (i.e., why bother with 12-bit), I have some ways to demonstrate what one loses going to a compressed JPEG. I have found that even when JPEGs may look visually acceptable, it can make it much more difficult to do quality post-processing as the JPEG compression hides most of the compression in the color components of the image, which more easily turns into artifacts when making color adjustments on an image.

I hope the above questions make sense
John Wheeler
 
I am more like trying to show difference in gradations 8 bit has 256 gradations of colors per channel and 12bit has 4096colors per channel

E.g. i take photo in RAW 12 bit and import it in photoshop then convert one copy of it to 8 bit and other to 16 bit (really just 12bit inside 16 bit container).
Then i want to zoom on a portion of the photo and somehow see the actual difference in gradations. Or apply some filter that will equally degrade both photos and show that 12 bit version degraded much more. need some visual way to show the difference.
 
HI @PutinHuilo
I will show you how to demonstrate the difference in high-bit vs. lower-bit images and the difference it makes. You could use the same technique on your images.
However, you may not get the desired results you seek. The original raw image must be extremely low noise and sharp to see such differences. Otherwise, the noise in the image will mask the differences, or the differences you can find will be limited to subset areas of the image.
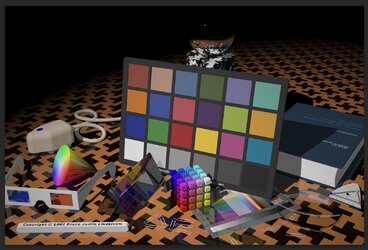
So, from an academic point of view, I am going to start with a 3D 16-bit test image (projected to a 2D image) that, with the shown technique below, will show the "color buckets" quite clearly.

First, let me give the URL link for this test image (it is a zip format and was created by Bruce Lindbloom. I use it for test situations:
http://www.brucelindbloom.com/downloads/DeltaE_16bit_gamma2.2.tif.zip

Here is a screen capture of the whole image:
Screenshot 2024-01-26 at 10.38.03 PM.jpg

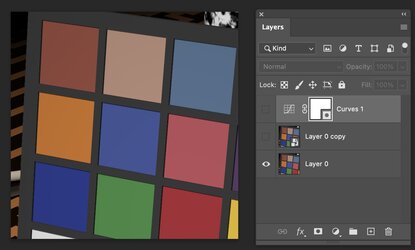
I will use just a cropped area of the image and three Layers to demonstrate. Here is a screenshot of the cropped area and the lowest Layer of the Layer stack, which is the 16-bit cropped version of Bruce Lindbloom's image:
Screenshot 2024-01-26 at 10.39.18 PM.jpg

Note, for this technique to work best, you need to turn off the "dither" option in Edit > Color Settings and uncheck the "Use Dither" checkbox. That option is to help reduce banding by adding noise when changing color spaces for going from 16 bit mode to 8 bit mode.

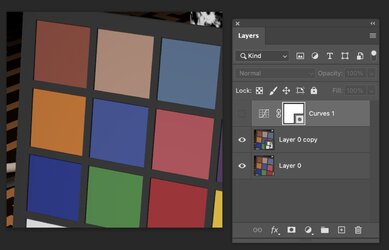
The second Layer is an 8-bit version of the 16-bit image. This can be done by saving to an 8-bit PNG file, yet the approach I took was to
- Duplicated the lower 16-bit image
- Turn it into a Smart Object
- Open that Smart Object
- Convert via Image > Mode > 8-bit
- Saved the Smart Object (PSB file)
- And return to the original document (which converts the 8-bit back into 16 bits yet retains the posterization of the 8-bit image)

The image below will look identical yet I have the 8 bit version is made visible in the Layer Stack:
Screenshot 2024-01-26 at 10.48.56 PM.jpg

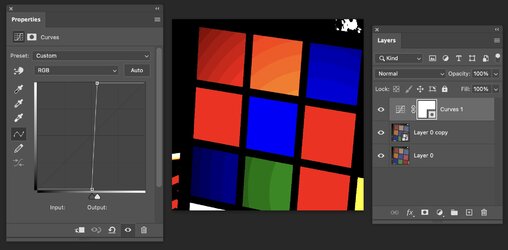
Now, to reveal the banding cause by going to 8 bit, one just has to add a Curves Adjustment Layer set very steep, and the banding shows up in the colors for the 8-bit version of the image (click on the image to enlarge and see the banding better):
Screenshot 2024-01-26 at 10.51.43 PM.jpg

Now to demonstrate the difference between the 8-bit version and the 16-bit version, all I did for the image below is to turn off the 8-bit Smart Object version, and the banding is gone:
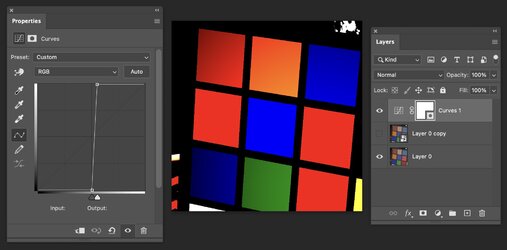
Screenshot 2024-01-26 at 10.53.11 PM.jpg

If I had converted Bruce Lindboom's image to 12-bit and compared it to an 8-bit image, the results would have been similar.

I hope this provides you with an approach to consider, yet don't be surprised if a generic raw image with noise makes it much more difficult to see the difference.
John Wheeler
 
Note, for this technique to work best, you need to turn off the "dither" option in Edit > Color Settings and uncheck the "Use Dither" checkbox. That option is to help reduce banding by adding noise when changing color spaces for going from 16 bit mode to 8 bit mode.
Great advice thank you i never know about dither option that's why i struggle to produce banding in the past, it all looked way too smooth, ugly, but still no banding, i really wanted to get banding and with this option off it shows up.

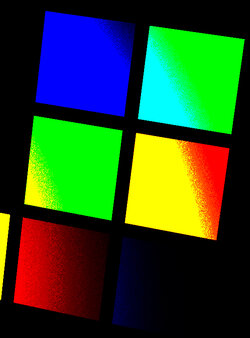
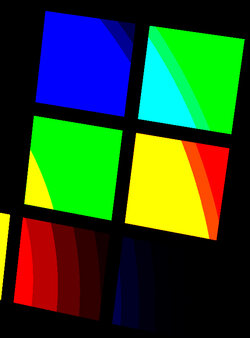
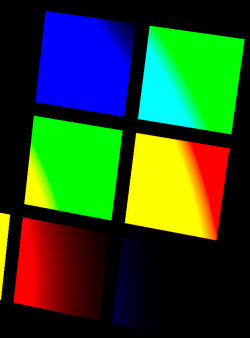
8.jpg 8-banding.jpg 16.jpg
Now its easy to see which one is 8 bit and which one is 16 bit image.


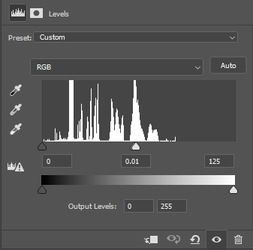
I did not read all your replay entirely yet, i used my own method that i use for ages, however with dithering off now it gives expected results.
1.png
Basically move middle slider of levels adjustment to the right to make histogram flat and then move both sliders from right to left until produce needed results.


By the way do you know why transition (gradient) between black and red color (black and any bright color really) longer than one between yellow and red or any other bright colors?
 
Last edited:
Great advice thank you i never know about dither option that's why i struggle to produce banding in the past, it all looked way too smooth, ugly, but still no banding, i really wanted to get banding and with this option off it shows up.

View attachment 142484 View attachment 142486 View attachment 142485
Now its easy to see which one is 8 bit and which one is 16 bit image.


I did not read all your replay entirely yet, i used my own method that i use for ages, however with dithering off now it gives expected results.
View attachment 142487
Basically move middle slider of levels adjustment to the right to make histogram flat and then move both sliders from right to left until produce needed results.


By the way do you know why transition (gradient) between black and red color (black and any bright color really) longer than one between yellow and red or any other bright colors?

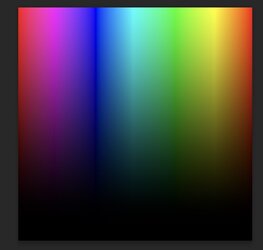
Here is a visual that I think helps show why banding is a longer transition in some cases vs others. This is just a square image with a horizontal rainbow gradient and a vertical black-to-white gradient set to multiple. The distance as you go from the bottom to the top (Black to Highly saturated color) is a longer distance than going from colors such as yellow (or cyan) to other colors. If you think about the color wheeler, the first third goes from red to orange to yellow to yellow-green to green. So, it crams a lot of colors into a smaller part of the wheel. Also, the width of yellow in the rainbow gradient is much smaller than the width of other colors. That is not a scientific answer, yet it might give you a feel for the reasons.
Hope that helps
John Wheeler

Screenshot 2024-01-28 at 5.39.55 PM.jpg
 
Thanks that explains it, by the way could you show example of color wheel you mentioned, there are too many versions if i use googole images.

Another question i have if there's 256 color shades for R G B channel in 8 bit image then how many shades are allocated for each color (Red Yellow Green Cyan Blue Magenta)?
what formula is used something like (256 * 256 * 256) / 6 = 2796202 or 256 / 6 = 42 shades per color?
 
Last edited:
Thanks that explains it, by the way could you show example of color wheel you mentioned, there are too many versions if i use googole images.

Another question i have if there's 256 color shades for R G B channel in 8 bit image then how many shades are allocated for each color (Red Yellow Green Cyan Blue Magenta)?
what formula is used something like (256 * 256 * 256) / 6 = 2796202 or 256 / 6 = 42 shades per color?
Hi @PutinHuilo
Again, I am not a color scientist, and there are many disciplines where they use their language regarding colors, such as shades, tints, etc. There are also several color models, such as RGB, HSB/HSV, and HSL. You might want to give those a look if you need more details.

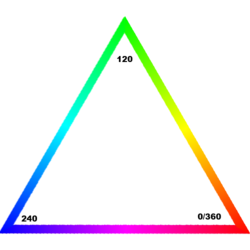
If I focus on the HSB model, it stands for Hue, Saturation, and Brightness. Hue goes from 0 to 360 degrees, saturation from 0 to 100%, and brightness from 0 to 100%. That is the model with which I would describe the color circle or color triangle (my preference).

In the HSB model, each color triangle side covers 120 degrees of Hue while Saturation and Brightness are at 100%. So this Color Triangle demonstrats the full range of Hues yet does not cover levels of Saturation or Brightness. That might be a starting point for your thinking.

From 0 degrees to 360 the colors progress as Red, Yellow, Green, Cyan, Blue, Magenta, Red

I hope this helps with your question
John Wheeler

Color-Triangle.png
 
i only see option for 32-16-8 in Photoshop, how to convert to 16 bit to 12-bit or 10-bit?
Hi @PutinHuilo
Conversion from 16 bits to a smaller number of bits is very similar to the effect of the posterization filter.

The approach to do:
- First, linearly reduce the value of all the pixels. This truncates the lower bit values
- and then increase those reduced values back up to the original values.

I will demonstrate this on an 8 bit gradient yet you can do the same on a 16 bit number.

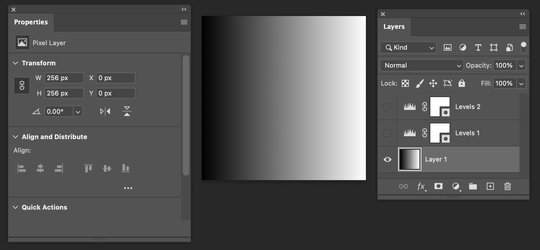
Below is a three Layer Photoshop Document.
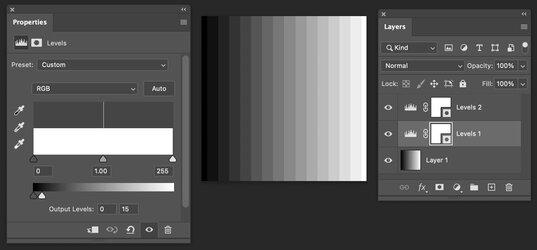
The lowest Layer is a uniform gradient from 0 to 255. (or 256 buckets). I want to reduce the number of buckets by 16.

Screenshot 2024-01-29 at 12.00.32 PM.jpg

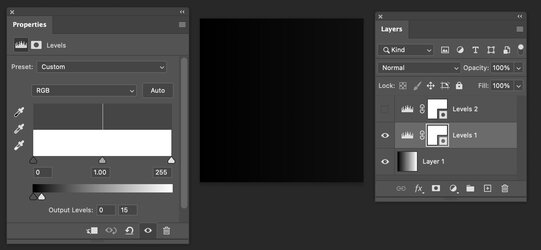
So the middle Layer is a Levels Adjustment Layer where I have set the maximum output to the value of 15, and all the pixels are remapped to values of 0 to 15 or 16 buckets.

Screenshot 2024-01-29 at 12.00.49 PM.jpg

The top Layer is to increase everything back up to 255. Just move the top white slider down to 15 to reverse the process.
The result ends up being a posterization effect, creating banding.

Screenshot 2024-01-29 at 12.01.03 PM.jpg

If you want to change a 16-bit image down to a 12-bit image, you take the 16-bit image and use the same Levels adjustment Layers with the same settings as in the example above. Going from 16 bits down to 12 bits decreases that amount of buckets by a factor of 16

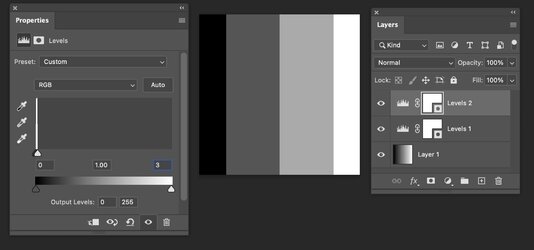
To take a 16-bit image down to 10 bits, one wants to decrease the number of buckets by a factor of 2^6 or 64x. The first Levels Layer should have the Output Levels set to 3 (0 to 3 is four levels or 64X lower than 256), and for the upper Levels Adjustment Layer, you set the White slider also to 3 to increase the values back up to the original value, and it will be posterized to 4 levels if starting with a 8 bit image or 2^10 - 1024 levels if starting with a 16 bit image.

I am showing the results when using an 8-bit starting image:

Screenshot 2024-01-29 at 12.26.35 PM.jpg


I hope this helps you understand how to turn a 16-bit image into 12 bit or 10-bit image.
John Wheeler
 
Hi @putin

Sorry about the confusion. I don't always provide high-clarity explanations.

To reduce that bit depth of an image it is very akin to what the Posterization Adjustment Layer does. Reducing the bit depth resolution or number of unique "RGB" combinations that are allowed. When you have posterization or reduced bit depth, the image's histogram will start to have blank gaps. That is the telltale sign.

Unfortunately, the Posterization Adjustment Layer does not address the case where you want to reduce a high bit depth Photoshop image to 12 or 10 bits.

I will attach two PSD files that will do just that for your use if still of interest. Just some basic background on the approach.

First point of note: The 16-bit mode in PS is only 15 bits internal to Photoshop. PS can read 16-bit images, yet 16-bit mode converts them to 15-bit (PS oddity and won't provide more details)

So reducing 16-bit files to a lower-bit is reducing PS 15-bit files to a lower-bit depth.

It's a two-step process.

1) For each bit depth reduction from 15 bits, you reduce the image RGB values by that many factors of two. Going from 15 bits to 12 bis would be reduced by 2, then 2 again, and then 2 once again (or 8 in total).

2) The second step is to increase the RGB values by the same number of factors of two increasing by 2, then 2 again, and then 2 again (or 8 in total)

Going from 15 bit to 10 bit it would be 5 factors of 2 decreasing and the same 5 factors of 2 increasing.

I have found doing the reduction and enlargement in multiple steps provides a better result (details not included).

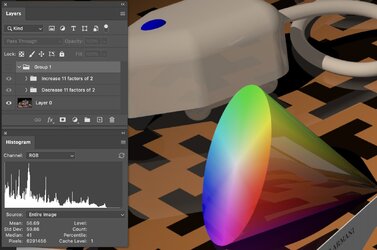
Here are the Layers, Histogram, and 16-bit Photoshop Image (15-bit inside PS) (part of test image from Bruce Lindbloom).

Screenshot 2024-02-01 at 10.47.36 PM.jpg

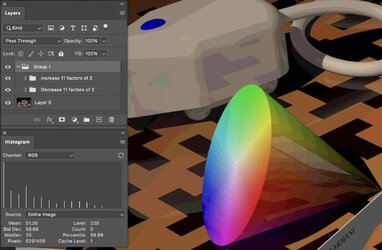
Here is the same image reduced down to a 4-bit depth image. Note in the histogram there are only
2^4 or 16 levels show the posterization effect when reducing the bit depth.

Screenshot 2024-02-01 at 10.48.01 PM.jpg

I have attached the PSD file.

You replace the image I used with your image.
I have two groups: one includes the reduction steps (11 to get to 4 bit) and another with the increasing steps (11 to get to 4 bit).

You just need to turn off the visibility or delete the same number of Layers in each group to have the bit depth reduction changed.
Again, you want 3 Layer steps in each group to go from 15 bits to 12-bit and use 5 Layer steps in each group if you want to go from 15 bits down to 10 bits.

Well, I probably beat this one to death, so I will leave it at this post.
John Wheeler
 

Attachments


Back
Top