What's new
Photoshop Gurus Forum

Welcome to Photoshop Gurus forum. Register a free account today to become a member! It's completely free. Once signed in, you'll enjoy an ad-free experience and be able to participate on this site by adding your own topics and posts, as well as connect with other members through your own private inbox!
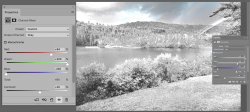
Channel Mixer - Ligten mode only affecting highlights


NemesisWorks

Banned
Messages
822
Likes
208
Hi, I'm trying to add some frost to the green grass and plants in PS using channel mixer with the following settings:
1599302697842.png
But the issue is, it is only affecting the highlights in the image not the midtones etc. I even tried chaning blend modes and settings of CM to no avail. What am I missing? Thanks.
 
Hi Evil Nemesis
I am not familiar with the approach you are taking yet off hand I am not sure why it would work. Do you have a link to a tutorial that would explain this in more detail?
Here is what is going on with this Layer Stack
1) The upper Layer is converted to Monochrome with all pixels set to R=G=B with the contribution to that final value being set how you have adjusted the sliders emphasizing the Greens and Reds and minimizing the blues

2) After that step, the Lighten blend mode on a color channel by channel basis takes the large value or Rs, then Gs, then Bs between your original image on the first Layer and the monochrome second Layer. If the values of the upper Layer are set too high, all you would get is a grayscale image.

That is why I am confused, I don't see how the steps above would isolate just the green colors and then lighten some portion of the greens yet the technique might right now be beyond my understanding.

Any pointers to an example that works with this technique might help debug your problem.
John Wheeler
 
Hi Evil Nemesis
Interesting technique though touchy.
The issue is the technique. The tutorial says " This technique works best on scenic photos, such as of trees, leaves or gardens, but feel free to try it on any images you want." And that is true. If you look at the image in the tutorial it too changes the highlight areas. The areas you might want to frost are not always the highlight areas.
Indeed the upper layer is monochrome and then the lighten blend indicates that take the highest value for each channel separately and use the larger value.
To help zoom in to what you want, leave the Layer Blend to normal and play with R,G,B and constant until the areas you want "frosted" are brighter than the areas you don't want frosted (thats what I did) and then turn on the Lighten blend and fine tune from there.
I found a combination of sliders that might be closer to what you wanted yet I had to play around with it a lot to get that result.
Hope this helps yet I am not so sure if it will.
John Wheeler

Frost-and-Snow-alternate-adjustments.jpg
 
Hey man, thanks alot for in depth answer. Yeah this will help. I had to record a tutorial on this for my YT channel. So now I can use this technique and add a layer mask on duplicated layer. Thanks man.
 
Sounds like a good approach to supplement with a Layer Mask. You might be able to just paint on the Channel Mixer Adjustment Layer Mask as an option. Glad the discussion was helpful and I learned something too :)
 

Back
Top