What's new
Photoshop Gurus Forum

Welcome to Photoshop Gurus forum. Register a free account today to become a member! It's completely free. Once signed in, you'll enjoy an ad-free experience and be able to participate on this site by adding your own topics and posts, as well as connect with other members through your own private inbox!

Can anyone tell me how I can create this in Photoshop?


Jasmine6

New Member
Messages
1
Likes
0
Hi Everyone -
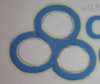
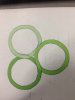
I am not a newbie with photoshop, I have some skill with it, but I have never been asked to create anything like this before and I was wondering if someone here would be kind enough to give me a clue as how to do it. At the moment, I have created the three circles as individual shapes and added stroke outlines to each, but I can't manipulate the strokes into the interwoven loop over top of each other like required. The last attachment is what I have so far, as you can see, I have the overlapping shapes, but I did that by erasing the layers. I need an outline that loops like the drawn picture. Any ideas? I'd really appreciate it! Thank you.
 

Attachments

  • Idea.jpg
    Idea.jpg
    383.7 KB · Views: 0
  • photo.JPG
    photo.JPG
    263.1 KB · Views: 0
  • Logo7.jpg
    Logo7.jpg
    556.8 KB · Views: 0
Hi Jasmine! And welcome to the forum!

These types of renders are somewhat easy to do, but extremely hard to explain!!!

They require that each component is created on it's own layer. All the circles, bridges/crossovers, and shading be on it's own separate layer! Especially the shading!

The bridges or crossovers as you know are made with the Pen Tool, each on it's own layer. Once these are done its a matter of making the proper selections (sometimes multiple selections), inverting those selections and adding in the shading with the Brush tool. The tricky part is eliminating the overspray from the shading! This is where the separate layers are essential. You must then select the appropriate circle and/or bridge layer, invert it, and hit delete to eliminate the overspray. This is why each time you add some shading, it must be on its own layer, otherwise you will delete previous shading!

As for stroking the final image, all I did was add a stroke via layer styles to each of the circles and the bridges. I then hit Command-Option-Shift-E (Mac) or Ctrl-Alt-Shift-E (PC) to merge and copy all visible layers to a new layer. I then used the Brush tool set to the same color as the circles and brushed out any unwanted stroke lines.

I rushed this example so the shading is terrible.

Before brush and after layer merge....

knot_04.png

After brushing out the stoke lines on the bridges.

knot_03.png
 

Back
Top