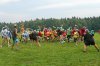
Although the desire to "make it look like a sunny day" seems easy enough, if you look at the histogram of the original image, you see big peaks in the darkest and brightest tones, with a huge gap indicating very few midtone pixels. This immediately tells you that you've got a lot of work to do -- you need to substantially lighten and expand the tonal range of the darkest areas (ie, the ground). Because substantial tonal changes need to be made, it also tells you to expect artifacts like noise, banding, changes in saturation, unrealistic skin tones, etc. to occur.
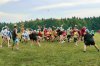
That being said, my 1st step was quite analogous to Dataflow's, but I went the opposite way: I selected the sky (taking particular care with the tree line), made a copy of the sky in a new layer and set the blending mode to "multiply". This substantially darkened it and expanded its tonal range, exactly what I wanted to occur. As expected, it also introduced noise and strange colors. I dealt with the noise in the darkened sky using Neat Image, and fixed the color problems with a "hue/sat" adjustment layer. I started by first darkening the sky instead of first lightening the ground because some areas in sky were so close to being blown, I didn't want to risk possible future problems (eg, halos at the tops of the trees, etc.) that could arise from such a large brightness change.
Now that there wasn't such a huge difference in brightness between the ground and the sky, the next task was to generally brighten everything up but also control the local contrast / shadowing, skin tones, noise, etc.. Although everything I wanted to do could have been done using only the native tools in PS, I was lazy and used a plug-in called Topaz Adjust because I remembered that I had previously developed a preset for it to brighten up this sort of cloudy-bright, semi-backlit outdoor scene. I tweaked my old preset a bit, and then applied it twice at around 50% opacity each time to give smoother tonality changes.
The final step was to deal with the line of trees in the distance. The previous steps had brightened them up nicely and gave them a decent color, but they still looked soft and flat. This is most likely because the noise reduction in the camera really hit them (ie, the shadows) hard. To try to improve their appearance, I selected them, and then applied a bit of medium radius smart sharpening to them. A final tweak to the overall image with levels and vib/sat produced the attached image. I downsized it to 600 px wide as requested by the OP.
It's still not completely believable that it's a bright sunny day (ie, as requested by the OP), but it's a major first step in the right direction. From this point, it would be easy to play with effects that simulate sunlight, add simulated shadows, give it a more appropriate sky for a sunny day, further refine the tones and color, etc., but IMHO, the hardest part of the task is over.
FWIW, sometimes these seemingly easy "fixes" take much more time and attention to detail than one would first think. This probably took me 20 minutes to get this far.
HTH,
Tom M
PS - What in the world is that dark spot in the sky? I was so tempted to remove it, but I thought it might be something the kids were playing with, so I left it in.


 Where did the sky and clouds go?
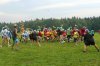
 .. It is a bright sunny day and the brightness has made the sky overexposed.... cameraman error I say.. :cool2: