What's new
Photoshop Gurus Forum

Welcome to Photoshop Gurus forum. Register a free account today to become a member! It's completely free. Once signed in, you'll enjoy an ad-free experience and be able to participate on this site by adding your own topics and posts, as well as connect with other members through your own private inbox!

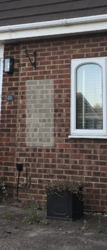
Brick Covering (paint)


Making a selection of the bricks and use the 'color replacement tool' in the brush panel is an option.
 
Making a selection of the bricks and use the 'color replacement tool' in the brush panel is an option.
Cheers Eggy, will give it a try and see how it turns out.
 
Make a temp layer and fill it with the hex code color, sample that color and use the color replacement tool.
You might wanna correct the color depending on the background to replace.
 
I've tried using the "color replacement tool" and it's turning the colour "#E1DDD4" to a darkish.

Make a temp layer and fill it with the hex code color, sample that color and use the color replacement tool.
You might wanna correct the color depending on the background to replace

Still no joy. I'll keep trying to see if it can be done. It's more curiosity/learning why i've asked the question.
 
The hex color is uniform whilst the bricks have many colors.
Maybe desaturate the bricks, reduce contrast heavely might help.
I would use the raw filter to soften the contrast as much as possible.
 
When painting a brick wall all you see is the color and shades of highlight and shadows.
The other colors in the brick are replaced by the new color.
Therefore you actually need to illiminate the existing spots before painting.
 
reduce contrast heavely
I desaturated the layer and adjusted in Camera raw. I guess it's going to be trial and error when doing a project like this to get it right.

wall.png
But you've put me on the right path. Cheers for the help/information Eggy :)
 
Also try all available noise reduction filters in PS and camera raw and even try to blur it somewhat.
If you're a monk, you can even out the bricks using dodge and burn...:joy:
 
I've seen your work in that thread. Not exactly it...
Another option would be to desaturate, reduce the contrast as much as possible, remove the noise and blur slightly.
Then add the colored selection on top and. use the IF blend to make some details visible, its trial and fail...
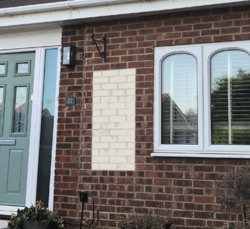
I came up with this and the main color is still #E1DDD4

test.jpg
 
Last edited:
After doing some searching about, I was advised to do it this way: Credit to davescm (ACP).

#1 Make a selection of the area & copy.
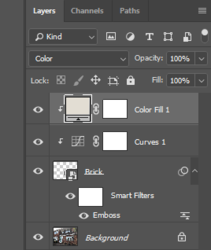
#2 Convert copy to a Smart Object.
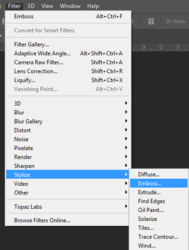
#3 Go to Filter > Stylize > Emboss
emboss.png

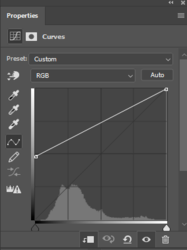
#4 Create a Curves Layer above Smart Object and Lighten.

Curves.png

#5 Create a Solid Colour Layer choose your colour and set mode to colour.

Colour.png

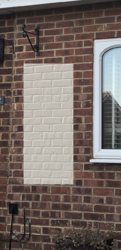
#6 Final output:

house-paint1.png
 
That looks good!
I would never have thought about using the emboss filter...
Thanks for sharing.
 
Last edited:

Back
Top