Photoshop Gurus Forum
Welcome to Photoshop Gurus forum. Register a free account today to become a member! It's completely free. Once signed in, you'll enjoy an ad-free experience and be able to participate on this site by adding your own topics and posts, as well as connect with other members through your own private inbox!
You are using an out of date browser. It may not display this or other websites correctly.
You should upgrade or use an alternative browser.
You should upgrade or use an alternative browser.
Best approach for removing tree?
- Thread starter thyestes
- Start date
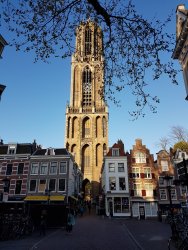
The blue sky is probably the easiest part of this. You can use the gradient tool to draw a new sky over the entire image, and then mask away the sky to reveal the buildings. The hard part will be to remove the tree branches that are covering the central tower and then somehow drawing-in the intricate architectural features that are now hidden by the branches. Using the clone stamp for this would be a nightmare. I don't know if this is a famous building where you can find another photo of it, or maybe you live nearby and can take your own photo. But if you somehow had another photo with an unobstructed view of the tower—shot from a similar perspective—you could clone the top half of that tower onto this photo. Maybe others will have a better idea, but to me, this is an extremely difficult project, especially for somebody new to Photoshop.
Thanks for your reply. It is de Dom in Utrecht pretty famous, at least in the Netherlands  I don't live too far away but they are restoring it.
Of course I can download picture with parts of that building, or even complete nicer and better pictures. Just want to use this case to get familiar with parts of Photoshop. At least I'll try your suggestion with the sky.
Kr
Martijn
Of course I can download picture with parts of that building, or even complete nicer and better pictures. Just want to use this case to get familiar with parts of Photoshop. At least I'll try your suggestion with the sky.
Kr
Martijn
Ignoring the difficulties of the building itself, here's a way to deal with the sky:
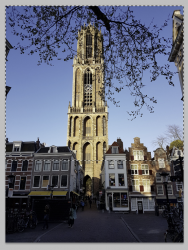
- Using the color sampler (eyedropper) tool, select the darkest blue of the sky as the foreground color and select the lightest part of the sky, down at the bottom, as the background color.
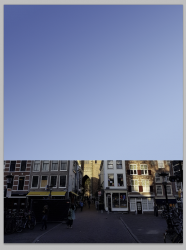
- Use the Rectangular Marquee tool to create a selection of the area where there is sky. Like this:

- Now use the gradient tool to draw a new sky into this selection. The sky is slightly darker on the left half of the photo vs. the right half, so when you use the gradient tool, you can angle it slightly from the top-left to the bottom-right. Something like this:

- Temporarily turn off the visibility of your new sky layer.
- Now, duplicate the original image to a new layer and turn off the visibility of the original background layer.
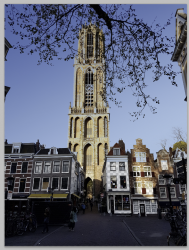
- Follow the instructions in the video attached below to remove the blue sky from your image. Once you've done that, move your new sky layer immediately below the layer where you have removed the sky. You should now have something like this:

- This looks like you are right back where you started. However, the sky is now separate on its own layer, so any changes you make to the layer with the building and tree will not affect the sky.
- Add a layer mask to the layer with the building and, painting with black, mask away the tree branches covering the sky. This will reveal your new sky that you created in the layer below.
Scooby Magic
Banned
- Messages
- 37
- Likes
- 12
- Messages
- 23,889
- Likes
- 13,633
Hey.
Just another approach.
I used the Gradient Tool set to the Foreground to Background preset. I point sampled the colors for the foreground and background from these two places.
Note the red X's
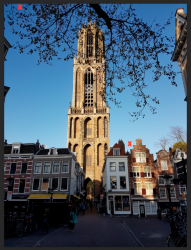
On a new layer above the original image, I then created a gradient trying to best match the angle.

I placed a layer mask on the gradient layer.
I then selected the layer mask and used the Brush Tool (set to black) and a brush set to 0% hardness, 1% opacity to blend the bottom of the Gradient layer into the existing sky background.
I do this to get the best possible blend between the new BG and the old............including the trees to the right. It's very hard to get a perfect selection that looks natural.
Here I have not yet finished masking out the tower. I will do this later.
Note how the trees and the tops of the building look more natural.
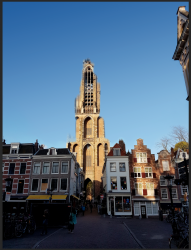
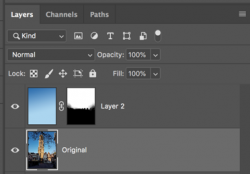
Later, I will also show how to remove the remaining tree off of the building.
Just another approach.
I used the Gradient Tool set to the Foreground to Background preset. I point sampled the colors for the foreground and background from these two places.
Note the red X's

On a new layer above the original image, I then created a gradient trying to best match the angle.

I placed a layer mask on the gradient layer.
I then selected the layer mask and used the Brush Tool (set to black) and a brush set to 0% hardness, 1% opacity to blend the bottom of the Gradient layer into the existing sky background.
I do this to get the best possible blend between the new BG and the old............including the trees to the right. It's very hard to get a perfect selection that looks natural.
Here I have not yet finished masking out the tower. I will do this later.
Note how the trees and the tops of the building look more natural.


Later, I will also show how to remove the remaining tree off of the building.

