What's new
Photoshop Gurus Forum

Welcome to Photoshop Gurus forum. Register a free account today to become a member! It's completely free. Once signed in, you'll enjoy an ad-free experience and be able to participate on this site by adding your own topics and posts, as well as connect with other members through your own private inbox!

Badly Damaged Photo


WarrenG

Well-Known Member
Messages
46
Likes
15
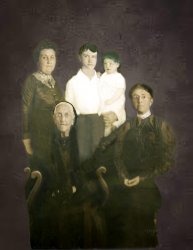
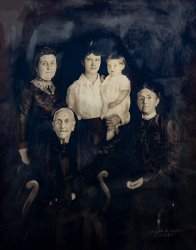
I'm trying to restore this photo of a friend's ancestors. I've worked on it for a day but not having a lot of luck. I've tried clone stamp, healing brush, curves, selecting areas & using color balance,, etc. I'm having trouble finding some of the detail to bring out - like the on the right side the man is sitting in a chair but I can't see it enough to bring it out on the edge of the photo. He looks like he's sitting on air. Also the old lady is sitting on a bench I think. Would appreciate any suggestions on how to restore this photo, especially how to bring out hidden detail. I scanned it at 300 dpi, 48 bit color, TIFF format.

Embler Ancestors Help photo.jpg

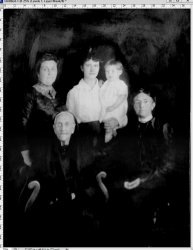
My edits so far.
Embler Ancestors - New Background.1.jpg

Mod edit: Any advice or suggestions offered for this image should be limited to the photos above. If anyone has any questions about this, please contact me in a PM.
 
I posted this yesterday. it took less than 10 minutes mainly using adjustments layers.
View attachment 121846
Good work, Hawkeye! Would you mind sharing the order of the adjustment layers you used and at what opacities? Did you apply the adjustment to the entire image or only selected parts of the image? I would love to become proficient like this.
 
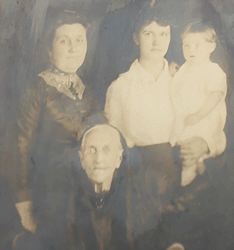
Here was my try @WarrenG
Just a crop of the image and I did not take it all the way to completion.
My approach was to separate out the work into different sections
- The highlights such as the faces and bright blouse
- dark clothing areas
- background

I did not do anything with the background yet would have totally masked it off and replaced it with something appropriate for the period

For the highlights, I used the tonality tools in Adobe Camera Raw Filter reducing the highlights dramatically to help pull out some of the details. I did nor proceed to try and reduce any of the noise. I was prioritizing preserving as much of the subtle tonality as possible and adding texture

For the clothing area I used a conversion to B&W and then placing the original image on top with a Color Blend to bring back the color. Various B&W tools or Color Mixer tools can do the job. The focus I was going for was bring out more contrast (which feels like more detail) in the clothing. Here is the step I used that is not always the best yet pretty easy to implement:

Right above the original image, place a Hue/Sat adjustment Layer
In the Hue/Sat adjustment Layer add a Color Overlay Layer Style with the color as pure white and the blend set to Color. That turns the Hue/Sat Adjustment Layer to a conversion to B&W (works with any adjustment Layer btw)
Then, crank up the saturation quite a bit (too much and JPEG artifacts raise there head which is less of a problem with original TIFF file)
Then slowly slide the color slider back and forth until you find a spot that provides the best B&W contrast in the target area.
You can also adjust the lightness.
After the above, I take it through the Adobe Raw Filter to get improved tonality, contrast, clarity and texture.

Have not provided every step by step detail yet did not want to spoil the fun for you.
I included a GIF animation of before and after for the partial work that I did on the image. TIFF will of course provide better result

Usually I got and touch up by hand in many areas on such images especially around the eyes as image fading, damage, as well as the original photo probably had distracting defects. I did not proceed with any of that.

Just giving an idea of direction and possibilities.

John Wheeler

Embler-Ancestors-Help-photo.gif
 
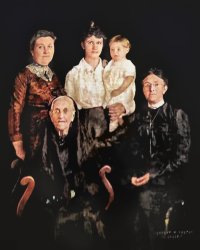
In PS, started in ACR to see if there were details in the shadows, then to Image/Shadow-Highlights for the same purpose; applied using a mask; selected the subjects to a separate layer above and added a dark BG below; added a black-to-neutral gradient to the bottom of the photo where the details were unavailable; sharpened and used a rustic colour overlay in colour mode.
Embler-Ancestors-Help-photo-copy.jpg

Went further for colour starting with the Neural Filter on the BW version and added to this by painting on separate layers in colour mode.
Embler-Ancestors-Help-photo.jpg
 
A combination of the Camera Raw Filter, AI Image Sharpener & Rimini...

However, further processing is not worthwhile due to the poor scan template
old photo example.jpg

Mod edit: Please see the original post about image size. If you have any questions, PM me.
 
Thanks
Here was my try @WarrenG
Just a crop of the image and I did not take it all the way to completion.
My approach was to separate out the work into different sections
- The highlights such as the faces and bright blouse
- dark clothing areas
- background

I did not do anything with the background yet would have totally masked it off and replaced it with something appropriate for the period

For the highlights, I used the tonality tools in Adobe Camera Raw Filter reducing the highlights dramatically to help pull out some of the details. I did nor proceed to try and reduce any of the noise. I was prioritizing preserving as much of the subtle tonality as possible and adding texture

For the clothing area I used a conversion to B&W and then placing the original image on top with a Color Blend to bring back the color. Various B&W tools or Color Mixer tools can do the job. The focus I was going for was bring out more contrast (which feels like more detail) in the clothing. Here is the step I used that is not always the best yet pretty easy to implement:

Right above the original image, place a Hue/Sat adjustment Layer
In the Hue/Sat adjustment Layer add a Color Overlay Layer Style with the color as pure white and the blend set to Color. That turns the Hue/Sat Adjustment Layer to a conversion to B&W (works with any adjustment Layer btw)
Then, crank up the saturation quite a bit (too much and JPEG artifacts raise there head which is less of a problem with original TIFF file)
Then slowly slide the color slider back and forth until you find a spot that provides the best B&W contrast in the target area.
You can also adjust the lightness.
After the above, I take it through the Adobe Raw Filter to get improved tonality, contrast, clarity and texture.

Have not provided every step by step detail yet did not want to spoil the fun for you.
I included a GIF animation of before and after for the partial work that I did on the image. TIFF will of course provide better result

Usually I got and touch up by hand in many areas on such images especially around the eyes as image fading, damage, as well as the original photo probably had distracting defects. I did not proceed with any of that.

Just giving an idea of direction and possibilities.

John Wheeler

View attachment 121866
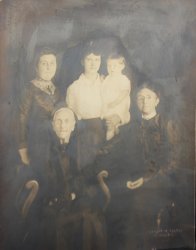
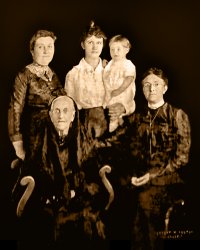
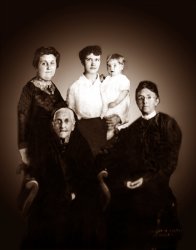
, John. I've been working on the photo trying different things. Below is what I was able to do. I'll start over again and try your techniques and see if I can improve what I've done so far- try to get more detail in lower part of photo. Did a B&W and a Sepia tone.

Embler-Ancestors-600dpi-PS-Sepia-Flatten-Faces-Added-Sepia.jpg
 
Last edited:
In PS, started in ACR to see if there were details in the shadows, then to Image/Shadow-Highlights for the same purpose; applied using a mask; selected the subjects to a separate layer above and added a dark BG below; added a black-to-neutral gradient to the bottom of the photo where the details were unavailable; sharpened and used a rustic colour overlay in colour mode.
View attachment 121867

Went further for colour starting with the Neural Filter on the BW version and added to this by painting on separate layers in colour mode.
View attachment 121868
Thanks, Babine. I'll experiment using your technique. I really like the color version.
 
A combination of the Camera Raw Filter, AI Image Sharpener & Rimini...

However, further processing is not worthwhile due to the poor scan template
View attachment 121881

Mod edit: Please see the original post about image size. If you have any questions, PM me.
Thanks, iLLuSioN. Which AI image sharpener software did you use? Remini did a good job with the faces. I usually use Remini as a last step to see if I can improve faces. Someyimes it does a good job and other times not so good.
 

Back
Top