What's new
Photoshop Gurus Forum

Welcome to Photoshop Gurus forum. Register a free account today to become a member! It's completely free. Once signed in, you'll enjoy an ad-free experience and be able to participate on this site by adding your own topics and posts, as well as connect with other members through your own private inbox!

Assign (and apply) the blending mode


Minti

Member
Messages
5
Likes
0
I have a b/w image, slightly textured, meaning some pixels are not straight white or black but in the middle. I want to use it against dark background keeping just the light pixels. Have tried playing with Layer Style Blend Options, but it removed too much. Applying the Linear Dodge (Add) to a layer fixed my problem on screen. However, I now need to apply this effect to pixels and save as Transparent PNG. Is there a way of doing that, similar to how you can apply a layer mask? Saving transparent PNG creates problems since the main layer needs to have something in the background for Linear Dodge (Add) to work as intended.

Basically what I'm trying to do is discard everything that's not white and save as PNG
 
I find this a bit confusing. Can you post an image of what you have and what you're trying to accomplish?
-Jeff
 
Indeed, thank you for asking.
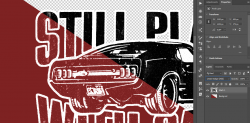
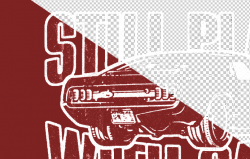
The car layer blending mode is on "linear dodge add". I need this output to be able to saved as PNG, however, it only works against opaque background.

Trying to get rid of blacks and save the transparent file with just whites. Hope this helps.

1614342940002.png
 
Still a bit confusing but what I think you're trying to do is get rid of the black parts of the car and the black parts of the lettering.

- Make your top layer active
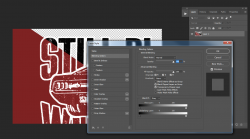
- Double click on that layer and open your Blending Options dialog box

1614349859255.png

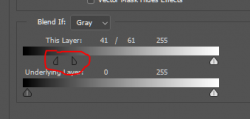
Go to the bottom of the dialog box where the sliders are:

1614349954090.png

Working with the top sliders (This Layer) on the right, start sliding them slowly to the right. You should start seeing the blacks disappear.
You can also split that slider into two by holding down your ALT key (Option on Mac) and clicking on it to make the transition smoother by sliding each individually:

1614350154808.png

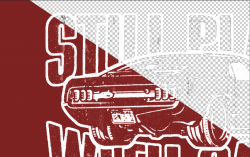
You should end up about here:

1614350310864.png

You can then use your eraser tool if needed to clean up any remaining naughty bits.

Now save your image as a png.

Let us know if this works for you.

- Jeff
 
The blending options sliders did not work for me, removing excessive whites and still leaving some black semi opaque pixels. Something I found more effective was to set blending mode for the layer, choosing the Linear Dodge (Add). This way I totally lost the blacks - and grayish pixels became semi-opaque white.

The problem is this only works while the layer in question (blacks and whites are same layer) is using the Linear Dodge (Add) effect, and for the effect to work it needs an opaque background.

What I'm trying to do though is to have this great Linear Dodge (Add) blend mode effect ON TRANSPARENT background.

I'd like to be able to pull off that trick. Never heard of such thing as possibility and was wondering if that's somehow viable.
 
You might be getting too aggressive with the sliders.
You can also try the Magic Eraser tool - it's bundled with the regular eraser:

1614356044983.png

Set your tolerance level - here I've set mine to 20:

1614356126527.png

Now click on your black areas. Here's what I ended up with.

1614356279465.png

You can clean out any remaining bits with your regular eraser.

Only other thing I can offer is for you to post your PS file and then we can edit. Others may jump in with alternatives.

- Jeff
 
Hi @Minti
Here is another approach.
Yet first, I think you are asking the Linear Dodge Blend tool to do something that it does not do.
What Linear Dodge Tool is this:
On a color channel by color channel basis, it adds the color numbers of each channel together to achieve the result.
So the black that turned to red was just adding the red color to the black color.
It does not delete any color pixels.

Another approach is to first, delete the black from your original grayscale image converting the black to transparency or (which is surrounded by transparency) and then add in the desired background colors which will show through the transparency. Here are the steps I took:

First, here is the original grayscale image with transparency that I assume approximates your original car image:
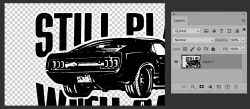
Screen Shot 2021-02-26 at 11.43.38 AM.png


Next, I make a selection around the black areas with the Select > Color Range Tool.
A couple keys notes.
To select the black I chose from the Select dropdown "Shadows"
I also selected the Invert checkbox option
I also moved the Range Slider to pick up the amount of black and graytone desired in the selection
and then clicked OK afterwards
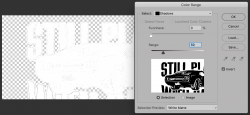
Screen Shot 2021-02-26 at 11.45.46 AM.png

With the selection applied (marching ants) I covert that to a Layer Mask by clicking the "Add Layer Mask" icon at the bottom of the Layers Palette. This hides all the black to the level I chose.
with the selection.
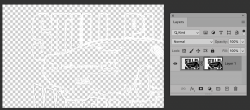
Screen Shot 2021-02-26 at 11.46.11 AM.png

Now I add a background Layer underneath this Layer of any color or shape desired. I just used solid blue as an example yet you could add the diagonal red just as easily.
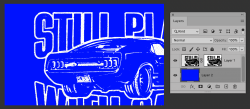
Screen Shot 2021-02-26 at 11.46.35 AM.png

This separates out getting rid of the black from adding the desired background and no blend is needed while only taking two Layers.

Hope this alternate approach is of some help.
John Wheeler
 

Back
Top