- Messages
- 23,906
- Likes
- 13,636
This is a a communal thread that anyone can contribute to it's content as long as it's associated with the layers panel.
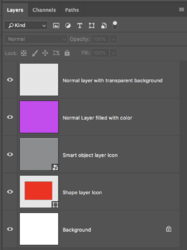
I thought it might be nice to provide some information on the different layers and what they look like. I'm not going to go into the individual adjustments at this time. This is more to help you to identify the different layers.
Below. These are the most common layers you will encounter. Note the icons in the lower right hand corner of the Shape Layer and the Smart Object Layer.
You can add a new (normal layer) by hitting the Create a New Layer icon located at the bottom of the layers panel.
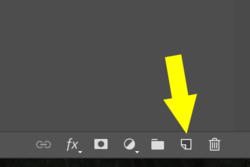
You can also go to LAYER > NEW select from menu. The Keyboard Short Cut is (KBSC) is Shift + Cmd/Cntrl + N
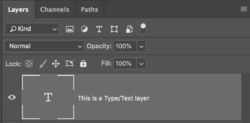
This is also very common. This is a Type/Text layer
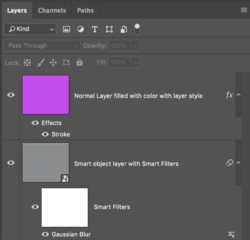
Below. This is a normal layer with a layer style attached. You can see the types of effects listed. In this case it's a stroke. You can turn the effects off using the eye icon next to "EFFECTS" or turn them off individually using the effect for example, "STROKE". You can also double click the items in the list to open the layer style interface.
The Smart Object Layer has had a Smart Filter attached. Smart filters can be edited at any time and it comes with it's own layer mask for you to mask out the effect if needed. In this case you can see the Smart Filter is a Gaussian Blur. You can also double click the items in the list to open and adjust the filters properties.
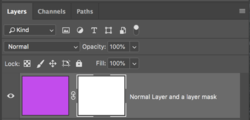
Below. This is a normal layer with a layer mask. You can add a layer mask to a layer by clicking on the Add Layer Mask icon located at the bottom of the layers panel.
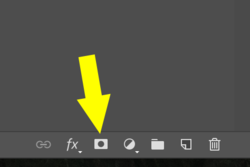
You can choose whether to add a Reveal all (white) or a Hide all (Black) layer mask by hitting the Opt/Alt key.
You can also add a layer mask by going to LAYER > LAYER MASK and choosing from the menu.
In order to work on a layer mask, it must be selected by clicking on it. You can tell it's selected when it shows white brackets around the mask.
Below. This is a normal layer with a Vector mask. You can tell its a Vector mask because when chosen, it will have the white brackets around it as well as brackets around the normal layer. You choose a Vector Mask by hitting the Cmd/Cntrl key while clicking the Add Layer/Vector mask Icon located at the bottom of the layers panel.

At this time, you can choose whether to add a Reveal all (white) or a Hide all (Grey) layer mask by hitting the Opt/Alt key. You can also go to LAYER > VECTOR MASK and selecting a Reveal all (white) or a Hide all (Grey) from the menu.

On some occasions, you may have a Layer Mask and a Vector Mask on the same layer. The same rules apply as described above to selecting the different masks.

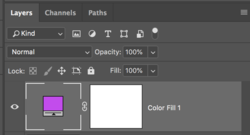
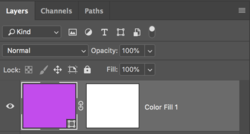
Below. The following are all adjustment layers with their corresponding Icons and layer masks.
You can create Adjustment Layers by clicking the half moon icon located at the bottom of the layers panel.
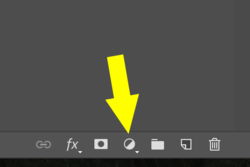
You can also go to LAYER > NEW ADJUSTMENT LAYER and selecting from the menu.
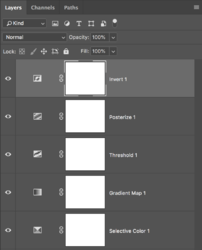
Below. The following are all adjustment layers with their corresponding Icons and layer masks.
You can create Adjustment Layers by clicking the half moon icon located at the bottom of the layers panel.
You can also go to LAYER > NEW ADJUSTMENT LAYER and selecting from the menu.
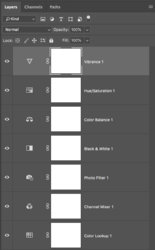
Below. The following are all adjustment layers with their corresponding Icons and layer masks.
You can create Adjustment Layers by clicking the half moon icon located at the bottom of the layers panel.
You can also go to LAYER > NEW ADJUSTMENT LAYER and selecting from the menu.
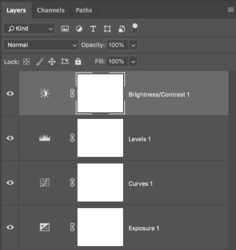
Below. The following are all adjustment layers with their corresponding Icons and layer masks.
You can create Adjustment Layers by clicking the half moon icon located at the bottom of the layers panel.
You can also go to LAYER > NEW ADJUSTMENT LAYER and selecting from the menu.
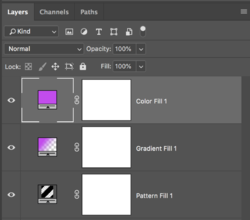
I thought it might be nice to provide some information on the different layers and what they look like. I'm not going to go into the individual adjustments at this time. This is more to help you to identify the different layers.
Below. These are the most common layers you will encounter. Note the icons in the lower right hand corner of the Shape Layer and the Smart Object Layer.
You can add a new (normal layer) by hitting the Create a New Layer icon located at the bottom of the layers panel.

You can also go to LAYER > NEW select from menu. The Keyboard Short Cut is (KBSC) is Shift + Cmd/Cntrl + N

This is also very common. This is a Type/Text layer

Below. This is a normal layer with a layer style attached. You can see the types of effects listed. In this case it's a stroke. You can turn the effects off using the eye icon next to "EFFECTS" or turn them off individually using the effect for example, "STROKE". You can also double click the items in the list to open the layer style interface.
The Smart Object Layer has had a Smart Filter attached. Smart filters can be edited at any time and it comes with it's own layer mask for you to mask out the effect if needed. In this case you can see the Smart Filter is a Gaussian Blur. You can also double click the items in the list to open and adjust the filters properties.

Below. This is a normal layer with a layer mask. You can add a layer mask to a layer by clicking on the Add Layer Mask icon located at the bottom of the layers panel.

You can choose whether to add a Reveal all (white) or a Hide all (Black) layer mask by hitting the Opt/Alt key.
You can also add a layer mask by going to LAYER > LAYER MASK and choosing from the menu.
In order to work on a layer mask, it must be selected by clicking on it. You can tell it's selected when it shows white brackets around the mask.

Below. This is a normal layer with a Vector mask. You can tell its a Vector mask because when chosen, it will have the white brackets around it as well as brackets around the normal layer. You choose a Vector Mask by hitting the Cmd/Cntrl key while clicking the Add Layer/Vector mask Icon located at the bottom of the layers panel.

At this time, you can choose whether to add a Reveal all (white) or a Hide all (Grey) layer mask by hitting the Opt/Alt key. You can also go to LAYER > VECTOR MASK and selecting a Reveal all (white) or a Hide all (Grey) from the menu.

On some occasions, you may have a Layer Mask and a Vector Mask on the same layer. The same rules apply as described above to selecting the different masks.

Below. The following are all adjustment layers with their corresponding Icons and layer masks.
You can create Adjustment Layers by clicking the half moon icon located at the bottom of the layers panel.

You can also go to LAYER > NEW ADJUSTMENT LAYER and selecting from the menu.

Below. The following are all adjustment layers with their corresponding Icons and layer masks.
You can create Adjustment Layers by clicking the half moon icon located at the bottom of the layers panel.
You can also go to LAYER > NEW ADJUSTMENT LAYER and selecting from the menu.

Below. The following are all adjustment layers with their corresponding Icons and layer masks.
You can create Adjustment Layers by clicking the half moon icon located at the bottom of the layers panel.
You can also go to LAYER > NEW ADJUSTMENT LAYER and selecting from the menu.

Below. The following are all adjustment layers with their corresponding Icons and layer masks.
You can create Adjustment Layers by clicking the half moon icon located at the bottom of the layers panel.
You can also go to LAYER > NEW ADJUSTMENT LAYER and selecting from the menu.


