What's new
Photoshop Gurus Forum

Welcome to Photoshop Gurus forum. Register a free account today to become a member! It's completely free. Once signed in, you'll enjoy an ad-free experience and be able to participate on this site by adding your own topics and posts, as well as connect with other members through your own private inbox!

A Simple Animated gif process


Rpbin

Member
Messages
14
Likes
4
I am looking for a simple process to create an animated gif from 6 stills. Any and all help gratefully received.
 

Attachments

  • FRAME 1.gif
    FRAME 1.gif
    124.5 KB · Views: 5
  • FRAME 2.gif
    FRAME 2.gif
    133.9 KB · Views: 5
  • FRAME 3.gif
    FRAME 3.gif
    126.2 KB · Views: 6
  • FRAME 4.gif
    FRAME 4.gif
    115.4 KB · Views: 5
  • FRAME 5.gif
    FRAME 5.gif
    123.2 KB · Views: 5
  • FRAME 6.gif
    FRAME 6.gif
    103.7 KB · Views: 5
Do you want us to create the gif for you or do you want to know how to?
I wish to learn how to but thank you VERY much for the offer. I will check out polarwoc's response and let you know how I get on, Thanks again!
This resource can guide you through the process. If you need assistance at any stage, let us know.
Hello, polarwoc, thank for your helpful response. You say "This resource" but what do I actually click on to access the resource, please?
 
If you don't see "Timeline" window, just go to Window in the menu bar on top and make sure the tick mark preceeds "Timeline".
 
Ok, when i get to
Step 3: In the Timeline window, click "Create Frame Animation." the Create Video Timeline button and Dropdown, do not respond to either left or right-hand clicks, so I can't access
"Create Frame Animation."
Create Video Timeline Button Unesponsive.jpg
 
Last edited:
As shown in the diagram below, as you click on the drop down menu and click on "Create Frame Animation", you see that "Create Frame Animation" is displayed. This is a button. Click it again, and the result will be the animation frame window shown.
1.png
 
Ok, when i get to
Step 3: In the Timeline window, click "Create Frame Animation." the Create Video Timeline button and Dropdown, do not respond to either left or right-hand clicks, so I can't access
"Create Frame Animation."
View attachment 87994
Sorry buddy. I see what you mean and understand the problem you are facing. Here is how you solve it:
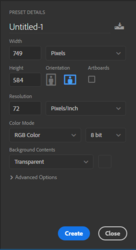
Instead of opening the file "Frame1.gif" in Photoshop through double clicking, just open Photoshop application first, Click on File>New with these options:
2.png
The reason I chose these dimensions is because of the files you presented, those were the largest values.
Now, you can select the "Create Frame Animation" as a button as described in this post.

Any issues, just ask.
 
Hi, Again polarwoc,

Two steps forward, Halt!

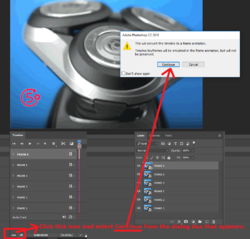
Thanks for the workaround for getting the images into the timeline, but now I can't see any option for Create New Layers for Each Frame or the subsequent Make Frames from Layers,

I have, incidentally standardized the frames to all exactly the same size 566 x 435 px and all now in png format. I'm not sure why the pic backgrounds have gone wonky.
 

Attachments

  • No Make Frames from Layers.jpg
    No Make Frames from Layers.jpg
    324.3 KB · Views: 1
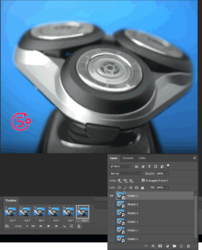
Shown at the bottom right is a reference of how your layers panel should look like.

Please post screenshot showing your layers panel.
 

Attachments

  • 1.png
    1.png
    198.1 KB · Views: 0
Here are the step by step instructions:
1) Open a new file with 566 X 435 Px dimensions at 72 PPI or as shown here with slightly different dimensions.
2) Make sure your "Timeline" window shows on the screen. If it does not show, just enable the tick mark preceeding "Timeline" in "Window" from the Menu Bar.
3) In the Timeline Window, select "Create Frame Animation" and then click on it again as shown here.
4) At this stage, we are waiting on first frame in the Timeline window and the Layer 1 in the Layers window. Now, drag and drop Frame1.gif onto the screen. Also position it correctly using Move tool and select OK for placement.
5) Underneath the first Frame in Timeline Window you will observe "0 Sec". Click on the arrow beside it to adjust how long you want the frame to appear in the final GIF. I selected "0.5 Sec"
6) On top right of the Timeline Window, you have a menu button. Click on it and select "New Frame". At the same time, select New Layer from Layers Window. Also, disable Layer 1 from being displayed so you should see a blank in Frame 2 in Timeline Window.
7) Repeat from Step 4 with Frame2.gif until all 6 frames and their corresponding 6 layers are shown in Timeline Window and Layers window respectively. This is how your document should look like if you have followed all steps the way described:
2.png
8) Where you see "Once" displayed under the frames in Timeline Window, click and select how many times you want the loop to play. I selected "Forever".
9) Click on the Frame 1 and notice what you see in the Layers Window. If it displays anything other than just Frame1, remove them from sight. Repeat this for every frame. Essentially, when you select a frame, you should only see its corresponding layer in the Layer Window.
10) Now play the sequence to check if everything is right. If it is not, now is the time to check which frame is jumping and correct it. If it is playing it right, proceed with saving.
11) Go to File > Export > Save For Web(Legacy)... > Save... and select file name.

Any questions, just ask.
 
Hi, Again polarwoc,

Two steps forward, Halt!

Thanks for the workaround for getting the images into the timeline, but now I can't see any option for Create New Layers for Each Frame or the subsequent Make Frames from Layers,

I have, incidentally standardized the frames to all exactly the same size 566 x 435 px and all now in png format. I'm not sure why the pic backgrounds have gone wonky.
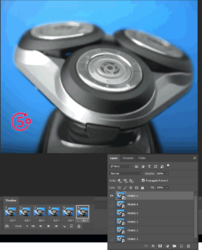
To answer your question specifically, while you are in that situation, do the following in order to see the "Create New Layers for Each Frame". Doing so will let you skip creating new layer for each frame in Step 6 above.
3.png
After this, you would be able to see this window:
2.png
 
Wow, Polarwoc!

Thank you so much for all the screenshots and detailed steps -- exactly what I need in this long-distance kind of tutoring!
it is so nice to come across a guru who is happy to dispense his knowledge calmy and precisely, instead of focussing on his own ego!
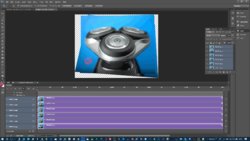
I will deffo work my way through your instructions tomorrow. You rock, buddy, thank you, speak again soon!Completre Ps Screen incl Layers Panel.jpg
 
Looks good. You have 6 frames and 6 layers. All you have to do is associate them correctly as per instructions above or web links above and you are on your way towards making first of several GIFs.

At this link here is an awesome collection of artwork in a section of this forum, done with painstaking amount of efforts. As a member of the forum, you could be a connoisseur and vote for the artist whose work you like. More participation encourages artists.
 
OK, a progress report...
This is the Procedure I have (created) and followed so far.

I'd be grateful if you would peruse it, please, polarwoc and let me know what you think so far. btw it is bespoke for PS CS6, but I'm hoping when finished it shouldn't be too much of a task to tune it for later PS versions.

TAdding the Frames STAGE 7.png
 
Unfortunately, your Forum does not seem to accept MS Word.docx, can you please let me know what a suitable file type for a Written Procedure with Screenshots would be, please?
 
The progress looks promising. From here, this is what you could do:
In the Layers Window, you should have all the 6 frames, one in each layer.
First select Frame 1, on the Layers window make all layers invisible except for the layer showing Frame1. And so on for all 6 frames.

Unfortunately, your Forum does not seem to accept MS Word.docx, can you please let me know what a suitable file type for a Written Procedure with Screenshots would be, please?
You could just copy-paste all that is in the .DOC file. All images in the Word document can be uploaded here and embedded in the middle of text.
 
The issue with not being able to open in photoshop was because the images are in " index " mode. They need to be set to RGB color in
the Image > Mode > RGB color. Then you can open the create frame animation tab.
 

Back
Top