No, it's definitely worth a try...
Ok, like I said this may not be an entirely viable solution but...
Done with PS CC in Windows...adjust to taste:
Create a path:

How you do this depends on what you have to work with but it could be via a Converted Selection, Pen Tool, Shape Tool, whatever.
If you do this via the 'Shape' tool it becomes a 'Live' shape which means that it will have 'properties' in the properties panel, (Window > Properties).
If you convert a selection or use the 'Pen' tool then the properties panel will be virtually empty BUT the same properties are also made available at the top of the window...

Also NOTE: If you do use the 'Pen' tool make sure it is set to 'Shape' NOT path....then you'll have the stroke options.
You can choose what type of stroke you want from this dropdown next to the 'Width' type-in:

Note you can change the 'Dash' and 'Gap' properties,(and add 2 more if you wish), with these and also the stroke width setting you can quickly get a stroke to look something like this:

Now, this may take a while to get right and will probably be very much 'trial and error' but being 'Live' it changes on-the-fly, which makes it a little quicker.
From the fly-out, (the small cog icon top right of the Stroke Options panel), you can save any custom 'dashed' lines you create for later use.
Instead of a solid line, dashed line or brush you can also use a 'pattern':

You can make your own 'pattern' and use it for fill, stroke, brushes etc.....here I have made a custom 'Graph Paper' pattern, used it in the stroke option and also set it to stroke the 'outside' of the path.
You can also move and/or change the shape of a 'Live' shape as long as you created it using the 'Pen' tool and the 'stroke will update automatically....although then your spacings may need changing to suit.
Trying to change, (edit), a predefined shape, (as in rectangle tool, elipse tool, polygon tool or custom shape), will result in a warning that it will no longer be a 'Live' shape....I got this a couple of times but didn't explore it fully so couldn't guarantee this is exactly correct...you'll see if you try it.
If you lose the path you can always select it again from the 'Paths' palette.
There are many many different things to play with on this, far too much to explain really, even these basics could keep you busy for a couple of hours.
Best thing is to play around with it....you never know what may happen!
Regards.
MrTom.

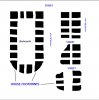
") You may have notice on the large blotch the center part was removed as well as divided up.
You may have notice on the large blotch the center part was removed as well as divided up.


 + spacing), pattern or dashed line?

 , as it would be so much easier. So we must create our own or at least approximate it. Image #3, yes it will end up being alot more complicate than just a white background but for creating the building footprints the B&W image is the easiest way to process.