What's new
Photoshop Gurus Forum

Welcome to Photoshop Gurus forum. Register a free account today to become a member! It's completely free. Once signed in, you'll enjoy an ad-free experience and be able to participate on this site by adding your own topics and posts, as well as connect with other members through your own private inbox!

3 same sized photos side by side with line inbetween


Stela

Member
Messages
9
Likes
0
Hi there!

I have my first problem I'm addressing to you, because I couldn't find the answer on the net, so I hope you can help me :)
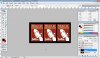
--> I'm trying to post 3 photos (sports moving) side by side on a black background with black space in between and black frame around. I opened a new project and simply put them side by side, but what happens is that I somehow didn't manage to get a perfect symmetry (Some photos are for a pixel or two longer/shorter than the original one) and I'm having difficulties fixing that with the mouse.
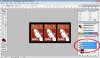
--> Second problem is, I would as well like to have a perfectly symmetric frame (so thickness of the frame left, right, up and down) and same thickness of the space between the photos. How shall I do that?
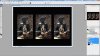
--> Third problem is, I wanted to crop one of the three photos and make it exactly the same size as the other two. The best solution I could think of was to open a new project, place the photo, use rectangular marquee tool, frame the photo with it, than re-size it with the help of the Shift, place it where I want to have it, crop out, use marquee tool again, copy it and paste it into the original project and then re-size it on the size others are (again with some tiny length difference for example). Is there an easier way to do that?

Thank you very much for your time and help!! :)

Stela
 
You could select the move tool (v) and nudge a photo/layer 1 pixel at a time with the arrow keys.

You can distribute the layers by selecting your black background layer to give some reference for the distribution of the photo layers. You can do that by clicking the background layer in the layers panel and holding down the control key.. If you want to you could also click on the layer and use the rectangular marque too (m) and select the entire back ground layer - same thing.

Once you have your reference for distributing the layers you need to select the layers that need distributing. So just click the top photo layer in the layers panel and hold shift while clicking on the bottom photo layer to select all three layers.

So with your photo layers selected click on the move tool (v) and you should be able to see some boxes with a line in the tool bar bar above they are the align and distribute buttons and if for some reason you can't see them click the layer menu in the toolbar and go down to align and also check out distribute which is just below align. Just make sure that your background is selected ... marching ants around the black back ground and that all 3 photo layers are selected in the layers panel so that photoshop knows you want it to manipulate those 3 layers.

To change the photo sizes theres like a hundred ways of doing that. I would use the rectangular marque tool (m) to draw a box to the size I wanted and then by hitting control+alt+j on the keyboard to copy the selection to a new layer... make sure the photo layer you want copied is selected otherwise you may get an error saying that the selected area was empty. Hide or delete the layer that is not needed.
 
Last edited:
Hi!

Thank you so much for your help :) But I still didn't manage to solve it all..

With the move tool and moving with arrows - it's not that the problem, but when I make a photo bigger after it's imported, let's say I do one 300 x 200 and another one 302 x 201 - I find it hard to be extremely precise. As well with what you said there are many ways to change photo sizes --> what way can I use to maybe define exactly how big frame I want to have? Let's say I placed 300 x 200 photo and I want to have them 150x 150 - so I'll need to crop somehow.

The distribution - if I just randomly place 3 photos in and do as you have said - if I use arrange - vertical centers, it puts them nicely symmetric regarding the top and bottom, but I can not find which command will put them symmetrical from left to right as well?

And one more question... I've placed 2 photos in and they're put in as "DSC_xxx" and one photo, as I said, I've taken out, cut it first and then copied it in and it's named "Layer" - the sign next to it is as well different then of other two. And when I used marquee tool for distributing, "Layer" is selected automatically and the other 2 photos I still have to select.. What does all that mean? :)

Thank you so much :)

Stela
 
So you have 300x200ish image that you want to resize to 150x150?

I would open the image in its own document click on the crop tool or (c) and type 150 in both the height and width boxes in the crop tool dialog box in the tool bar. Then crop the image with the crop tool, since 150x150 is dialed in the crop will be a square. Then copy that and put it the main document.

If I didn't care that the resizing was squished.. going from a rectangle shape to a square shape I would transform the pic hitting contrl+t and then typing in the toolbar above 150 in width and 150 in height... by default Height and width are shown as % but if you right click the mouse into the area where you enter the values you can change it to pixels or whatever.

As for aligning, man that is difficult to explain + some bad advise = confusion. just to add to the confusion here are some happy snaps. So in the middle pic I selected all 3 picture layers and in the bottom picture Ive selected the background layer and selected the entire layer.. those marching ants around the border. The cat pic just says I'm finished and good luck :)
:mrgreen: cat-standing.jpg

ps don't you think I did an ok aligning job with my pictures?
 

Attachments

  • align1.jpg
    align1.jpg
    89.7 KB · Views: 1
  • align2.jpg
    align2.jpg
    92 KB · Views: 1
Last edited:
Dear Besmirched, thank you very much for your reply again. And I love your cat photo.. some things are now much clearer to me :)

I know you have said you've finished now, but just if you'll ever have more time (or somebody else reading this and knowing the answer), I feel like there's only 1 puzzle peace missing to me to do this nice pic distribution. I'm attaching you my screen shot to show you how I manage to put them symmetrical considering top and bottom, but from the sides, they're not aligned nice... If you'll still have time to write me what do I have to click there, it will be great! :) Otherwise I'll just search further and play manually hoping my eyes don't lie for too many pixels :P :)

Wish you a great day and thank you again!

Stela
 

Attachments

  • ps.jpg
    ps.jpg
    448 KB · Views: 2
One way of distributing across (and the only way I know) would be to select the image you would like on the left in the layer panel and click left align then the same for the right image and the middle image should centre when you have all 3 layers selected and hit distribute horizontal centres.

Then you could select the outer photo one at a time and nude them with the move tool and arrow keys. Another tip is that shift+arrow key = a 10pixlel move.

Another way of doing what you want is by using guides. When you have rulers displayed .. like you did in your pic above grab the move tool (v) and click and drag with the mouse from an area inside the ruler down or across to the middle of the screen. With some luck you should see a thin guide line emerge from the ruler. If you open up the info panel (f8) you will be able to precisely drag the guides to exactly where you need to place them. Use the guides to align the pics. Play with it!

Hopefully someone more proficient with ps will steer you betterly. Good luck again :)
 
Last edited:
besmirched, thank you very very much!!!! :thumbsup:
Managed to do a nice distribution now :)

Have a wonderful day! :)
Stela
 

Back
Top