What's new
Photoshop Gurus Forum

Welcome to Photoshop Gurus forum. Register a free account today to become a member! It's completely free. Once signed in, you'll enjoy an ad-free experience and be able to participate on this site by adding your own topics and posts, as well as connect with other members through your own private inbox!

Need help for a redesign project.


ElectroTheBoat

New Member
Messages
4
Likes
0
Hi, I'm a noob. I wanted to redesign a Ruffles Flamin' Hot chips packet, but I don't know how to completely make it one color (with the creases and folds included) so that I can add the colors (blue and reddish orange) later.

Click to enlarge.
YibArjj.png
 
Place a new blank layer overtop, change the mode to Colour and fill that layer with the choice of colour. You can now add colours to any areas that you have selected or use a mask.

Ruffles.jpg
 
Is what Gary describes above what you want or are you wanting to change the whole packaging to white?

Screen Shot 2025-03-26 at 5.00.14 PM.png

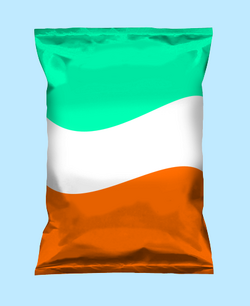
If it's white, you can make the package any color you wish......
Screen Shot 2025-03-26 at 6.11.27 PM.png

Gary's technique with layer masking.......
Screen Shot 2025-03-26 at 6.22.04 PM.png
 
Hi!
IamSam
It would be interesting to learn more about the method used to go from a colored bag to a gray and white bag.
Because it's easy to find ways to do the opposite.
Start with a gray and white bag and superimpose an image on it.
Thanks

 
Yes I meant the latter one. I wanted to redesign it completely for fun
It would be interesting to learn more about the method used to go from a colored bag to a gray and white bag.
Unfortunately I was afraid of this! LOL!! While turning the bag white and leaving the shadowing was fairly straight forward and simple for me, it would be somewhat difficult for a Ps noob.

Also, there may be another easier and faster way that I've not found yet.............like the Brandon Shepherd video...........it would be nice to know which video you watched.

But I will post how I did it after I've had the chance to see if there's an easier way! And I'm hoping someone else chime in here.

I would also suggest looking HERE for some possible choices.
 
Echoing @IamSam , this may be difficult for a complete beginner. (My method would be "cleaner" using layer masks or clipping masks, but I'm deliberately leaving those steps out to make this as easy as possible for a beginner.)
  • Activate the Magic Wand, click the "Contiguous" box, and click the Magic Wand onto an area of the white background behind the bag.
  • This creates a selection of the entire non-bag background. You'll use this selection later to erase any stray marks you may make beyond the edges of the bag.
  • Save this selection by going to Select>Save Selection, and then give it a name.

  • Open a new layer above your bottom layer. Using the brush tool, manually paint over the various items of text by sampling the colors—either blue, white or red—of the bag.
  • Also use the brush tool to paint over the flames and the potato chips. Keep sampling the various shades of blue and red as you paint over these items to avoid disturbing the folds and indentations as much as possible.
  • If needed, activate the selection you saved above by going to Select>Load Selection. Press the Delete key, which will delete any stray marks.
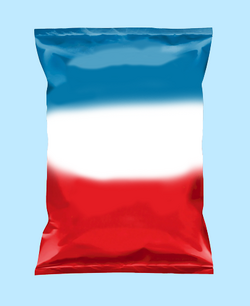
  • You're basically left with three large areas of blue, white and red, like this:

1743102120225.png


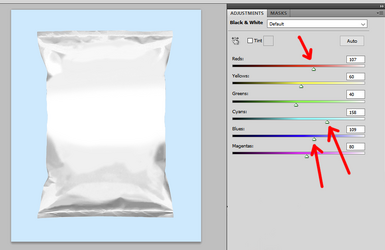
  • Open a Black & White adjustment layer.
  • Grab the Red slider and move it to the right, which will lighten anything in the image that was originally red.
  • The goal is to lighten the red area enough so that the bag is nearly white and matches the original white swath of the bag. But you don't want to lighten the reds so much that you lose the creases and folds along the edges of the bag. I set the red slider to a setting of 107, but you can experiment.
  • Now work on the top part of the bag by adjusting the Blue and Cyan sliders. You can see my settings where the arrows are pointing.
  • Try to get it to look something like this:

1743102875912.png


  • Open a new layer above the B&W layer.
  • Select a light gray color and paint along the sides of the bag—in the middle—to give it some shading to simulate thickness.
  • If you want, you can paint light gray within the entire band of the very whitest parts of the bag to even-out the whole thing. Most of the complicated folds and creases are at the edges of the bag, so make sure to leave those alone.
  • If needed, activate the selection that you saved earlier to erase any stray marks outside of the lines.
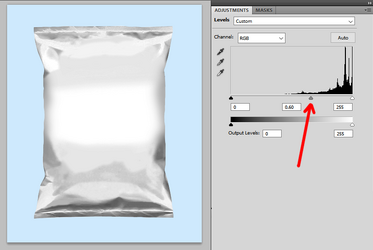
  • Lastly, open a Levels adjustment layer and slide the midtone slider to the right—like where my red arrow is pointing—to boost the overall contrast of the bag and accentuate the folds and creases.
  • Here's the final "white" bag that you can place your new design over.

1743103699264.png


  • Open a new layer at the top of your layer stack. Change the layer blend mode to Multiply.
  • Now paint any colors you like on this new layer, and the folds and creases will be preserved.

1743104350901.png
 
Last edited:
Hi. I decided to experiment a bit with all methods, and a simple one I have found is just using a 'Darken' mode clipping mask. I turned the Fill down a bit for darker hues. Thank you for the help, everyone!
 
I decided to experiment a bit with all methods, and a simple one I have found is just using a 'Darken' mode clipping mask. I turned the Fill down a bit for darker hues.
Can you post your results? I would like to see how it turns out using your technique.
 

Back
Top